Crochet Lemon Scrubby: Your Guide to Joyful Cleaning

Bright and Cheerful Design
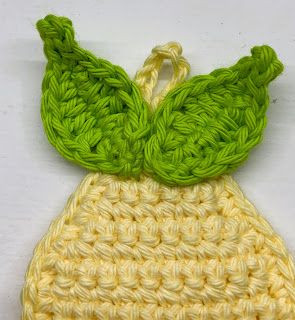
Bright and cheerful, the Crochet Lemon Scrubby is as delightful as it is practical. Its vibrant yellow color and textured design make cleaning a breeze while adding a touch of sunshine to your kitchen. Made with love and attention to detail, this little scrubby is perfect for tackling tough stains and giving your dishes that extra sparkle. With its cute lemon shape and soft, yet sturdy texture, doing the dishes suddenly becomes a fun and enjoyable task. Plus, it's reusable and eco-friendly, so you can feel good about giving your kitchen a fresh, lemony clean every time!
Materials You'll Need
Before we dive into the pattern, let's gather our materials:
- 1 oz- Worsted-weight cotton yarn in yellow and green (or any colors you prefer).
- Crochet hook (size #7/4.5mm recommended).
- Scissors.
- Yarn needle & stitch markers.
Note: This pattern uses US crochet terminology.
Abbreviations
- ch - chain
- sc - single crochet
- sc dec - single crochet decrease
- sc3tog - single crochet 3 together (a sc dec over 3 stitches)
- RS - Right Side
Finished Size
6-1/2" H (including hanging loop) x 3-1/2" W
Step 1: Lemon Sides (Make 2)
Start with the yellow yarn. ch2.
Note: Ch1, Turn after each row.
Row Instructions
- Row 1: 3sc in the second ch from hook. (3 sc)
- Row 2: sc in each. (3 sc)
- Row 3: (RS) 2sc in the first st, sc in 1, 2sc in the last st. (5 sc)
- Mark this as the Right Side with a stitch marker.
- Row 4: 2sc in the first st, sc in 3, 2sc in the last st. (7 sc)
- Row 5: sc in each. (7 sc)
- Row 6: 2sc in the first st, sc in 5, 2sc in the last st. (9 sc)
- Row 7: 2sc in the first st, sc in 7, 2sc in the last st. (11 sc)
- Rows 8-14: sc in each. (11 sc)
- Row 15: sc dec, sc in 7, sc dec. (9 sc)
- Row 16: sc dec, sc in 5, sc dec. (7 sc)
- Row 17: sc in each. (7 sc)
- Row 18: sc dec, sc in 3, sc dec. (5 sc)
- Row 19: sc dec, sc in 1, sc dec. (3 sc)
- Row 20: sc in each. (3 sc)
- Row 21: sc3tog. (1 sc)
Cut yarn after the first side is complete and set the piece aside. Edge - Do not cut the yarn after the second side is complete. Instead, holding the wrong side of both pieces together, sc around the outside of the lemon pieces, working through both thicknesses.
Loop - When you reach the first tip of the lemon, 2sc into the sc in the tip of the lemon, ch8, 2sc in the same space. Then continue to sc through both thicknesses to the second tip.
Finishing - 3sc in the second tip and slip stitch to join to the first sc of the round.
Cut yarn and tuck in ends.
Step 2: Leaves (Make 2)
Starting with green yarn. Ch10.
Row Instructions
- Row 1: sl st in the second ch from the hook and the next ch, sc in the next, hdc in the next, dc in the next, tr in the next, dc in the next, hdc in the next, sc in the last ch, working on the opposite side of the starting ch.
- Row 2: sc in the first ch, hdc in the next ch, dc in the next, tr in the next, dc in the next, hdc in the next, sc in the next, sl st in the last 2. Join with a sl st to the first sl st and cut the yarn leaving a long end.
Weave the long end through the back of your leaf to the bottom and attach the leaves to the top of the lemon - do not go through both thicknesses of the lemon.
- Funny Pictures
-
 Hilarious Memes for Those Bored to Tears
-
 Weekly Treat of Funniest Parenting Memes for Good Laugh out Loud Right Now
-
 Really Funny Pics to End These Weekend Perfectly
- Recipes
-
 Crispy Baked Avocado Fries
-
 Scrambled Chickpea and Spinach Pitas
-
 Cinnamon Pancakes
- Lifehacks
-
 Crochet Basics: Aligned Cobble Stitch
-
 Brick Stitch Crochet Tutorial
-
 Crochet Basics: Wattle Stitch
- Crochet Ideas
-
 Crochet Snorlax Plushie Doll
-
 Crochet Beautiful Penguin Toy
-
 Crochet Tiny Snowman
- DIY
-
 DIY Santa Craft For Kids
-
 Paper Plate Angel Craft
-
 Upcycled Mason Jar Chicken Vase
- Knitting Ideas
-
 Knitted Bridger Cowl
-
 Knitted Keepsake Bag
-
 Knitted Cutie Cupcake Dolls