Handmade Lazy Daisy Dishcloth Crochet Pattern

Description
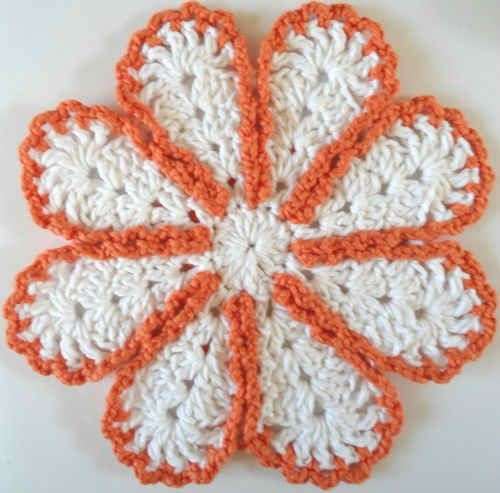
Create your very own handmade Lazy Daisy Dishcloth using the art of crochet. This project is perfect for beginners looking to practice their crochet skills while also creating a functional and beautiful item for their kitchen. The Lazy Daisy stitch adds a charming floral touch to the dishcloth, making it a lovely addition to any home decor. Whether you choose a bright and cheerful color palette or opt for a more neutral look, this project allows you to showcase your creativity and attention to detail. Handmade dishcloths also make wonderful gifts for friends and family, adding a personal touch to any kitchen. So grab your crochet hook and some yarn, and get ready to create a one-of-a-kind Lazy Daisy Dishcloth that will bring joy and functionality to your home.
Skill Level
Easy
Size
About 10½” round.
Materials
- Worsted Weight Cotton:
- White – 2 oz, 100 yd (60 g, 92 m)
- Orange – ½ oz, 25 yd (15 g, 23 m) (Bernat Cottontots)
Crochet Hook
Size H-8 (5.00 mm)
Joining with Single Crochet (sc)
When instructed to join with sc, begin with a slip knot on hook, insert hook in stitch or space indicated, yarn over and pull up a loop, yarn over and draw through both loops on hook.
Special Stitches
V-Stitch (v-st)
(dc, ch 1, dc) in same stitch or space indicated.
Shell
(2 dc, ch 1, 2 dc) in same stitch or space indicated.
Shell2
(2 dc, ch 2, 2 dc) in same stitch or space indicated.
Dishcloth Instructions
Rnd 1: (Right Side) Starting at center, with White, ch 4, join with sl st to first ch to form a ring; ch 3 (counts as first dc, now and throughout), 15 dc in ring; join with sl st to first dc. (16 dc)
Rnd 2: Ch 4 (counts as first dc and ch 1), dc in first dc, ch 1, skip next dc, [v-st in next dc, ch 1, skip next dc] around; join. (8 v-sts)
Rnd 3: Sl st in next ch-1 space, ch 3, (dc, ch 1, 2 dc) in same stitch as joining, ch 1, [Shell in next v-st, ch 1] around; join.
Rnd 4: Sl st in next dc, ch 3, Shell2 in next Shell, dc in next dc, ch 1, [skip next (dc, ch 1, dc), dc in next dc, Shell2 in next Shell, dc in next dc, ch 1] around; join.
Rnd 5: Sl st in next dc, ch 3, dc in next dc, Shell2 in next Shell, dc in next 2 dc, [ch 1, skip next (dc, ch 1, dc), dc in next 2 dc, Shell2 in next Shell, dc in next 2 dc] around; join with sc to first dc (to align yarn).
Rnd 6: Sl st in space under sc, (ch 1, htr) 7 times in next Shell, ch 1, [sl st in next ch-1 space, (ch 1, htr) 7 times in next Shell, ch 1] around; join with sl st to first sl st. Finish off White and weave in ends.
Edging Instructions
Rnd 1: With right side facing, join Orange with sc to any first ch-1 space, ch 3, * [sc in next ch-1 space, ch 3] 7 times, working down Rnds between shells in ch-1 spaces, [sc in next ch-1 space, ch 3] 3 times, sc in skipped dc on Rnd 1; working up Rnds in same ch-1 spaces, [ch 3, sc in next ch-1 space] 3 times, ch 3; repeat from * around; join with sl st to first sc. Finish off and weave in ends.
- Knitting Ideas
-
 Knitted Keepsake Bag
-
 Knitted Textured Heart Dishcloth
-
 Knitted Snowfall Dishcloth
- Lifehacks
-
 Crochet Basics: Twisted Fringe
-
 7 Crochet Tips And Tricks
-
 How To Work Crochet Into Denim
- DIY
-
 Popsicle Stick and Jingle Bell Christmas Tree Ornament
-
 Upcycled Mason Jar Chicken Vase
-
 Crochet Namaste Stephanie Doll
- Funny Pictures
-
 These are the Pics That Simply Describe Your Life
-
 Hilariously Accurate Parenting Memes That Show the Other Side of Parenthood
-
 Great Pics That Just Depict Our Lives
- Recipes
-
 Crispy Baked Avocado Fries
-
 Baked Beans and Hot Dogs with Biscuit Topping
-
 Roasted Rosemary Lemon Chicken Breasts
- Crochet Ideas
-
 Crochet Snorlax Plushie Doll
-
 Crochet Cat in 1 Row
-
 Crochet Beautiful Penguin Toy