Crochet Teddy Bear Daisy Amigurumi: Step-by-Step Guide

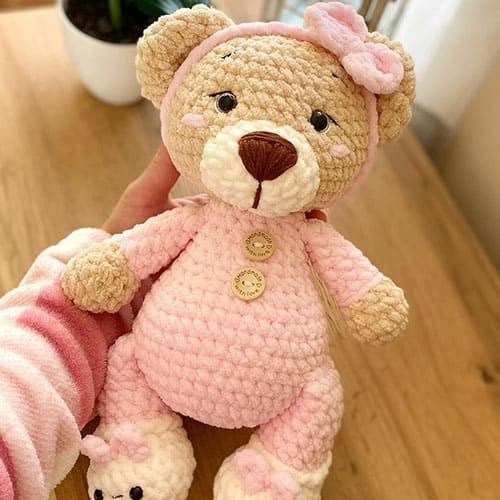
Crochet Teddy Bear Daisy Amigurumi is the sweetest and most huggable little creation you can make! This adorable amigurumi design combines the timeless charm of a teddy bear with the delicate beauty of daisy flowers. The soft yarn and intricate crochet stitches come together perfectly to bring this lovable bear to life. Whether you're making it as a gift for a dear friend or crafting it just for fun, this project is sure to bring a smile to your face. Get your crochet hooks ready and prepare for a fun and rewarding journey of creating your very own Crochet Teddy Bear Daisy Amigurumi!
Materials
To create the Crochet Teddy Bear Daisy Amigurumi, you will need the following materials:
- Plush yarn with a yardage of 100 g and 70 m, available in pink, milky, and light brown colors.
- Hook N. 6mm.
- Eyes 12 mm.
- Scissors.
- Stitch marker.
- Wide-eyed needle.
- Holofiber filling.
Abbreviations
Familiarize yourself with the abbreviations used in this guide:
- ch - chain
- mr - magic ring
- sc - single crochet
- inc - increase
- dec - decrease
- blo - back loop only
- slst - slip stitch
Arms
Start with the light brown color.
- 6 sc in mr
- 6 inc (12)
- (3sc, inc) * 3 (15)
- (3sc, dec) * 3 (12)
- (4sc, dec) * 2 (10)
- Change color to pink – 10 slst
- BLO, 10 sc
- (3sc, dec) * 2 (8)
- Rows 9-13: 8 sc (5 rows)
Do slst in the next stitch, stuff primarily the lower part of the arms, and cut the yarn.
Crochet 2 pieces.
Legs
Start with the milky color.
- 8 sc in mr
- 8 inc (16)
- (3sc, inc) * 4 (20)
- (9sc, inc) * 2 (22)
- 22 sc
- 1sc, (1sc, dec) * 3, 5sc, 1 dec, 5 sc (18)
- (dec, 1sc) * 3, 3sc, dec, 4 sc (14)
- Change color to pink – 14 slst
- BLO, 14 sc
- Rows 10-15: 14 sc (6 rows)
Do slst in the next stitch, stuff the legs, and cut the yarn.
Crochet 2 pieces.
Body
Use pink color for the body.
- 8 sc in mr
- 8 inc (16)
- (1sc, inc) * 8 (24)
- (2sc, inc) * 8 (32)
- (3sc, inc) * 8 (40)
- Rows 6-7: 40 sc (2 rows)
- Incorporate the legs: 7 sc together with a leg, 6 sc, inc, 6sc,
7 sc together with the other leg, 6 sc, inc, 6 sc (42) - 3sc, inc, 20sc, inc, 17 sc (44)
- 44 sc
- (9sc, dec) * 4 (40)
- (8sc, dec) * 4 (36)
- (4sc, dec) * 6 (30)
- (3sc, dec) * 6 (24)
- 24 sc
- (10sc, dec) * 2 (22)
- (9sc, dec) * 2 (20)
- Incorporate the arms: 2sc, 4 sc together with an arm, 6sc, 4 sc together with the other arm, 4 sc (20)
- (8sc, dec) * 2 (18)
- Change yarn color to brown – 18 sc
Stuff the body with filling, distributing it first along the sides, then in the center.
Do not cut the yarn; continue crocheting in the round.
Head
Continue crocheting with brown color.
- 18 inc (36)
- (3sc, inc) * 9 (45)
- (14sc, inc) * 3 (48)
- Rows 24-26: 48 sc (3 rows)
- (10sc, dec) * 4 (44)
- (9sc, dec) * 4 (40)
- 40 sc
- (8sc, dec) * 4 (36)
- 36 sc
- (4sc, dec) * 6 (30)
- 30 sc
- (3sc, dec) * 6 (24)
- (1sc, dec) * 8 (16)
- 8 dec
Insert the eyes between the 30 and 31 row, at a distance of 6 sc.
Stuff the head as the opening narrows. Pay special attention to the neck. Distribute the stuffing along the sides, shape as needed, and add to the center if necessary.
Ears
- 8 sc in MR
- 8 inc (16)
- (3sc, inc) * 4 (20)
- Rows 4-5: 20 sc
Make slst and leave a long tail for sewing to the head.
Face
- 8 sc in MR
- 8 inc (16)
- 2sc, (1sc, inc)*2, 4sc, (1sc, inc)*2, 2 sc (20)
- 20 sc
Do slst and leave a long tail for sewing to the body.
Tail
- 6 sc in MR
- 6 inc (12)
- (3sc, inc) * 3 (15)
- (3sc, dec) * 3 (12)
Do slst and leave a long tail for sewing to the body.
Assembly
- Sew the ears between rows 4 and 11 (top view).
- Sew the face between rows 23 and 30, or to your liking.
- Sew the tail between rows 5 and 10 of the body, or as preferred.
- Join the two colors on the legs with sc.
- Embroider the nose to your taste. You can also attach a ready-made plastic nose.
- Secure the legs to the body with 2-3 stitches.
Your Crochet Teddy Bear Daisy is ready!
- Funny Pictures
-
 Cute Cat Memes That Will Make Your Day Brighter
-
 Spot-on and Funny Memes About Introverts Struggles
-
 Top Wonderful Cat Memes on Their Way to Better Your Day
- Recipes
-
 Creamy Old Fashioned Rice Pudding
-
 Russian Tea Cakes (Snowball Cookies)
-
 Rigatoni with Sausage, Tomatoes, and Zucchini
- Lifehacks
-
 How to Crochet a Harlequin Stitch
-
 Removing The Toughest Stains
-
 Crochet Basics: Crumpled Griddle Stitch
- Crochet Ideas
-
 Crochet Christmas Tree
-
 Crochet Goblet of Fire
-
 Crochet Adorable Ammonite
- DIY
-
 DIY Snowman Wreath
-
 Mini Santa Sleigh Ornament
-
 Crochet Gingerbread House Blanket
- Knitting Ideas
-
 Knitted Easter Bunny
-
 Knitted Mobile Phone/Glasses Case
-
 Knitted Cabled Wallet