Snow White Bunny Amigurumi Crochet Pattern

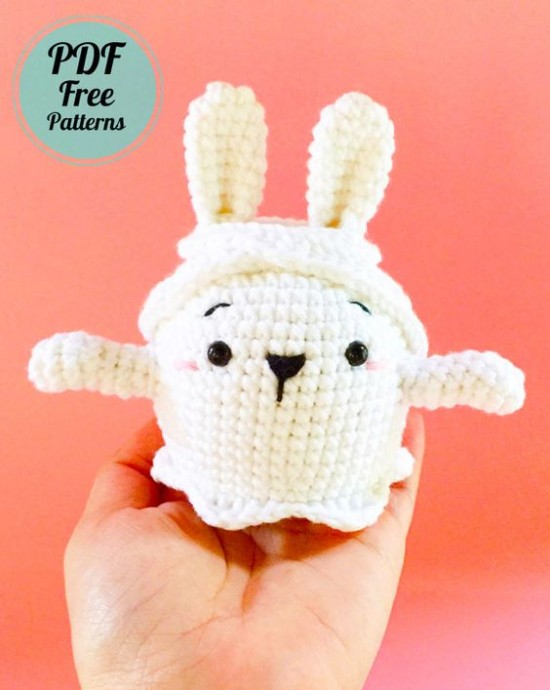
Create your very own adorable Snow White Bunny Amigurumi with the art of crochet! This charming project involves using yarn and a crochet hook to craft a cute bunny toy that will bring joy to anyone who sees it. By following a pattern and using basic crochet stitches, you can bring this sweet bunny to life in no time. Whether you're a beginner or an experienced crocheter, this project is sure to be a fun and rewarding one to complete. With its fluffy white yarn and intricate crochet details, the Snow White Bunny Amigurumi is a delightful addition to any collection of handmade toys. This project allows you to showcase your creativity and crafting skills while also creating a special gift for a loved one. Whether you choose to make this bunny for yourself or to give it away as a present, the process of crocheting this charming amigurumi is sure to bring a smile to your face. So grab your crochet hook and yarn, and get ready to bring this adorable bunny to life!
Materials
Dk light Yarn (Snow, Black, Pastel Pink)
2.75mm Crochet Hook
Yarn needle
7mm Safety Eyes (1 Pair)
Stitch marker
Polyester Fiberfill
Scissors
Height
Approx. 12cm if you're using the same yarns and crochet hook.
Stitches
(US Terminology)
Rnd = Round
Sc = Single crochet
Inc = Increase
Dec = Decrease
Slst = Slip Stitch
Dc = Double Crochet
Tr = Treble Crochet
St/ Sts = Stitch/ Stitches
Ch = Chain
BLO = Back Loop Only
(…) x = Repeat instructions in the round bracket for the indicated number of times
[ ] = Number of stitches in each round/ row
Body Construction
Head to the Bottom of the Body (Snow)
Rnd 1: 8 Sc in magic ring. [8]
Rnd 2: (Inc) x 8. [16]
Rnd 3: (1 Sc, Inc) x 8. [24]
Rnd 4: (2 Sc, Inc) x 8. [32]
Rnd 5: (3 Sc, Inc) x 8. [40]
Rnd 6: (4 Sc, Inc) x 8. [48]
Rnd 7-18: 48 Sc (12 rounds). [48]
Rnd 19: (4 Sc, Dec) x 8. [40]
Rnd 20: (4 Sc, Inc) x 8. [48]
Rnd 21: BLO 48 Sc. [48]
Insert the safety eyes between round 10 and 11, 8 stitches apart. Start stuffing and continue as you crochet. Stuff slightly the bottom part of the body to keep it flat.
Rnd 22: (4 Sc, Dec) x 8. [40]
Rnd 23: (3 Sc, Dec) x 8. [32]
Rnd 24: (2 Sc, Dec) x 8. [24]
Rnd 25: (1 Sc, Dec) x 8. [16]
Rnd 26: (Dec) x 8. [8]
Fasten off, leaving a long tail for sewing. Close the remaining sts and tie a knot to secure the yarn. Weave in yarn end.
Body Edging
Using Snow yarn, work in front loops of Rnd 21. Start in the last stitch while the head pointing towards you.
Rnd 1: (1 Sc, 1 Dc, 2 Tr, 1 Dc, 1 Sc, 2 Slst) x 6. [48]
Slst in the first st. Fasten off, weave in yarn ends.
Ears (Make 2) (Snow)
Rnd 1: 6 Sc in magic ring. [6]
Rnd 2: (Inc) x 6. [12]
Rnd 3-9: 12 Sc (7 rounds). [12]
Do not stuff the ear. Flatten the ear and 1 Sc through both layers of the opening to close. Fasten off, leaving a long tail for sewing. Fold the ear in half and sew the sides of the last round together. Do not cut the yarn; you will use it for sewing to the head.
Arms (Make 2) (Snow)
Rnd 1: 5 Sc in magic ring. [5]
Rnd 2: (Inc) x 5. [10]
Rnd 3-4: 10 Sc (2 rounds). [10]
Rnd 5-6: (Inc) x 2, (Dec) x 3, 1 Sc, Inc (2 rounds). [10]
Rnd 7: 10 Sc. [10]
Rnd 8: (3 Sc, Dec) x 2. [8]
Fasten off, leaving a long tail for sewing. Stuff the arms.
Bandage (Snow)
Ch 60. Start in the 3rd from the hook with 58 Hdc. Fasten off, leaving a long tail for sewing.
Assembly
1. Using 2 strands of Black yarn and a tapestry needle, embroider the eyebrows 2 rounds above the eyes with 8 sts apart. Continue to sew the nose at round 11, centered between the eyes. Make a vertical line about 2 sts long below the center of the nose.
2. Using 2 strands of Pink Pastel yarn, embroider the blush about 2 sts long beside the eyes between round 11 and 12.
3. Sew ears on the top of the head on round 3 and 4.
4. Sew arms on the sides of the body between round 13 and 14. Slightly slant the arms upward.
5. Place one edge of the bandage behind the left arm and wrap it around the ears, forming the letter X on the front center of the head. Place the other end behind the right arm. Sew in place.
- Funny Pictures
-
 Hilarious Memes for Those Bored to Tears
-
 Weekly Treat of Funniest Parenting Memes for Good Laugh out Loud Right Now
-
 Really Funny Pics to End These Weekend Perfectly
- Recipes
-
 Crispy Baked Avocado Fries
-
 Scrambled Chickpea and Spinach Pitas
-
 Cinnamon Pancakes
- Lifehacks
-
 Crochet Basics: Aligned Cobble Stitch
-
 Brick Stitch Crochet Tutorial
-
 Crochet Basics: Wattle Stitch
- Crochet Ideas
-
 Crochet Snorlax Plushie Doll
-
 Crochet Beautiful Penguin Toy
-
 Crochet Tiny Snowman
- DIY
-
 DIY Santa Craft For Kids
-
 Paper Plate Angel Craft
-
 Upcycled Mason Jar Chicken Vase
- Knitting Ideas
-
 Knitted Bridger Cowl
-
 Knitted Keepsake Bag
-
 Knitted Cutie Cupcake Dolls