How to Create Your Very Own Adorable White Bunny Amigurumi

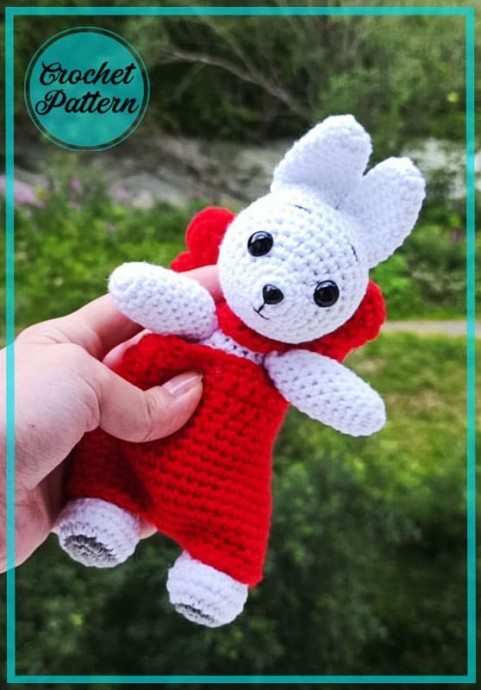
Create your very own adorable white bunny amigurumi with the art of crochet. This project is perfect for those who enjoy working with yarn and creating cute, handmade toys. By following a simple pattern and using basic crochet stitches, you can bring this little bunny to life. The soft white yarn will give your amigurumi a fluffy and cuddly appearance, making it a perfect gift for children or a charming addition to your home decor. Whether you are a seasoned crocheter or a beginner looking for a fun project, making a white bunny amigurumi is a delightful way to spend your time and showcase your crafting skills.
List of Materials Required
1. Yarn of a suitable color (white) - I used YarnArt Jeans yarn, crochet hook #2.5. Red yarn (for shorts) - I used Semenovskaya “Souffle” with hook number 4. Some black yarn (for eyebrows and mouth). Some gray yarn (for the heels).
2. Hook of a suitable size (I have #2.5 and #4).
3. A piece of a wide red ribbon (for a bow) and a small piece of a red thin ribbon (around the neck).
4. Filler.
5. Black half-beads (8 mm), small plastic spout (you can embroider).
Auxiliary tools: scissors, needle, yarn, eye glue.
Abbreviations
- AR – Amigurumi Magic ring
- LL – Lifting loop
- MR – Amigurumi Magic ring
- App – application
- sc – Single Crochet
- inc – Increase
- dec – Decrease
- tr – Triple Crochet / Treble Crochet
- st – Stitch
- dc – Double Crochet
- hdc – Half Double Crochet
- sl-st – Slip Stitch
- ch – Chain
- ..in – make increase into same stitch as many as the number which is given in front of “inc” abbreviation (e.g., 3inc, 4inc).
- FLO – Crochet into front loops only
- BLO – Crochet into back loops only
- BL – Bobble Stitch – do 5dc all in the same stitch and then yarn over and pull through all the loops on your hook (the original loop + 1 loop for each partially completed dc).
Ears (2 Parts)
We start with the ears because we will crochet them later so as not to sew them separately.
- 1 Rnd: 6 sc in MR (6)
- 2 Rnd: inc into each loop (12)
- 3-11 Rnd: 12 sc (12)
We crochet the second ear in the same way. We do not leave the yarn for sewing, because we will crochet the ears later.
Head
- 1 Rnd: 6 sc in MR (6)
- 2 Rnd: inc into each loop (12)
- 3 Rnd: (3 sc, inc) * 3 times (15)
- 4 Rnd: 15 sc (15)
- 5 Rnd: 3 sc, 9 inc, 3 sc (24)
- 6 Rnd: 24 sc (24)
- 7 Rnd: 5 sc, (inc, 1 sc) * 3 times, 2 sc, (1 sc, inc) * 3 times, 5 sc (30)
- 8 Rnd: (4 sc, inc) * 6 times (36)
- 9-11 Rnd: 36 sc (36)
- 12 Rnd: 14 sc, then apply the ears and crochet 6 sc, grabbing the loops of one side of the ear, 1 sc, 6 sc, apply the second ear and crochet together with one wall of the ear, 6 sc, 9 sc (36)
- 13 Rnd: 14 sc, now crochet 6 sc, capturing the loops of the second side of the ears, 1 sc, 6 sc together with the second wall of the ears, 9 sc (36)
- 14 Rnd: (4 sc, dec) * 6 times (30)
- 15 Rnd: (sc, dec) * 10 times (20)
- 16 Rnd: (sc, dec) * 7 times (14)
Add some filler to the head.
- 17 Rnd: (sc, dec) * 4 times, dec, sc (9)
Pull off the hole. Fasten the ears together (in the middle of the ears approximately) with one stitch. To be put together. This can be done later.
Body
- 1 Rnd: 6 sc in MR (6)
- 2 Rnd: inc in each loop (12)
- 3 Rnd: (sc, inc) * 6 times (18)
- 4 Rnd: (2 sc, inc) * 6 times (24)
- 5 Rnd: (3 sc, inc) * 6 times (30)
- 6 Rnd: (4 sc, inc) * 6 times (36)
- 7-11 Rnd: 36 sc (36)
- 12 Rnd: (4 sc, dec) * 6 times (30)
- 13-16 Rnd: 30 sc (30)
- 17 Rnd: (3 sc, dec) * 6 times (24)
- 18 Rnd: 24 sc (24)
- 19 Rnd: (2 sc, dec) * 6 times (18)
- 20 Rnd: 18 sc (18)
- 21 Rnd: (sc, dec) * 6 times (12)
Add filler. We leave the yarn for sewing on the head. Sew on the head.
We Crochet Arms (2 Parts)
- 1 Rnd: 6 sc in MR (6)
- 2 Rnd: inc in each loop (12)
- 3-14 Rnd: 12 sc.
- Add filler, fold the handle in half and tie both halves with single crochet. We crochet the second handle in the same way.
Legs (2 Parts)
In gray:
- 1 Rnd: 7 ch, from the 2nd loop from the hook, crochet 5 sc along the chain, 3 sc in the last loop, then crochet along the other side of the chain: 4 sc, increase (14)
- 2 Rnd: inc, 4 sc, 3 inc, 4 sc, 2 inc (20)
Change the yarn to white:
- 3 Rnd: inc, 5 sc, (1 sc, inc) * 4 times, 5 sc, inc (26 sc)
- 4-5 Rnd: 26 sc (26)
- 6 Rnd: 7 sc, (1 sc, dec) * 4 times, 7 sc (22)
- 7 Rnd: 7 sc, 4 dec, 7 sc (18)
- 8 Rnd: 3 sc, 6 dec, 3 sc (12)
- 9-17 Rnd: 12 sc (12)
Add filler.
- 18 Rnd: dec in each loop (6)
Pull off the hole. We crochet the second leg in the same way. The description of the legs themselves was written out from the Internet (a description of some bunny from free access) with my minor changes. Unfortunately, I cannot indicate the author, since I was simply writing out a description of the bunny; the author has not survived. Sew on the legs and handles (I made them on a yarn mount so that they were movable).
Ponytail
- 1 Rnd: 6 sc in MR (6)
- 2 Rnd: inc in each loop (12)
- 3 Rnd: (sc, inc) * 6 times (18)
- 4-5 Rnd: 18 sc (18)
- 6 Rnd: 3 sc, 6 dec, 3 sc (12).
- Add filler.
- 7 Rnd: we crochet 6 decreases, we sew the tail to the bunny.
We Crochet Panties
We will crochet with red yarn. I will not give a detailed description of the pants, as they need to be adjusted to fit your bunny (depends on the crocheting density, on the hook number, and on the thickness of the yarn used).
I used hook #4, Souffle yarn.
- 1 Rnd: Dial a chain of 30 ch + 7 button loops.
- 2 Rnd: 30 sc, ch lifting, turning (while we crochet in rotary rows).
- 3 Rnd: 30 sc, ch, turning.
- 4 Rnd: 30 sc, ch, turning.
- 5 Rnd: inc, 28 sc, inc (32), turning.
- 6 Rnd: 32 sc, here we close the shorts and then we will crochet in a circle (you need to try on according to your bunny, I crocheted according to my bunny).
- 7 Rnd: We make 2 increments in a row (34).
- 8 Rnd: 10 sc, inc, 10, inc, 8 sc, here I typed a chain of 8 ch, skipped 7 loops and continued to crochet in the eighth loop (this is the hole for the ponytail).
- 9 Rnd: Further we will crochet in a circle to the desired length, along a chain of ch.
We crochet sc (under the chain). You can make 2-3 increments in rows, to the desired width. Try on a bunny. Having reached the required length of the panties, fold them in half and tie 4 sc in the middle (or sew with a needle). I tied on the seamy side sc) Turn it out again on the front side, sew on the button. We glue the eyes, embroider the eyebrows, mouth, and nose.
We cling a red bow around the neck. Our bunny is ready!
- Funny Pictures
-
 Hilarious Memes for Those Bored to Tears
-
 Weekly Treat of Funniest Parenting Memes for Good Laugh out Loud Right Now
-
 Really Funny Pics to End These Weekend Perfectly
- Recipes
-
 Crispy Baked Avocado Fries
-
 Scrambled Chickpea and Spinach Pitas
-
 Cinnamon Pancakes
- Lifehacks
-
 Crochet Basics: Aligned Cobble Stitch
-
 Brick Stitch Crochet Tutorial
-
 Crochet Basics: Wattle Stitch
- Crochet Ideas
-
 Crochet Snorlax Plushie Doll
-
 Crochet Beautiful Penguin Toy
-
 Crochet Tiny Snowman
- DIY
-
 DIY Santa Craft For Kids
-
 Paper Plate Angel Craft
-
 Upcycled Mason Jar Chicken Vase
- Knitting Ideas
-
 Knitted Bridger Cowl
-
 Knitted Keepsake Bag
-
 Knitted Cutie Cupcake Dolls