Crochet Dish Soap Dress: A Charming Granny Square Project

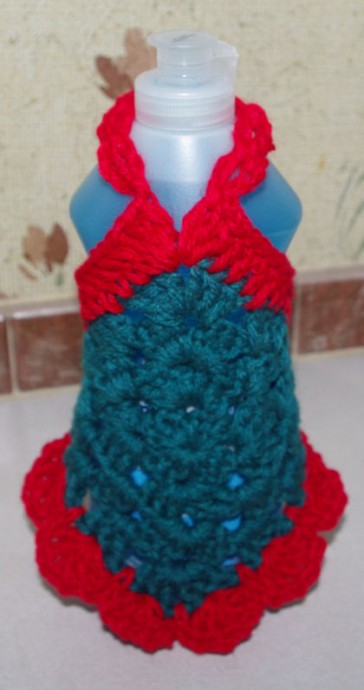
Create a charming dish soap dress using the traditional crochet technique to make a Granny Square design. This unique and practical project combines the beauty of handmade crochet with the functionality of a dish soap holder. By using colorful yarn and intricate stitches, you can customize the dress to match your kitchen decor or add a pop of color to your sink area. The Granny Square pattern adds a touch of vintage flair to this modern household item, making it a delightful addition to your home.
Materials
Red Heart Super Saver-4ply worsted weight
- Choose colors to coordinate with your kitchen decor.
- Main Color (I used = less than 3/4 oz)
- Trim Color = less than 1/2 oz
- Hook Size G/4.00MM
- 1-7/8" button
- Coordinating thread
- Sewing needle
Stitches
ch, sc, sl st, dc.
Difficulty Level
Medium
Dress Front
RND 1: With Main Color, ch 4, (work all of the following sts in the 4th ch from the hk) 2 dc, * ch 1, 3 dc, repeat from * twice more, ch 1. Join with sl st in top of beg ch 4. Ch 3, turn the piece over.
RND 2: (2 dc, ch 2, 3 dc) in next ch 1 sp.* (3 dc, ch 2, 3 dc) in next ch 1 sp. Repeat from * twice more. Join with sl st in top of beg ch 3. Ch 3, turn the square over.
RND 3: 2 dc in next open space on the side of the square. (3 dc, ch 2, 3 dc) in the next open space on the corner of the square. * 3 dc in next side space. (3 dc, ch 2, 3 dc) in next corner space. Repeat from * twice more. Join with sl st in top of beg ch 3. Ch 3, turn the square over.
RND 4: Work 3 dc in each open space on the side of the square and work (3 dc, ch 2, 3 dc) in each corner space. Join with a sl st in the top of the beg ch 3.
Fasten off.
Side 1
Join Trim Color with a dc in the first dc on one side.
Dc in ea dc and ch sp along side.
3dc in first corner sp.
Neck
(ch3, dc around post of last dc.) 7 times
3dc in same corner sp.
Side 2
Dc in ea dc and ch sp along side.
3dc in corner sp.
* (Dc, ch1, dc, ch1, dc, ch1, dc, ch1, dc) in center dc of next 3dc group.
Sc in next ch sp.
Rep from * 6 more times.
(Dc, ch1, dc, ch1, dc, ch1, dc, ch1, dc) in center dc of next 3dc group.
3dc in next corner sp.
Join with a sl st in the first dc made.
Button Loop
Ch6 (or the number of chains it takes to accommodate your button.
Sl st in the same st.
Fasten off.
- Funny Pictures
-
 Hilarious Memes for Those Bored to Tears
-
 Weekly Treat of Funniest Parenting Memes for Good Laugh out Loud Right Now
-
 Really Funny Pics to End These Weekend Perfectly
- Recipes
-
 Crispy Baked Avocado Fries
-
 Scrambled Chickpea and Spinach Pitas
-
 Cinnamon Pancakes
- Lifehacks
-
 Crochet Basics: Aligned Cobble Stitch
-
 Brick Stitch Crochet Tutorial
-
 Crochet Basics: Wattle Stitch
- Crochet Ideas
-
 Crochet Snorlax Plushie Doll
-
 Crochet Beautiful Penguin Toy
-
 Crochet Tiny Snowman
- DIY
-
 DIY Santa Craft For Kids
-
 Paper Plate Angel Craft
-
 Upcycled Mason Jar Chicken Vase
- Knitting Ideas
-
 Knitted Bridger Cowl
-
 Knitted Keepsake Bag
-
 Knitted Cutie Cupcake Dolls