How to Crochet an Adorable Bear and Bunny Plush Toy


You’ll Need
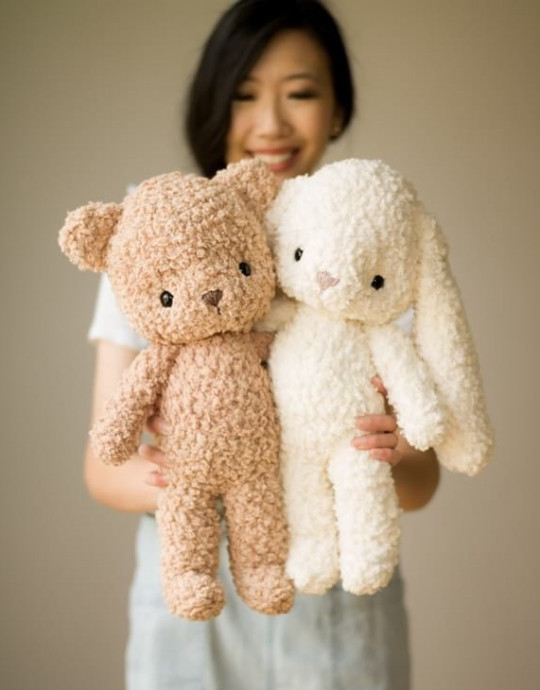
Go For Faux Fleece Sherpa Yarn (level 7 Jumbo) in “Honey” (for bear) and “Cream” (for bunny); 262 g/127 yds for Bear (2 skeins) and 404 g/195 yds for Bunny (3 skeins);
Crochet hook 6.5 mm;
Large plastic yarn needle;
Fiberfill;
18 mm safety eyes;
Lock ring stitch markers;
Small amount of worsted weight (level 4) yarn for nose: Brown for bear (I used Cotton Ease Yarn in “Cocoa”) and Light purple for bunny (I used Cotton Ease Yarn in “Mushroom”).
Instructions
Head
R1: 6 sc in magic ring. (6 sts)
R2: *Inc*, rep 6 times (12 sts)
R3: *Sc 1, Inc*, rep 6 times. (18 sts)
R4: *Sc 2, Inc*, rep 6 times. (24 sts)
R5: *Sc 3, Inc*, rep 6 times (30 sts)
R6: *Sc 4, Inc*, rep 6 times (36 sts)
R7: *Sc 5, Inc*, rep 6 times (42 sts)
R8-14: Sc 42
R15: *Sc 5, dec*, rep 6 times (36 sts)
R16: *Sc 4, dec*, rep 6 times (30 sts)
R17: *Sc 3, dec* rep 6 times (24 sts)
R18: *Sc 2, dec*, rep 6 times. (18 sts)
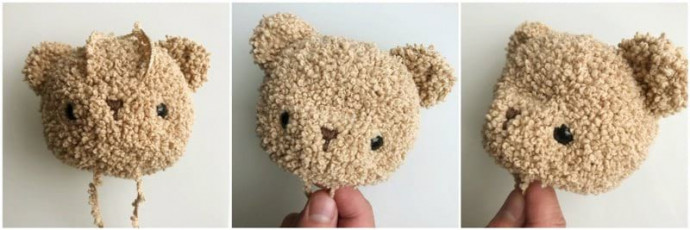
Add safety eyes about 1.75”/4.4 cm from bottom of head (bottom of safety eye is at the 1.75”/4.4 cm mark, middle of safety eye is around the 2”/5 cm mark), approximately 3.75”/9.5 cm apart (from inner tip to inner tip). DO NOT snap in washers yet.
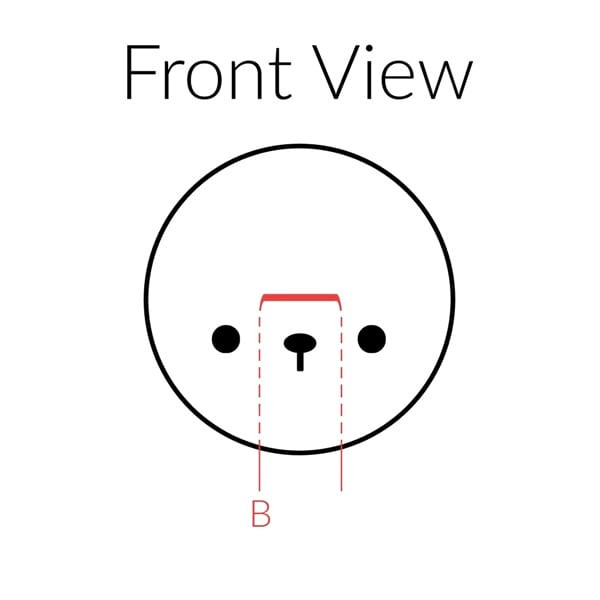
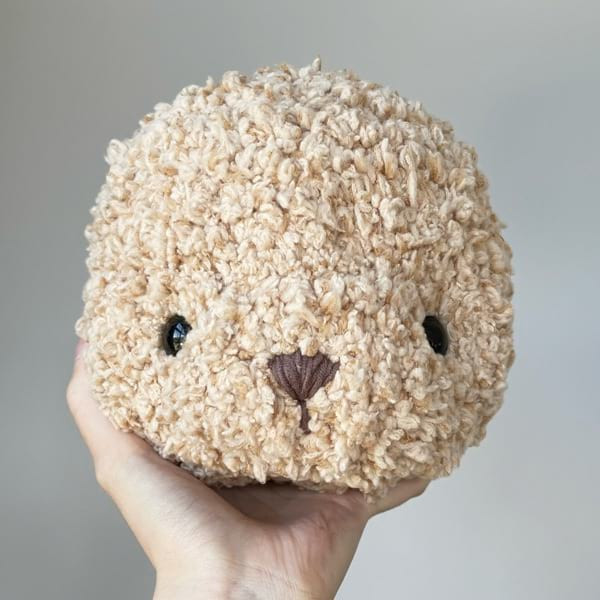
With eyes loosely in place, embroider nose using worsted weight yarn and needle into an upside-down triangle shape with a downward line. Position the nose between the eyes: the top of the nose should be positioned at the midline of the safety eyes. The dimensions of our triangular nose are: 1”/2.5 cm wide x 0.75”/1.9 cm tall. The little line below the triangle is 0.5”/1.3 cm long.
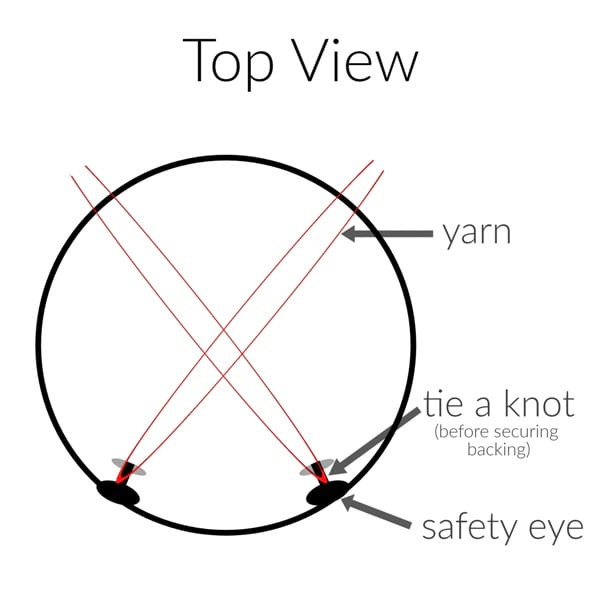
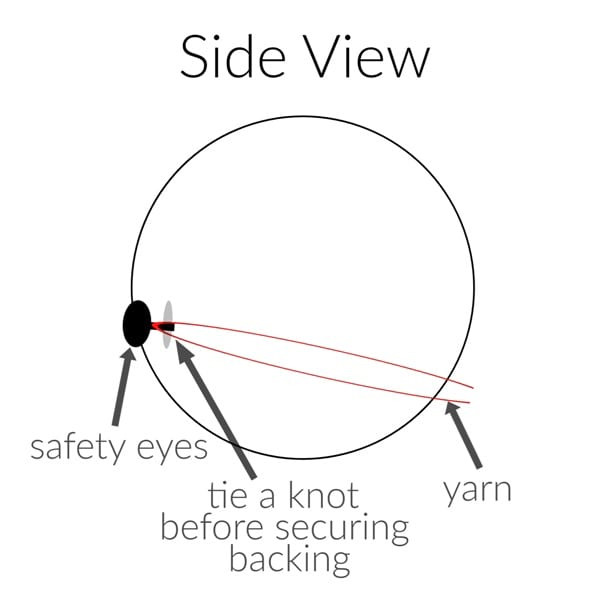
To give the face more definition, we will be using a technique called eye indentation. After inserting the safety eyes (without attaching washer/backing yet), use the yarn strands you set aside at the beginning and tie knots around the post of each safety eye. Snap in the washers. Have the strands cross each other inside the head and have them exit out the back of the head. Ensure that both strands from the SAME safety eye are in close proximity to each other when they exit the back of the head to make it easier to tie a knot (but they should not come out of the same hole). After this is done, you should have 4 strands of yarn coming out the back of the head, each exiting from their own hole. Stuff head, making sure there is stuffing above and below the criss-crossed eye indentation strands.
R19: *Sc 1, dec*, rep 6 times. (12 sts)
Finish stuffing as needed.
R20: *Dec*, rep 6 times. (6 sts)
Fasten off and weave in end.
Finish off the eye indentation: grab the two strands of yarn that correlate with one safety eye. Pull back to desired indentation and tie a double knot to secure. Repeat with other eye. Weave in ends.
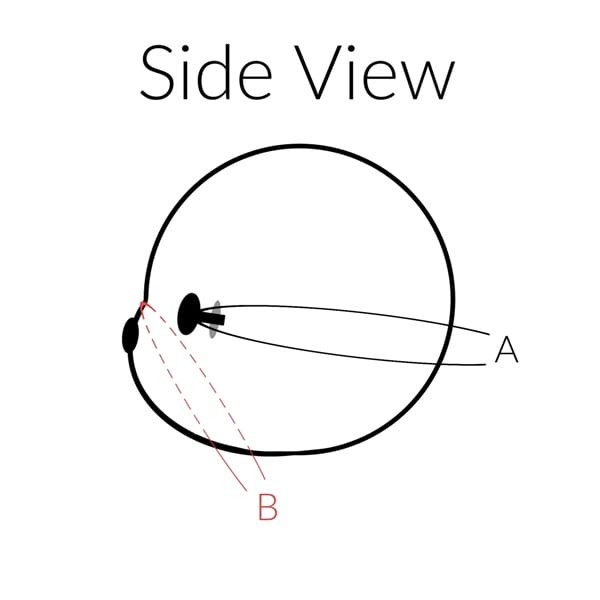
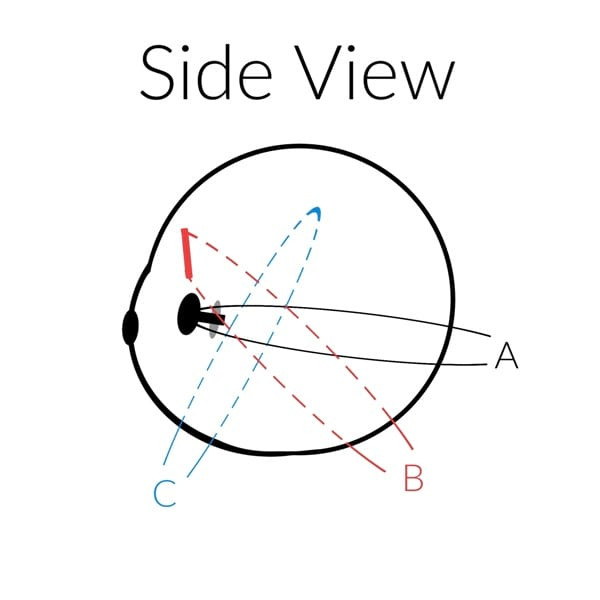
We will now do some special head shaping techniques. Note that A refers to eye indentation in the diagrams below for the Bear & Bunny. Also, the solid lines indicate the section of the yarn strand on the outside of the head while the dotted lines indicate the section of the yarn strand that is on the inside of the head.
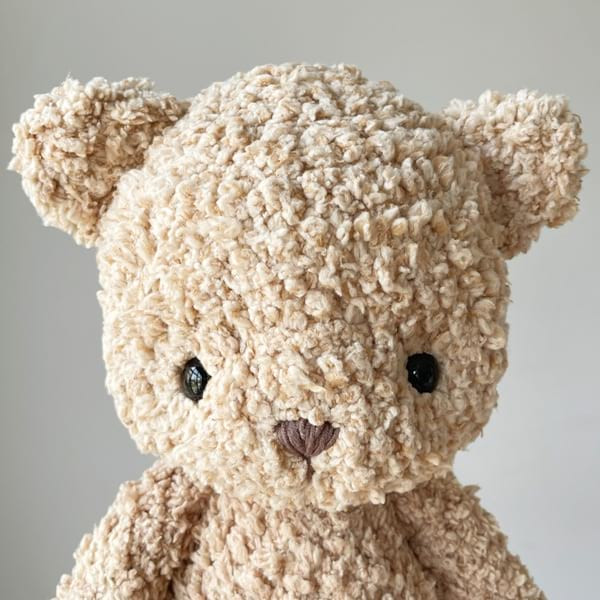
Bear Head Shaping
(1) To create the snout, cut a 35”/89 cm strand of yarn and thread it from the bottom of the head up to 1.5”/3.8 cm above the top of the nose, across (about 2”/5 cm) and back down again (reference red line B in front view and side view diagrams). Pull tightly until desired snout is created, tie both ends into a knot and weave in ends. The snout has now been created.
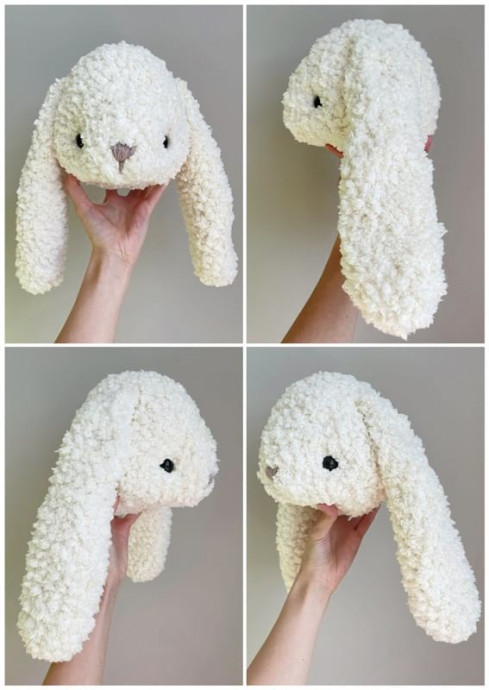
Bunny Head Shaping
(1) To shape the snout of the bunny, cut two 35”/89 cm strands of yarn and thread through the head as shown in diagrams (red lines B). The solid line above each eye is approximately 2.5”/6.4 cm in length. Pull tightly until snout has been protruded to desired shape. Tie both ends into a knot and weave in ends. The snout has now been shaped.
(2) To indent the sides of the head for ear placement (which will also help push out the cheeks), cut two 35”/89 cm strands of yarn and thread through the head as shown in diagrams (blue lines C). The indentation occurs approximately 4”/10 cm diagonally above the top of the safety eye. Pull tightly until side of head has been indented. Tie both ends into a knot and weave in ends. The sides of the head have been indented, and this is where you will attach the ears later on.
Bear Ears
Make 2.
R1: 6 sc in magic ring. (6 sts)
R2: *Inc*, rep 6 times. (12 sts)
R3-4: Sc 12.
Fasten off and leave long end for sewing. Flatten sphere and sew onto head about 4″/10 cm apart.
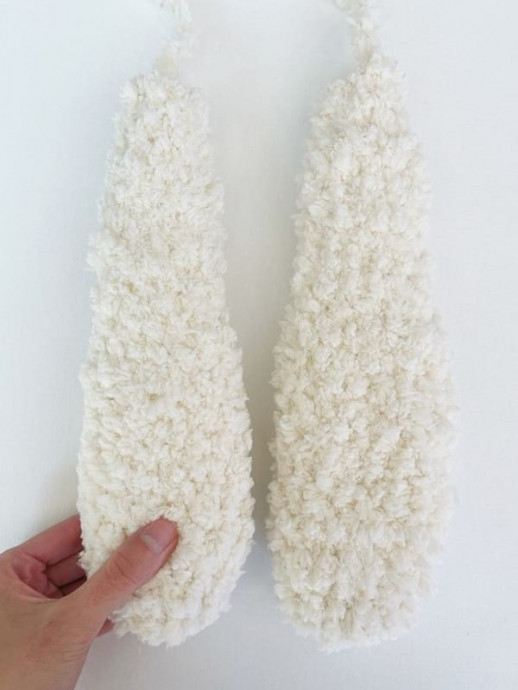
Bunny Ears
Make 2.
R1: 8 sc in magic ring. (8 sts)
R2: *Inc*, rep 8 times. (16 sts)
R3-14: Sc 16. (16 sts)
R15: *Sc 2, dec*, rep 4 times. (12 sts)
R16-22: Sc 12. (12 sts)
R23: *Sc 1, dec*, rep 4 times. (8 sts)
R24-25: Sc 8. (8 sts)
Fasten off and leave long end for sewing (do not stuff). Sew onto indented sides of head about 5.5″/14 cm apart so that ears are flopping downwards. Attach upper 3”/7.6 cm of ear so that it sits firmly against the head.
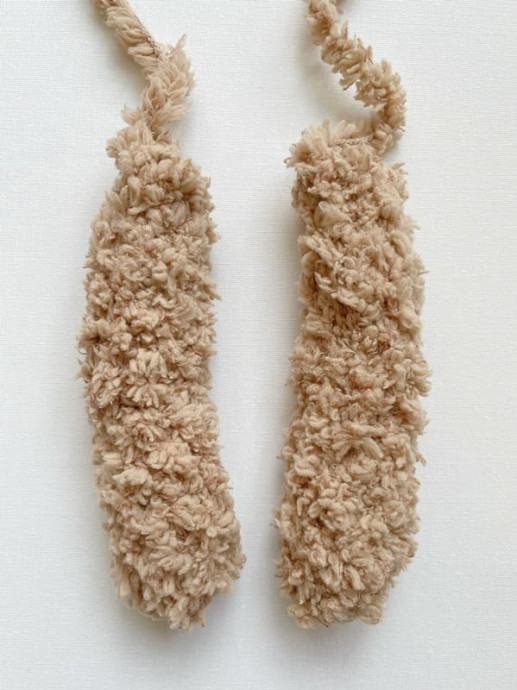
Legs
Make 2.
R1: 6 sc in magic ring. (6 sts)
R2: *Sc 2, Inc*, rep 2 times. (8 sts)
R3: Sc 8. (8 sts)
R4: *Sc 3, Inc*, rep 2 times. (10 sts)
R5-7: Sc 10. (10 sts)
R8: *Sc 4, Inc*, rep 2 times. (12 sts)
R9-16: Sc 12. (12 sts)
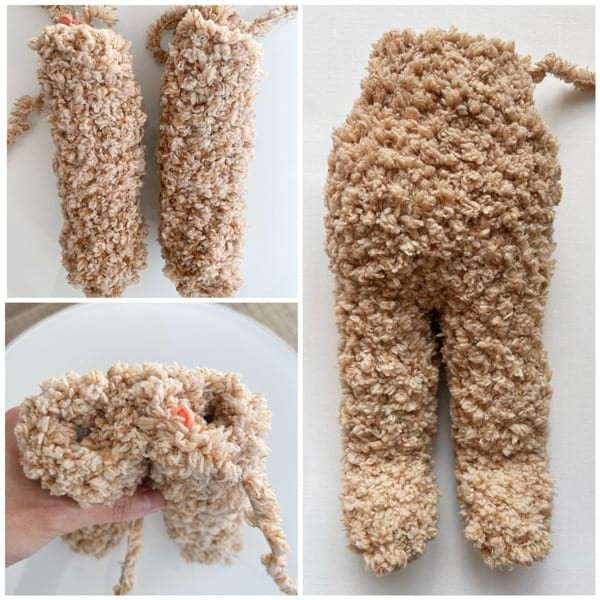
We will now join the two legs and begin crocheting the body. For the first leg, fasten off and leave a long end (we will be using this end to sew the bottom of the body shut later on). For the second leg, DO NOT CUT OFF the yarn. Chain 1 and join with slip stitch to any sc on the first leg. *Slip stitch in next sc on same leg, Chain 1, then slip stitch to next sc on opposite leg*, repeat a total of 3 times. You will now begin working the body in a round as illustrated by this diagram with a total of 24 stitches (first round of body):
Body
R1: Sc 24
R2: *Sc 3, Inc*, rep 6 times. (30 sts)
R3-7: Sc 30. (30 sts)
Using a yarn needle or crochet hook, move the yarn end from the first leg down to the bottom of the body. Seam the bottom shut so there are no longer any holes or gaps.
R8: *Sc 3, Dec*, rep 6 times. (24 sts)
R9: Sc 24. (24 sts)
R10: *Sc 2, Dec*, rep 6 times. (18 sts)
R11: Sc 18. (18 sts)
R12: *Sc 7, Dec*, rep 2 times. (16 sts)
R13: Sc 16. (16 sts)
Fasten off and leave long end for sewing. Stuff legs and body and seam to head.
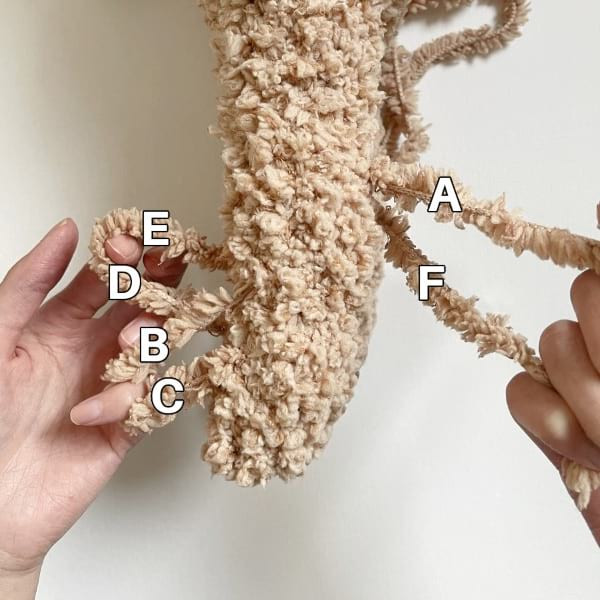
We will now do some foot shaping: cut two 20”/51 cm strands of yarn (one strand for each foot). Please reference the accompanying photos showing the front and side views of the leg.
Leg Side View
The yarn strand will enter the back of the leg at A, exit the front of the leg at B, enter the front of the leg at C, exit the front of the leg at D, enter the front of the leg at E and exit the back of the leg at F.
Please note these distances from the bottom of the leg:
A and F: 5.5”/14 cm
B and E: 3.5”/9 cm
C and D: 2”/5 cm
The distance between C and D (and also B and E) is approximately: 1”/2.5 cm Pull the yarn ends (at A and F) back tightly to shape the leg, creating a bend at the foot. Tie knots and hide ends. The foot has now been defined. Repeat for other leg.
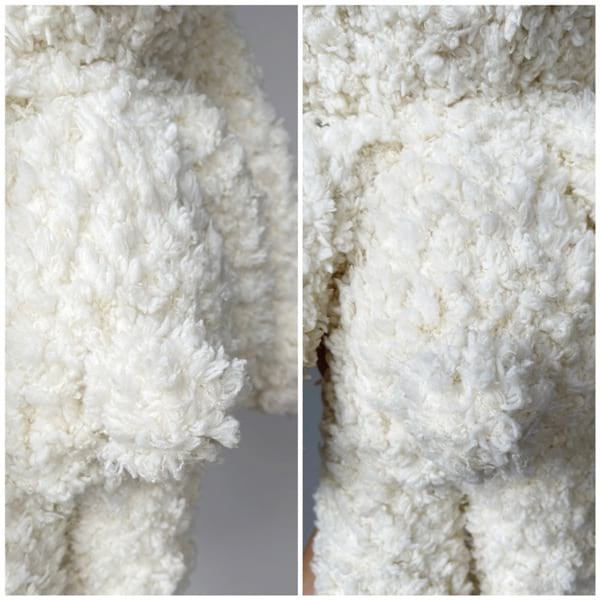
Arms
Make 2.
R1: 6 sc in magic ring. (6 sts)
R2: *Sc 2, Inc*, rep 2 times. (8 sts)
R3-10: Sc 8. (8 sts)
R11: *Sc 2, Dec*, rep 2 times. (6 sts)
R12: Sc 6
Fasten off and leave long end for seaming. You do not need to stuff the arms. Sew onto sides of body.
Tail
R1: 6 sc in magic ring. (6 sts)
R2: *Sc 2, Inc*, rep 2 times. (8 sts)
R3: *Sc 2, dec*, rep 2 times. (6 sts)
Fasten off and leave long for sewing. Sew onto bottom back of body.