Crochet Fluffy Amigurumi Sheep Tutorial

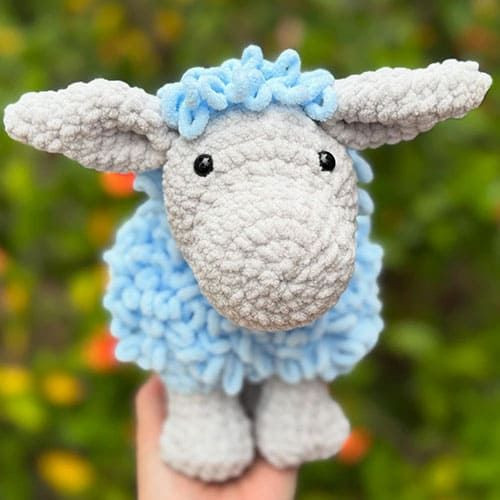
If you're looking to add some cuteness to your crochet collection, you can't go wrong with a Crochet Amigurumi Fluffy Sheep! These adorable little creatures are not only fun to make but also make for the perfect snuggle buddy or a charming decoration for your space. With their fluffy wool and sweet faces, they are guaranteed to bring a smile to your face every time you see them. Whether you're a seasoned crocheter or just starting out, creating these fluffy sheep will surely be a project you'll enjoy from start to finish!
Materials
- Yarn and hook of your choice (I use yarnsmiths chenille with a 4.5mm hook)
- Stitch marker
- Stuffing
- Scissors
- Safety eyes
- Needle for sewing
Abbreviations
- R: round
- MR: magic ring
- sc: single crochet
- hdc: half double crochet
- dc: double crochet
- trc: triple crochet
- inc: increase
- dec: decrease
- slst: slip stitch
- BO: bobble stitch (6 loops on the hook)
- BLO: back loop only
- x: times to repeat
Legs and Feet – Make 4
In secondary colour.
- R1. 8 sc in MR (8)
- R2. hdc, inc, dc, inc, trc inc, ch 3, in next st 2 slst, ch 3, trc inc, dc, inc, hdc, inc, sc inc (22)
Each stitch in the next round is worked in the BLO
- R3. BLO 8 sc, 2 dec, 10 sc (20)
- R4. dec around (10)
- R5-7. sc around (3 rounds)
You may need to sew the gaps where the chain stitches are in the feet when stuffing.
Belly
In primary colour.
- R1. 10 sc in MR (10)
- R2. 10 inc (20)
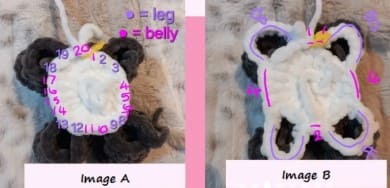
We will now crochet through both the legs and the belly; the steps underlined is when you crochet through the belly and the legs.
- R3. 1 sc, 2 sc, 4 sc, 2 sc, 2 sc, 2 sc, 4 sc, 2 sc, 1 sc (20)
(See image A)
We will now crochet around the outside of the legs and the body (the underlined is the stitches on the legs)
- R4. 1 sc, 8 sc, 4 sc, 8 sc, 2 sc, 8 sc, 4 sc, 8 sc, 1 sc (44)
(See image B)
To make sure all the hooves are facing forward, attach the legs to the body in R3.
- Front left: stitches 3 & 2
- Back left: stitches 6 & 5
- Back right: stitches 8 & 7
- Front right: stitches 10 & 9
This is where you should decide if you would like the bobble stitch effect on your sheep’s body or the surface crochet effect.
Continue Body for Bobble Stitch Effect
- R5. *BO, 1 sc, BO, inc* x11 (55)
- R6. *1 sc, BO, 1 sc, BO, 1 sc* x11 (55)
- R7. *BO, 1 sc, BO, 1 sc, BO* x11 (55)
- R8. *1 sc, BO, 1 sc, BO, 1 sc* x11 (55)
- R9. *BO, 1 sc, BO, 1 sc, BO* x11 (55)
- R10. *1 sc, BO, 1 sc, BO, 1 sc* x11 (55)
- R11. *BO, 1 sc, BO, 1 sc, BO* x11 (55)
- R12. *BO, 1 sc, BO, dec* x11 (44)
R13. *1 sc, BO, dec* x11 (33) - Begin stuffing the legs and the body.
R14. *BO, dec* x11 (22) - finish stuffing.
- R15. dec around (11)
- R16. 5 dec, 1 sc (6)
FO.
Continued Body for Surface Crochet Body
- R5. *3 sc, inc* x11 (55)
- R6-12. sc around (7 rounds)
- R13. *3 sc, dec* x11 (44) - begin stuffing the legs and the body.
- R14. *2 sc, dec* x11 (33)
- R15. *1 sc, dec* x11 (22) - finish stuffing.
- R16. dec around (11)
- R17. 5 sc, 1 sc (6)
FO.
Head
In secondary colour.
- R1. 8 sc in MR (8)
- R2. 8 inc (16)
- R3. *1 sc, inc* x8 (24)
- R4-6. sc around (3 rounds)
- R7. 1 sc, 7 inc, 16 sc (31)
- R8. 1 sc, *sc, inc* x7, 16 sc (38)
- R9-11. sc around (3 rounds)
Attach eyes between round 8 & 9, 11 visible stitches apart.
- R12. *17 sc, dec* x2 (36)
- R13. *4 sc, dec* x6 (30)
- R14. *3 sc, dec* x6 (24)
- R15. *2 sc, dec* x6 (18)
- R16. *1 sc, dec* x6 (12)
- R17. dec around (6)
FO, leaving a long tail for sewing.
Ears – Make 2
In secondary colour.
- R1. 4 sc in MR (4)
- R2. *1 sc, inc* x2 (6)
- R3. sc around (6)
- R4. *2 sc, inc* x2 (8)
- R5. *1 sc, inc* x4 (12)
- R6-9. sc around (4 rounds)
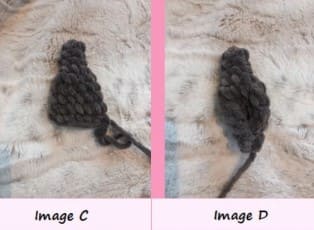
FO, leaving a long tail for sewing. Fold in half and sc along the bottom of the last round, fold in half again and with your needle sew together the sides of the last 3 rows, see images C & D.
FO, leaving a long tail for sewing.
Tail
In secondary colour.
- R1. 6 sc in MR
- R2. inc around (12)
- R3-6. sc around (4 rounds)
Fold in half and sew the bottom, FO.
Surface Crochet Body
To add the ruffles to the body, slst and pull a loop, slst in the next stitch, repeat this method all around the body. I like to do 3 rows on the side and then work in a circle towards the top.
Assembly
- Sew on head.
- Sew on ears.
- Using the surface crochet method above, add on the ruffles (optional) for surface crochet body only.
- Using the surface crochet method above, add on the fringe (optional).
- Sew on the tail.
