Crochet Twisted Loop Scarf

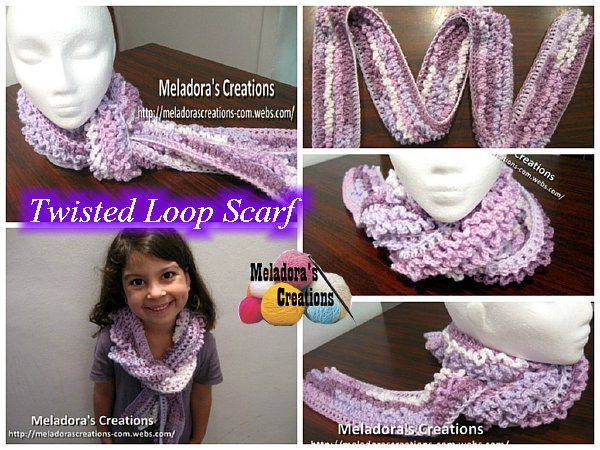
The Crochet Twisted Loop Scarf is such a fun and stylish accessory to add to your wardrobe! This cozy scarf features a unique twisted loop design that adds a modern twist to any outfit. Whether you're heading out for a casual coffee date or a day of running errands, this scarf is sure to keep you warm and looking effortlessly chic. The best part is, you can customize it with your favorite colors and yarns to make it truly unique to your personal style. So grab your crochet hook and get ready to create a trendy accessory that will elevate your winter fashion game!
Ingredients
For this project, you will need:
- HOOK: 5 mm hook or size H hook for the US
- YARN: worsted weight yarn, 4 ply US, 10 ply AU – 100 grams / 3.5 oz – 210 meters / 230 yards
Abbreviations
- ch = Chain
- sl st = Slip Stitch
- st = Stitch
- DC = Double Crochet
- Sc dec = Single Crochet Decrease
- * = Repeat what’s in between * for the rest of the row
Scarf Dimensions
The scarf shown above is 8 cms / 3 inches wide and is done with alternating twisted loops on both sides of the scarf.
Instructions to Start
To start, ch 150.
Rows for Width
Rows 1 – to desired width (DC rows):
DC into the third ch from the hook (the ch 2 will not count as a stitch). *DC in all sts,* ch 1 and turn your work. Pull up to elongate your loop before starting your first DC of row 2 (the ch 1 & elongated loop does not count as a stitch; it’s just a step up).
Row 2
DC into the first stitch of row. *DC in all sts,* ch 1 and turn your work. Pull up to elongate your loop before starting row 3.
DC as many rows as you wish until you get your desired width. For a skinny scarf, 4 rows are recommended if you are making one for a child, and 6 for a wide adult scarf. The number of rows is up to you; just keep it an even number of rows. The first and last row of DC’s will not be worked to leave you a nice border on the scarf.
Preparing for Twisted Loop Stitch
When you're ready, ch one and cut your yarn. Now we will be doing the twisted loop stitch. You can change colors now to make your ruffles stand out more. If you're using variegated yarn, you could use the same color; it’s up to you. If you're making the scarf for a child and would like to make a thicker scarf, I recommend only doing 6 rows and adding the twisted loop stitch on two rows of each side, so that it’s not too heavy for the child. However, recommend sticking to 4 rows for a child.
Row 1 of Twisted Loop Stitch
Skip the first row of DC’s to leave yourself a border on this side of the scarf. Go into the 2nd row of DC’s. Start by slip stitching onto the second DC post of the row and ch 7, sl st onto the post of the following DC. *Ch 7 again and sl st onto the following post of the next DC,* and repeat until the last DC of the row, which will not be worked either. When you get to the end of the row, ch 1 and cut your yarn, leaving a tail to be worked in later.
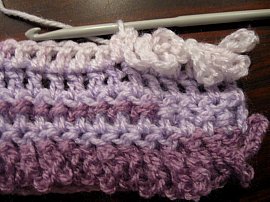
Repeat row 1 until you have all of your rows completed, except for the first and last rows, leaving a border.
Completing the Second Side
When you’re finished with one side and you’re ready to do the back side, work the twisted stitch as follows:
To do the rows in between, attach your yarn as you did before, only now you will be working above the sl st connections you made from the other side.
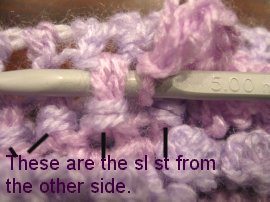
Repeat until you have the desired number of rows completed on this side.
Evening Out the Scarf
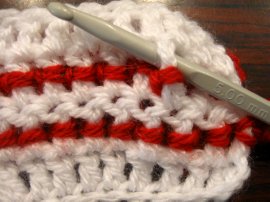
You might have noticed that the chain part of your scarf is tighter than the DC side. To even this up, attach your yarn on the looser DC side and *sc 1, sc dec,* repeat for the row. Cut yarn leaving a tail long enough to be worked in with a tapestry needle.
Other Color Options
Or alternate the colors on the base row and then alternate the color of the ruffles. The back looks cool as well, so you don’t have to add ruffles on one side if you don’t want to.
Change colors every row if you like!