Crochet Bitty Bunny: A Step-By-Step Guide

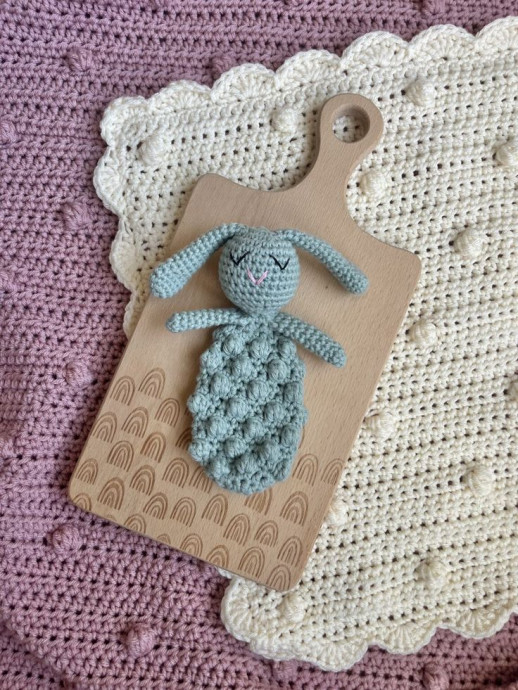
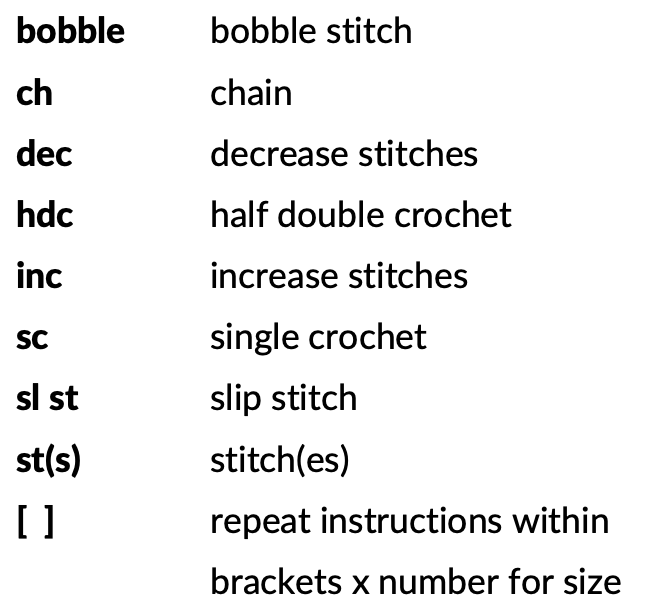
The Crochet Bitty Bunny is an adorable little project that will bring a smile to your face! This charming bunny pattern is perfect for beginners and seasoned crocheters alike. With its cute floppy ears and fluffy tail, the Bitty Bunny is sure to become a favorite in your collection. Whether you're making it as a gift for a friend or just want to add a touch of whimsy to your décor, this bunny is guaranteed to add a friendly and cozy vibe to any space. So grab your crochet hook and yarn, and let's get started on this delightful project!
Materials Needed
Materials Needed Include:
For Size 4 Cotton/Acrylic Yarn:
- 2.75 mm • US size C
- 4.0 mm • US size G
For Bulkier Yarn (Parfait Chunky):
- 4.0 mm • US size G
- 5.0 mm • US size H
Yarn Types
YARN: [I’ve used WeCrochet Comfy or Dishie//Hobby Lobby ILTY Cotton and Big Twist Baby Bear//Premier Parfait Chunky for this project]
- Weight: Worsted
- WeCrochet Comfy or Dishie
- ~ 80 yds in Main Color
Weight: Bulky
- WeCrochet Comfy Bulky
- Premier Parfait Chunky
- ~ 100 yds in Main Color
Notions
- Darning Needle
- Embroidery Thread
- Measuring Tape
- Polyfil Stuffing
- Rattle Insert (if desired)
- Scissors
- Stitch Marker (if desired)
Gauge
Exact gauge is not necessary for this project.
Final Height
~7.5 // 10 inches from top to bottom
Special Stitches
Bobble Stitch (bobble):
To make a bobble stitch you will work multiple double crochets into the same stitch.
To begin, yarn over and insert hook into the stitch. Yarn over and draw up a loop. This leaves three loops on your hook. Yarn over and pull through the first two loops (two loops left on hook).
Yarn over, insert hook into the stitch. Yarn over and draw up a loop, leaving four loops on your hook. Yarn over and pull through the first two loops (three loops left on hook).
Yarn over, insert hook into the stitch. Yarn over and draw up a loop, leaving five loops on your hook. Yarn over and pull through the first two loops (four loops left on hook).
Yarn over, insert hook into the stitch. Yarn over and draw up a loop, leaving six loops on your hook. Yarn over and pull through the first two loops (five loops left on hook).
Yarn over and pull through the five loops on the hook. Pull stitch tightly and it will create a bobble. You can choose to make the bobbles on the right or the wrong side of your project, just make sure they are on the outside of the body when finished.
Decrease Stitches (dec):
To decrease stitches, you will sc or hdc 2 stitches together.
Increase Stitches (inc):
To increase stitches, you will sc or hdc 2 stitches into the same spot.
Pattern
Making the Ears: (Make Two)
You will use a 2.75 mm hook for size 4 yarn or a 4.0 mm hook for bulkier yarn. Make TWO ears.
- Round 1: To begin, make a magic circle. Place 6 sc in the magic circle. [6] Do not join. You will continue to work in the round.
- Round 2: Place 2 sts in each st around [12]
- Rounds 3-5: sc x 12 around. [12] (36 total stitches)
- Round 6: [dec, sc x 2] x 3 [9]
- Rounds 7-16: sc x 9 [9] (90 total stitches)
- Round 17: dec, sc x 7 [8]
- Round 18: Leave the ears unstuffed. Pinch the top of the ear together and place 4 sc through each side in order to close off the ear. Leaving a long tail, cut yarn and tie off. You will use the tail to sew the ear to the bunny head. Set aside until assembly.
Making the Arms: (Make Two)
You will use a 4.00 mm hook for size 4 yarn or a 5.0 mm hook for bulkier yarn. Make TWO arms.
- Round 1: To begin, make a magic circle. Place 6 sc in the magic circle. [6] Do not join. You will continue to work in the round.
- Rounds 2-11: sc x 6 around [6] (60 total stitches)
- Round 12: You will leave the arms unstuffed. Pinch the top of the arm together and place 3 sc through each side in order to close off the arm. Cut yarn, tie off and weave in ends. You will use the crochet arms into the body.
Making the Head
Next you will make the head of the bunny. You will use a 4.0 mm hook for size 4 yarn or a 5.0 mm hook for size 5/6 yarn. If you crochet loosely, you may wish to size down slightly for the head of the bunny so that you don’t have holes in your work that allow the stuffing to show through. The eyes of the bunny will be embroidered so the pattern does NOT note to stop and add safety eyes. If you prefer to use safety eyes, you will need to add facial features before closing the head.
- Round 1: To begin, make a magic circle. Place 6 sc in the magic circle. [6] Do not join. You will continue to work in the round.
- Round 2: [inc] x 6 around. [12]
- Round 3: [inc, sc] x 6 around. [18]
- Round 4: [inc, sc x 2] x 6 around. [24]
- Round 5: [inc, sc x 3] x 6 around. [30]
- Rounds 6-11: sc x 30 around. [30]
- Round 12: [dec, sc x 3] x 6 around. [24]
- *Stop here and begin stuffing head firmly.
- Round 13: [dec, sc x 2] x 6 around. [18]
- Round 14: [dec, sc] x 6 around. [12]
- Round 15: [dec] in each st around. [6]
Leaving a bit of a tail, cut yarn and tie off. Thread a needle and sew under the front loop of each remaining stitch. Cinch tightly together to close the head. Tie off and weave in the ends.
Making the Body
You will use a 4.0 mm hook for size 4 yarn or a 5.0 mm hook for size 5 yarn. If you use a bulkier weight yarn, you will want to size up to an even larger hook. I don’t recommend super bulky yarn as the bobbles end up kind of bulky and close together, but you may find something that works with a large hook size!
Stitch counts are included at the end of each round. Bobble rows include [total # stitches, # bobble stitches]. You will not join at the end of each row. You will continue to work in the round.
For rounds with increases and decreases, they will always be done with a hdc stitch, not a sc stitch. sc stitch will only be used on rounds that also have bobbles.
- Round 1: To begin, make a magic circle. Place 6 hdc stitches in the magic circle. [6]
- Do not join. You will continue to work in the round.
- Round 2: [inc] x 6 around. [12]
- Round 3: [inc, hdc] around. [18]
- Round 4: [sc x 2, bobble] x 6. [18, 6 bobbles]
- Round 5: [inc, hdc x 2] around. [24]
- Round 6: sc x 2, bobble, [sc x 3, bobble] x 5, sc. [24, 6 bobbles]
- Round 7: hdc x 24 around. [24]
- Round 8: sc, [bobble, sc x 3] x 5, bobble, sc x 2. [24, 6 bobbles]
- Round 9: hdc x 24 around. [24]
- Round 10: [bobble, sc x 3] x 6. [24, 6 bobbles]
- Round 11: hdc x 24 around. [24]
- Round 12: [sc x 3, bobble] x 6. [24, 6 bobbles]
- Round 13: hdc x 24 around. [24]
- Round 14: sc x 2, bobble, [sc x 3, bobble] x 5, sc. [24, 6 bobbles]
- Round 15: [hdc x 2, dec] x 6. [18]
- Round 16: sc, [bobble, sc x 2] x 5, bobble, sc. [18, 6 bobbles]
- Round 17: hdc x 18 around. [18]
- Round 18: [hdc, dec] x 6. [12]
At this point, you will add the arms to your bunny to avoid having to sew them in later. The arms should be closed (as written in Part One) with three stitches across.
Add in arms as below:
- Round 19: sc x 3. For the next three stitches, place your first arm on the outside of the body and sc x 3 through both the arm and the stitches of the neck. This will attach your first arm.
- sc x 2. For the next three stitches, place your second arm on the outside of the body and sc x 3 through both the arm and the stitches of the neck. This will attach your second arm. sc x 1 to finish the round.
- Round 20: [dec, sc x 2] x 3. [9]
- Slip stitch to first stitch and then, leaving a long tail, cut yarn and tie off. You will use this tail to attach the head to your body, so be sure to leave a long enough tail.
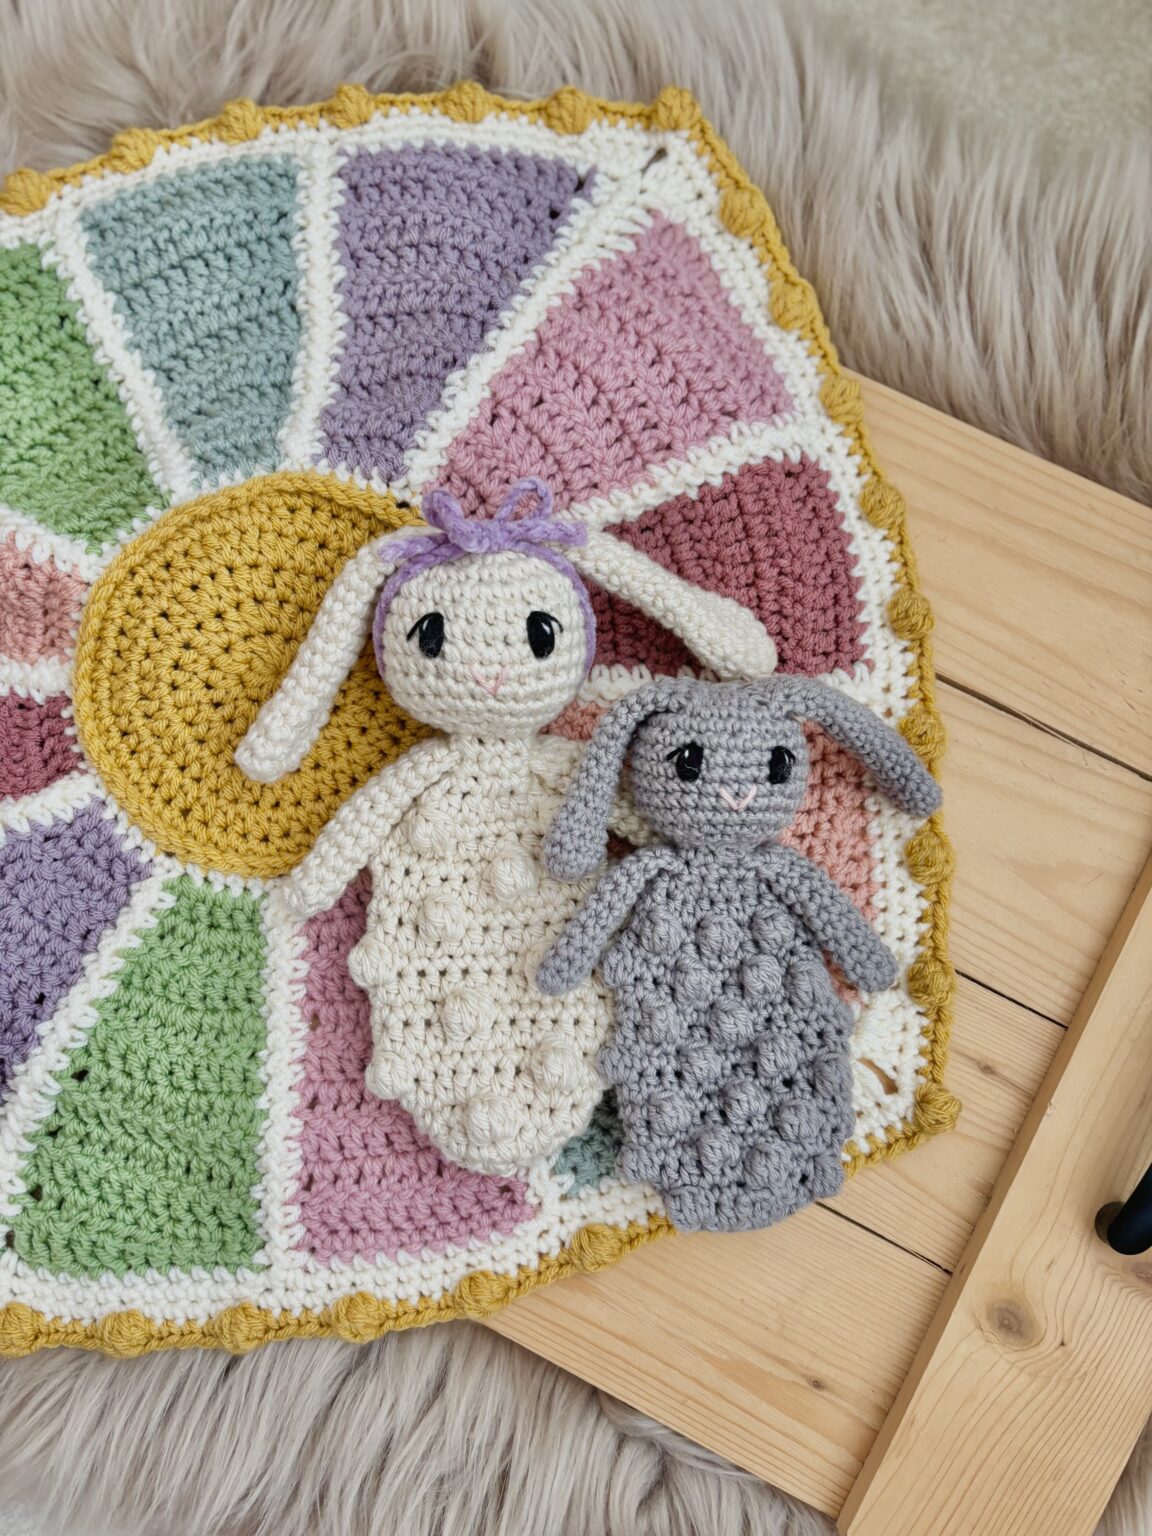
Assembly
You should now have the head finished and body with two attached arms. Next, we’ll attach the body to the head. I highly recommend using pins to make sure the head is sewn on straight and centered to the body. In a circular fashion, pin the opening of the body around the bottom of the head. There are nine stitches around the top of the body. Aim to pin the top of the body between rounds 14-15 on the bottom of the head. Carefully stitch through the body and head to attach. I prefer starting from the back of the body/head and moving around the front. I like to stitch around the head twice to make sure it is securely fashioned.
Adding the Features
Now that the head and body are attached, we will go back to add the features to the head. If preferred, you can add these features before assembling. Adding after assembly makes it easier to make sure the features are centered. If you are using safety eyes, you will need to add the features before assembly so that you are able to close up the head. Follow the same embroidery instructions below for placement of the safety eyes.
Embroider the eyes at row 7 from the top of the head. I like to make a simple V stitch across the row and leave 4-5 stitches in between the eyes. You can also use black and white embroidery thread to embroider true-looking eyes for your bunny. Add the ears on either side at the top of the head. Place the ear about 2 rows down from the top of the head.
To add the nose, thread an embroidery needle with colored embroidery thread. You will be using the needle and yarn to make a “v” shape that will be filled in to make the nose.
Push your needle up through a stitch at the bottom of row 9, centered between the eyes. Working at a diagonal, go up 1-2 rows and place your needle back through the head. Pull straight across the top leaving three stitches between and push your needle back up. Now, pull across diagonally back to the spot you first came through and place your needle back through the center. This should create a “v” shape.
If desired, you can fill in the “v” stitching in an up and down motion to fill in the space across the top. You can also just leave it as a simple v-stitch if you’d like!
