Crochet Ferris Bunny Doll: A Whimsical Creation for All Ages

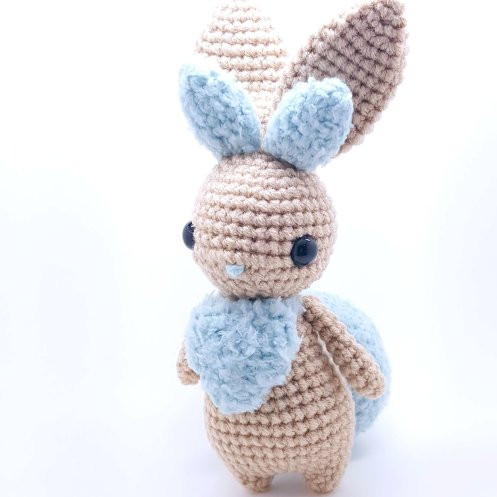
The Crochet Ferris Bunny Doll is an adorable and whimsical creation that brings joy to anyone who lays eyes on it. With its fluffy yarn, charming details, and lovingly crafted design, this bunny doll is sure to become a cherished companion for playtime or display. Whether you're a seasoned crocheter looking for a fun project or someone searching for a unique gift, the Crochet Ferris Bunny Doll is a delightful choice that will bring smiles and warmth to any heart.
Materials
To create your own Crochet Ferris Bunny Doll, gather the following materials:
- 2.25mm/B crochet hook
- Red Heart Super Saver (a ‘stiffer’ yarn works best to hold its shape) – Main color
- Yarn Bee Cloud 9 or a fluffy/fur yarn
- Lightweight yarn that matches the color of your fur yarn – used together, Fluff color
- Stitch marker
- Yarn needle
- Fiberfill
- 12 mm safety eyes
Abbreviations
Familiarize yourself with these common crochet abbreviations:
- MC = magic circle
- RND = round
- Sc = single crochet
- Sc rnd = sc in each st of the round
- Inc = increase
- Dec = decrease
- Sl st = slip stitch
- Sts = stitches in reference to amount at the end of the rnd
- […] = repeat instructions within brackets as specified
Techniques
To successfully create the Crochet Ferris Bunny Doll, it is important to master the following techniques:
Magic Circle
Essential to the start of most amigurumi.
Invisible Decrease
This technique is good for preventing gaps and giving a more uniform look to your single crochets.
Working in Front Lobes
In my patterns, I always work single crochets in the front loops of the stitch unless otherwise specified. By working in only the front loops, the single crochets will stack up straighter than if you worked them in both loops.
Stitch Markers
I use a stitch marker (bobby pin) for keeping track of the beginning of my rounds. I place it in the first stitch of the round.
Staggered Rounds
Staggered rounds offset the patterns' increases or decreases, so you don’t get that pinwheel look, and it is more of a circle than a hexagon. For example, [4 sc, inc] x6 is an even increase round that can be staggered, becoming 2 sc, inc, [4 sc, inc] x5, 2 sc. This way, the even single crochets are split at the beginning of the round.
Close
Closing a piece involves threading your yarn needle with the yarn end and putting it through each of the front loops of the last round's single crochets (usually 6), pulling tight. It should look like a mini magic circle, then put the needle through the center of it and out through the piece. Tie your knot and stuff the ends back into the piece.
Whip Stitch
This usually means the finished piece is folded flat with the last single crochet or yarn end at the edge of the piece. Thread the yarn needle with the yarn end, and again using only the front loops, ‘zigzag’ or whip stitch the opening closed.
Pattern
Body
The Ferris Bunny's pattern starts with making the body, which is created from the legs up. The first two rounds are for the legs, therefore you will be making two of them and joining them together to get the body started.
In main color:
- RND 1: 6 sc in MC (6 sts)
- RND 2: [sc, inc] x3 (9 sts)
Make two of these, and don’t cut the yarn of the second leg. Instead, chain 3 and join to the first leg with a sl st. Sc in the same st as the sl st; this will be the first sc of the round. Continue with eight more sc’s around the first leg, three sc’s across the chain, nine sc’s around the second leg, and three sc’s across the other side of the chain, totaling 24 sc’s around. (24 sts)
- RND 3: [3sc, inc] x6 (30 sts)
- RND 4: Sc rnd (30 sts)
- RND 5: 2 sc, inc, [4sc, inc] x5, 2 sc (36 sts)
- RND 6-10: Five sc rnds (36 sts)
- RND 11: 2 sc, dec, [4sc, dec] x5, 2 sc (30 sts)
- RND 12-13: Two sc rnds (30 sts)
- RND 14: [3sc, dec] x6 (24 sts)
- RND 15-16: Two sc rnds (24 sts)
- RND 17: sc, dec, [2sc, dec] x5, sc (18 sts)
- RND 18: Sc rnd (18 sts)
Stuff the body and leave a length of yarn for tying in later. Set aside.
Head
The Ferris Bunny's head is a separate piece from the body. This separation allows for a better shape for the head. If continued after the body, the head can become very balloon-like, which isn’t the desired shape.
In main color:
- RND 1: 6 sc in MC (6 sts)
- RND 2: 6 inc (12 sts)
- RND 3: [sc, inc] x6 (18 sts)
- RND 4: sc, inc, [2sc, inc] x5, sc (24 sts)
- RND 5: [3sc, inc] x6 (30 sts)
- RND 6: 2 sc, inc, [4sc, inc] x5, 2 sc (36 sts)
- RND 7-10: Four sc rnds (36 sts)
- RND 11: 15sc, 6 inc, 15sc (40 sts)
- RND 12: 15sc, 6 dec, 15sc (36 sts)
- RND 13: 2 sc, dec, [4sc, dec] x5, 2 sc (30 sts)
- RND 14: [3sc, dec] x6 (24 sts)
- RND 15: sc, dec, [2sc, dec] x5, sc (18 sts)
Place eyes between RNDs 10 and 11, nine sts apart. Leave a length of yarn for attaching to the body; both head and body should end in 18 sts for a proper fit. Fill any empty space between the head and body with fiberfill as you go. Tie in both the head’s and body’s yarn ends.
Chest Fluff
The chest fluff goes around Ferris’s neck and is created using Yarn Bee Cloud 9 (or your equivalent) and a lightweight yarn (I used Baby Bee Sweet Delight) together. Use the same size hook, 2.25mm.
In fluff color:
- RND 1: 6 sc in MC (6 sts)
- RND 2: [sc, inc] x3 (9 sts)
- RND 3: sc, inc, [2sc, inc] x2, sc (12 sts)
- RND 4: [sc, inc] x6 (18 sts)
- RND 5: sc, inc, [2sc, inc] x5, sc (24 sts)
- RND 6-7: Two sc rnds (24 sts)
- RND 8: sc, dec, [2sc, dec] x5, sc (18 sts)
No need to stuff. Leave a length of yarn for attaching to the body along the neckline and tie in the yarn end.
Arms x2
Returning to the main color, create Ferris’s arms.
In main color:
- RND 1: 6 sc in MC (6 sts)
- RND 2: [sc, inc] x3 (9 sts)
- RND 3-5: Three sc rnds (9 sts)
- RND 6: [sc, dec] x3 (6 sts)
- RND 7-9: Three sc rnds
No need to stuff the arms. Leave a length of yarn for attaching to the body at RND 17, keeping about one stitch between the fluff and arm. Tie in the yarn end.
Ears x2
Ferris's ears consist of two parts: the main ear in the main color and the ear fluff in fluff color. The two parts are sewn onto the head separately.
In main color:
- RND 1: 6 sc in MC (6 sts)
- RND 2: [sc, inc] x3 (9 sts)
- RND 3: sc, inc, [2sc, inc] x2, sc (12 sts)
- RND 4: [3sc, inc] x3 (15 sts)
- RND 5: 2 sc, inc, [4sc, inc] x2, 2 sc (18 sts)
- RND 6-11: Six sc rnds (18 sts)
- RND 12: 2 sc, dec, [4sc, dec] x2, 2 sc (15 sts)
- RND 13: [3sc, dec] x3 (12 sts)
- RND 14: sc, dec, [2sc, dec] x2, sc (9 sts)
Leave a length of yarn for attaching to the top of the head, starting at RND 1 of the head (magic circle) and sew down. Tie in yarn ends.
Ear Fluff x2
In fluff color:
- RND 1: 6 sc in MC (6 sts)
- RND 2: [sc, inc] x3 (9 sts)
- RND 3: sc, inc, [2sc, inc] x2, sc (12 sts)
- RND 4-7: Three sc rnds (12 sts)
- RND 8: sc, dec, [2sc, dec] x2, sc (9 sts)
Leave a length of yarn for attaching on top of the head in front of the ears, keeping it within the same space as the ears, which might require sewing through the same stitch of the head multiple times. Tie in yarn ends.
Tail
Now for the giant tail!
In fluff color:
- RND 1: 6 sc in MC (6 sts)
- RND 2: 6 inc (12 sts)
- RND 3: [sc, inc] x6 (18 sts)
- RND 4: sc, inc, [2sc, inc] x5, sc (24 sts)
- RND 5: [3sc, inc] x6 (30 sts)
- RND 6: 2 sc, inc, [4sc, inc] x5, 2 sc (36 sts)
- RND 7: [5sc, inc] x6 (42 sts)
- RND 8: 3 sc, inc, [6sc, inc] x5, 3 sc (48 sts)
- RND 9-10: Two sc rnds (48 sts)
- RND 11: 3 sc, dec, [6sc, dec] x5, 3 sc (42 sts)
- RND 12: [5sc, dec] x6 (36 sts)
- RND 13: 2 sc, dec, [4sc, dec] x5, 2 sc (30 sts)
- RND 14: [3sc, dec] x6 (24 sts)
- RND 15: sc, dec, [2sc, dec] x5, sc (18 sts)
- RND 16: [sc, dec] x6 (12 sts)
Stuff and leave a length of yarn for attaching to the body. To ensure the bunny doll stands, the tail needs to be parallel to its legs. Start between RNDs 8 and 9 of the body (at its center) and slowly work your way around. This will be the hardest to sew on, so take your time and check to ensure your bunny doll can properly stand with its tail. Tie in yarn end.
Nose
First, thread some of the lightweight yarn. The nose is worked in between RNDs 11 and 12 at the center of the face.
Optional: Blush. Instead of pulling the needle through anywhere, try pulling through near the bottom of one of the eyes. Create a horizontal stitch over one stitch on the head, then pull the needle back through to the other eye and repeat.
And tah-dah! Your bunny doll is complete!