Crafting Adorable Baby Dolls through Crochet

Crocheting adorable baby dolls is such a heartwarming and delightful hobby! Creating these cute little companions allows you to pour your creativity into every stitch, resulting in a one-of-a-kind toy that is sure to bring joy to both children and adults alike. From choosing the perfect yarn colors to meticulously crafting the tiniest details like their tiny shoes and button eyes, each step in the crochet process is filled with love and attention. The satisfaction of holding the finished baby doll in your hands, knowing that you've made something so special and charming, is truly a rewarding experience. So, gather your favorite crochet hooks and cozy up with some soft yarn to bring your own adorable baby doll to life!
Materials Needed
Before you start, make sure to gather the following materials:
- Worsted weight yarn in various colors
- Crochet hooks (F hook recommended)
- Stuffing material
- Embroidery thread
- Safety eyes
- Black felt
- Fabric glue (optional)
Head Instructions
With any skin-tone worsted weight yarn and an F hook:
- Sc6 in a circle
- Sc twice into each st (12 sts)
- Sc1, sc twice into next st around (18 sts)
- Sc2, sc twice into next st around (24 sts)
- Sc3, sc twice into next st around (30 sts)
- Sc4, sc twice into next st around (36 sts)
- Sc around for 10 rounds
-Embroider and insert safety eyes. Don’t forget the little curl of hair!-
- Sc4, sc2tog around (30 sts)
- Sc3, sc2tog around (24 sts)
- Sc2, sc2tog around (18 sts)
- Sc1, sc2tog around (12 sts)
- Stuff firmly and leave a long tail
Ears Instructions
(Make 2)
- Ch4, sc into second loop from hook, sc 3 times in next st, sc in final st (5)
- Ch1, turn. Sc across, and then continue around and sc into backs of the first row’s sts (8)
- Sl st into the last row to form an even oval, cut thread and tie tight.
Body Instructions
In pink yarn:
- Sc6 in a circle
- Sc twice into each st
- Sc1, sc twice into next st around (18 sts)
- Sc2, sc twice into next st around (24 sts)
- Sc around
- Sc3, sc twice into next st around (30 sts)
- Sc around for 5 rounds
- Sc3, sc2tog around (24 sts)
- Sc around for 2 rounds
- Sc2, sc2tog around (18 sts)
- Sc1, sc2tog around (12 sts)
- Break yarn and tie off
Feet Instructions
(Make 2)
- Sc3 in a circle
- Sc twice into each st (6 sts)
- Sc1, sc twice into next st (9 sts)
- Sc2, sc twice into next st around (12 sts)
- Sc around for 2 rounds
- -Insert stuffing-
- Sc2tog around (6 sts)
- Sc around
- Break yarn and leave a 6 inch long tail to sew with
Arms Instructions
(Make 2)
- Starting with the skin-colored yarn, Sc6 in a circle
- Sc around for 2 rounds
- -Switch to pink yarn-
- Sc around for 4 rounds
- Break yarn and leave a 6 inch long tail to sew with
Bib Instructions
In white yarn:
- Sc5 in a circle
- Sc twice into each st (10 sts)
- Sc1, sc twice into next st around (15 sts)
- Sc2, sc twice into next st 3 times (18 sts)
- Turn, ch1, sc 14
- Break yarn. Whip out your red yarn, and attach that to one of the top corners.
- Sc into each st all the way around, sl st into the corner that you started in, ch 18, sl st into the opposite corner, forming a loop (It should look like a little necklace.)
- Break yarn and weave in ends.
Assembly Instructions
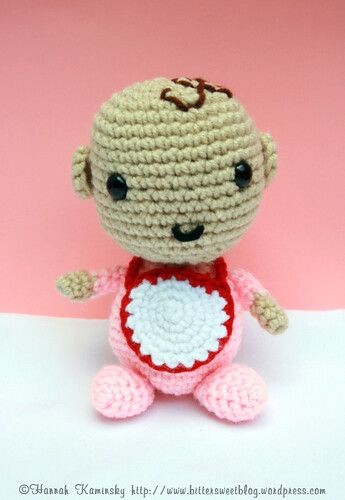
Positioning the bib on the body so that the loop goes around the opening up top, sew on the head. Done correctly, this should prevent the bib from ever coming off (as long as the baby keeps its head together!) Cut a smile out of black felt and either stitch or use fabric glue to adhere it to the face. Everything else is very straightforward; sew on the ears, arms, and feet as indicated by the photos.
Take care of your new bundle of joy!