How to Crochet Adorable Bunnies: A Crafting Guide

Crochet bunnies are the epitome of cuteness and charm! With their fluffy ears and adorable little tails, these handmade creations can bring a smile to anyone's face. Whether you're making them as a gift for a loved one or as a delightful addition to your own collection, crocheting bunnies is a fun and rewarding craft. Not only are they fun to create, but they also make lovely decorations for Easter or baby showers. The best part? You can customize your crochet bunny with different colors and embellishments to give them their own unique personality. So, grab your yarn and hook, and let your creativity hop to life with a charming crochet bunny!
Supplies
- 3mm Crochet Hook
- Worsted Weight Yarn
- 8mm Safety Eyes
- Polyester Stuffing
- Felt
- Crochet Thread
- Scissors
- Needle
Abbreviations
- Ch - Chain
- Sc - Single Crochet
- Inc - Increase
- Invdec - Invisible Decrease
- Fo - Fasten Off
Finished Size
9 Inches
Head and Body
- Rd1: Starting at the top of your doll's head sc x 6 in an adjustable ring (6)
- Rd2: Inc x 6 (12)
- Rd3: Inc x 12 (24)
- Rd4-5: Sc x 24 (24)
- Rd6: [Sc, inc] x 12 (36)
- Rd7-15: Sc x 36 (36)
- Rd16: Invdec x 18 (18), from this point on stuff your work firmly as you work. And insert your safety eyes nine rows down and six stitches apart.
- Rd17: Invdec x 9 (9)
- Rd18: Sc x 9 (9)
- Rd19: Inc x 9 (18)
- Rd20: [Sc x 2, inc] x 6 (24)
- Rd21-30: Sc x 24 (24)
- Rd31: Invdec x 12 (12)
- Rd32: Invdec x 6 (6)
- Rd33: Indec x 3 (3), fo and weave in end.
Arm (Make 2)
- Rd1: Sc x 6 in an adjustable ring (6)
- Rd2-5: Sc x 6 (6), leave a long tail and fo.
Leg (Make 2)
- Rd1: Sc x 7 in an adjustable ring (7)
- Rd2-7: Sc x 7 (7)
- Rd8: Sc x 3, invdec, sc x 2 (6)
- Rd9-13: Sc x 6 (6)
- Rd14: Sc x 2, invdec, sc x 2 (5)
- Rd15-16: Sc x 5 (5), leave a long tail and fo.
Ear (Make 2)
- Rd1: Sc x 6 in an adjustable ring (6)
- Rd2: Inc x 6 (12)
- Rd3: Inc x 12 (24)
- Rd4: Inc x 24 (48)
- Rd5-7: Sc x 48 (48)
- Rd8: [Sc x 2, invdec] x 12 (36)
- Rd9: Sc x 36 (36)
- Rd10: [Sc x 3, invdec] x 7, sc (29)
- Rd11-12: Sc x 29 (29)
- Rd13: [Sc x 3, invdec] x 5, sc x 4 (24)
- Rd14-15: Sc x 24 (24)
- Rd16: Invdec x 12 (12)
- Rd17-23: Sc x 12 (12)
- Rd24: Sc x 6, invdec, sc x 4 (11)
- Rd25-30: Sc x 11 (11)
- Rd31: Sc x 6, invdec, sc x 3 (10)
- Rd32-34: Sc x 10 (10)
- Rd35: Sc x 4, invdec, sc x 4 (9)
- Rd36-40: Sc x 9 (9)
- Rd41: Sc x 3, invdec, sc x 4 (8)
- Rd42-45: Sc x 8 (8), leave a long tail and fo.
Assembly
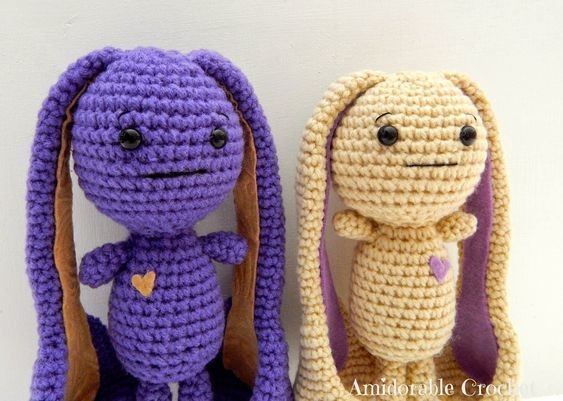
Stuff your Bunny's arms and legs firmly and sew them on your doll. Do not stuff the ears; sew them on your Bunny. Then I like to add felt in the ears. Then embroider on a mouth. Weave in all your ends and trim them.