How to Crochet an Adorable Turtle

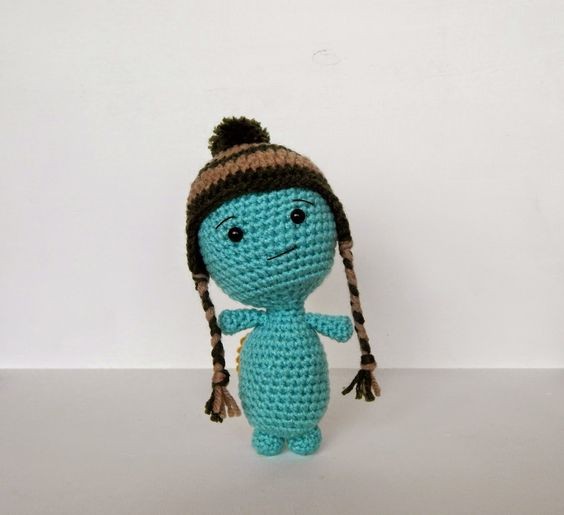
Crochet turtles are absolutely adorable! There is something so charming about a handmade turtle with its intricate shell and little flippers. Crafting a crochet turtle can be a delightful experience, as you get to choose the colors and details that make it uniquely yours. Whether you're a seasoned crocheter or just starting out, creating a crochet turtle can be a fun and rewarding project. Plus, once you finish making it, you'll have a cute little turtle friend to keep you company or to gift to someone special. So, grab your crochet hook and yarn, and let's dive into the whimsical world of crochet turtles!
Supplies
2.75mm Crochet Hook
Worsted Weight Yarn in Turquoise, Green, Orange and Tan
Crochet Thread in Black
Stuffing
8mm Safety Eyes
Scissors
Needle
Stitch Markers
Abbreviations
Ch - Chain
Sc - Single Crochet
Hdc - Half Double Crochet
Inc - Increase
Dec - Decrease
Fo - Fasten Off
Finished Size
8 inches
Head and Body
Rd1: Starting at the top of your dolls head with turquoise yarn sc x 5 in a ring (5)
Rd2: Inc x 5 (10)
Rd3: Inc x 10 (20)
Rd4: Inc x 20 (40)
Rd5-12: Sc x 40 (40)
Rd13: You will be marking in this round where you will be placing the eyes. Sc x 17, place a stitch marker in the last stitch, sc x 6, place a stitch marker in the last stitch, sc x 17 (40)
Rd14-20: Sc x 40 (40)
Rd21: Sc x 4, dec x 17, sc x 2 (23)
Rd22: Insert your eyes where you placed the stitch markers between Rd13 and Rd14. And from this point on stuff your doll firmly as you work. Sc x 3, dec x 8, sc x 4 (15)
Rd23: Sc x 3, dec x 5, sc x 2 (10)
Rd24-25: Sc x 10 (10)
Rd26: [Sc x inc] x 5 (15)
Rd27: [Sc, inc] x 7, sc (22)
Rd28: [Sc x 3, inc] x 5, sc x 2 (27)
Rd29: [Sc x 5, inc] x 4, sc x 3 (31)
Rd30-31: Sc x 31 (31)
Rd32: [Sc x 5, dec] x 4, sc x 3 (27)
Rd33-40: Sc x 27 (27)
Rd41: Dec x 13, sc (14)
Rd42: Dec x 7 (7)
Rd43: Dec x 3, fo and weave in end (3)
Leg (Make 2)
Rd1: Starting at the bottom of your leg with turquoise yarn sc x 5 in a ring (5)
Rd2: Inc x 5 (10)
Rd3-4: Sc x 10, fo at the end of Rd4 (10)
Arm (Make 2)
Rd1: Starting at the top of your arm with turquoise yarn sc x 6 in a ring (6)
Rd2-7: Sc x 6, fo at the end of Rd7 (6)
Shell
Rd1: Starting in the middle of the shell with orange yarn sc x 6 in a ring (6)
Rd2: Inc x 6 (12)
Rd3: Inc x 12 (24)
Rd4: Sc x 24 (24)
Rd5: [Sc x 4, inc] x 4, sc x 4 (28)
Rd6: Sc x 28 (28)
Rd7: Reverse sc x 28, fo (28)
Hat
Rd1: Starting at the top of hat with green yarn sc x 6 in a ring (6)
Rd2: [2hdc in next stitch] x 6 (12)
Rd3: [2hdc in next stitch] x 12 (24)
Rd4: Change to tan yarn hdc x 24 (24)
Rd5: [Hdc x 2, 2hdc in next stitch] x 8 (32)
Rd6: Change to green hdc x 32 (32)
Rd7: Hdc x 32 (32)
Rd8: Change to tan [hdc x 3, 2hdc in next stitch] x 8 (40)
Rd9: [Hdc x 4, 2hdc in next stitch] x 8 (48)
Rd10: Hdc x 48, fo (48)
First Ear Flap
Row1: Insert hook where you would like the first ear flap to start, pull up loop of green yarn and sc x 7 (7)
Row2: Turn, ch, sc x 7 (7)
Row3: Turn, ch, dec, sc x 3, dec (5)
Row 4: Turn, ch, dec, sc, dec, fo (3)
Second Ear Flap
Work this ear flap the same as the first ear flap. But do not fasten off at the end of Row 4, instead single crochet around the entire piece, fo and weave in end.
Assembly
Stuff the arms and legs and sew them onto your doll. Sew on eyebrows and a mouth. Add tassels onto your ear flaps, and make a pom pom for the top of your hat. Sew the shell onto your dolls back. Weave in all ends and trim them.