Crochet Pet Turtle Toy Tutorial

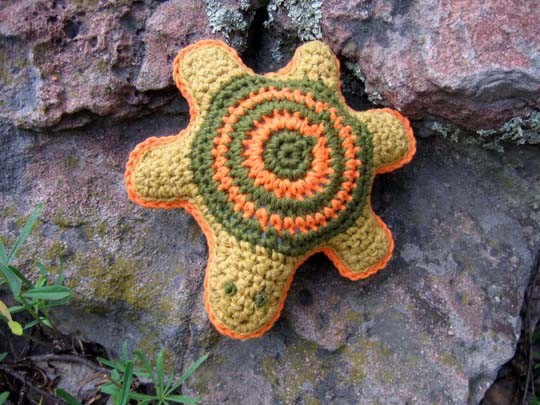
What a delightful and cuddly gift! A Crochet Pet Turtle Toy is a soft and adorable companion for any child to snuggle and play with. Made from soft, colorful yarn, this turtle can be customized with different textures, embellishments, and accessories to make it truly one-of-a-kind. The gentle rattle inside adds a soothing sound to stimulate little ears, while the sturdy construction ensures it can withstand plenty of hugs and snuggles. This handmade toy is perfect for imaginative play, storytelling, and sensory exploration, and will become a beloved friend for any child.
Skill Level
: IntermediateSize
: One size, approximately 6.5” wide by 8” longMaterials
:- Yarn: Worsted weight cotton
- Colors & Approx Yardage:
- #89 Camel, 75 yds (Main color (MC))
- #64 Olive, 50 yds (Color A)
- #52 Light Sage, 20 yds (Color B)
- #11 Sunburst, 30 yds (Color C)
- Hook: US G/6 (4.25 mm)
- Notions: Yarn needle, fiberfill stuffing; optional: 1 jingle bell
Gauge
: 16 sts and 16 rows = 4”/10 cm in single crochet on size G/6 (4.25 mm) hookPattern Notes
:The turtle is worked in two pieces beginning with the circular shell body. The head, legs, and tail are attached by working back and forth in rows. Upper and lower body pieces are slip stitched together, with stuffing inserted before closure. Yarn ends can be left hanging to be worked over and stuffed inside when pieces are joined. For child and pet safety, eyes are embroidered.
Stitches Used
:- Chain (ch)
- Slip Stitch (sl st)
- Single Crochet (sc)
- Single Crochet two (three) together (sc2(3)tog)
Special Techniques
:Magic loop beginning ring: wind yarn around finger once, hold the circle of yarn as you insert the hook into it, yo and pull the loop through, ch 1, work the first round over strands of the circle. After the first two rounds are complete, pull on the yarn tail gently to close the center of the ring.
Turtle
Upper Shell
Note: The upper shell is worked in two colors in rounds which are joined with a slip stitch.
Round 1: With Color A, make a beginning ring (either by traditional ch 4, join into ring method or by magic loop method described above). Ch 1, work 6 sc in ring, join with sl st (6 sc).
Round 2 (inc rnd): Ch 1, work 2 sc in each sc around, join with sl st (12 sc). Join Color C, drop Color A but do not cut it.
Round 3 (inc rnd): With Color C, ch 1, work 2 sc in each sc around, join with sl st (24 sc). Change to Color A, drop Color C but do not cut it.
Round 4 (inc rnd): With Color A, ch 1, work 2 sc in first sc, sc in next sc, *2 sc in next sc, sc in next sc, repeat from * around, join with sl st (36 sc). Change to Color C, drop Color A but do not cut it.
Round 5: With Color C, ch 1, sc in each sc around, join with sl st (36 sc). Change to Color A, cut Color C, leaving a 6” tail to stuff inside later.
Round 6 (inc rnd): With Color A, ch 1, work 2 sc in first sc, sc in next 2 sc, *2 sc in next sc, sc in next 2 sc, repeat from * around, join with sl st (48 sc).
Round 7: Ch 1, sc in each sc around, join with sl st and fasten off (48 sc).
Lower Shell
Note: The lower shell is worked in one color in spiral crochet method.
Round 1: With Color B, make the beginning ring as on the upper shell. Ch 1, work 6 sc in ring (6 sc). Do not join but continue in spiral single crochet. Place a thread marker to note the beginning of rounds and move it up as you work.
Round 2 (inc rnd): Work 2 sc in each sc around (12 sc).
Round 3 (inc rnd): Work 2 sc in each sc around (24 sc).
Round 4 (inc rnd): Work 2 sc in first sc, sc in next sc, *2 sc in next sc, sc in next sc, repeat from * around (36 sc).
Round 5: Sc in each sc around (36 sc).
Round 6 (inc rnd): Work 2 sc in first sc, sc in next 2 sc, *2 sc in next sc, sc in next 2 sc, repeat from * around, join with sl st and fasten off (48 sc).
Round 7: Sc in each sc around, join with sl st and fasten off (48 sc).
Appendages
Note: Work on the upper shell piece first, then repeat the same instructions on the lower shell piece. You will be working around the outside of the circular piece in this order: head, skip 4 sc to left, first leg, skip 4 sc to left, second leg, skip 4 sc to left, tail, skip 4 sc to left, third leg, skip 4 sc to left, fourth leg.
Head
Row 1: Attach MC to any st on last rnd of shell. Ch 1, sc in same st, sc in next 4 sc, turn (5 sc).
Rows 2-4: Ch 1, sc in each sc across, turn (5 sc).
Row 5 (inc row): Ch 1, work 2 sc in first sc, sc in next 3 sc, 2 sc in last sc, turn (7 sc).
Row 6 (dec row): Ch 1, sc2tog, sc in next 3 sc, sc2tog, turn (5 sc).
Row 7 (dec row): Ch 1, sc2tog, sc in next sc, sc2tog (3 sc). Fasten off.
First Leg
Row 1: Skip next 4 sts to left on the shell, attach MC in next sc. Ch 1, sc in the same sc, sc in next 3 sc, turn (4 sc).
Rows 2-4: Ch 1, sc in each sc across, turn (4 sc). At the end of Row 4, fasten off.
Second Leg
Repeat Rows 1-4 of the first leg.
Tail
Row 1: Skip next 4 sts to left on the shell, attach MC in next sc. Ch 1, sc in the same sc, sc in next 2 sc, turn (3 sc).
Rows 2-4: Ch 1, sc in each sc across, turn (3 sc).
Row 5 (dec row): Ch 1, sc3tog (1 sc). Fasten off.
Third Leg
Repeat Rows 1-4 of the first leg.
Fourth Leg
Repeat Rows 1-4 of the first leg.
Repeat head, legs & tail on the other shell piece.
Finishing
Upper Body Edging
:Attach MC to any sc on the body. Ch 1, sc evenly all around the piece, placing sc in each sc on the body and working evenly around head, legs, and tail, working around corners with 3 sc in each corner and 3 sc at the point of the tail. Work over yarn ends as you go or lay them in the center of the piece to be stuffed inside later. Join with sl st to beg sc and fasten off (approx. 120 sc).
Lower Body Edging
:Repeat upper body edging instructions.
Join Upper and Lower Body
:Hold pieces with wrong sides together, matching head, tail, and legs. Working through inner loops only of each sc, attach Color C through both thicknesses in any sc between tail and leg. Sl st through inner loops of each st around, leaving tail sts unworked until stuffing has been inserted.
Stuff with fiberfill (inserting optional jingle bell in the center of stuffing if desired), then sl st remaining sts together to close.
With Color A, embroider two French knots for eyes as shown. Bury all yarn tails inside the stuffed body.