How to Create a Crochet Plushy Watercolor Easter Basket

Penelope
Mar 26, 2024 04:41 AM
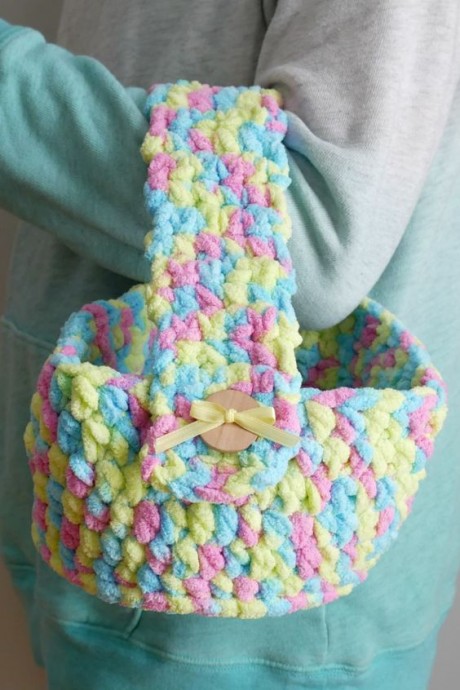
Create a charming Easter basket with a unique twist by crafting a crochet plushy watercolor design. This project combines the cozy texture of crochet with the delicate beauty of watercolor to make a one-of-a-kind basket that will stand out during the holiday season. Choose pastel yarn colors to give your basket a soft and inviting look, perfect for holding Easter eggs or other festive treats. The plushy texture of the crochet stitches will add a touch of whimsy to the design, making it a fun and creative project to work on.
Materials:
- L (8.0 mm) crochet hook
- 1 ball of Bernat Baby Blanket (I used the “Jelly Beans” colorway) *Note: I did not use the full ball of yarn.
- 2 buttons
- Tapestry Needle
- Scissors
- Tape Measure
Sizing:
- 22 inch circumference
- 7 inches across bottom of basket
- Handle is 15 inches long
Instructions for Basket:
- Ch 4, join in the furthest ch from the hook to make a ring.
- Round 1: Ch 2, then work 11 hdc into the center of the ring. Join to close round with a sl st.
- Round 2: Ch 2, then work 2 hdc into each st around. Join to close round with a sl st.
- Round 3: Ch 2, then work a hdc into the first st. *Work 2 hdc into the next st, then a hdc into the next st. Repeat from * around. Join to close round with a sl st.
- Round 4: Ch 2, then work a hdc into the first st. *Work a hdc into the next st, a hdc into the next st, then two hdc into the next st. Repeat from * around. Join to close round with a sl st.
- Round 5: Ch 2, then work a bphdc (back post half double crochet) in each st around. Join to close round with a sl st. Note: if you are not familiar with the bphdc, check out the video, where I show it nice and slow!
- Rounds 6-10: Ch 2, then work a hdc in each st around. Join to close round with a sl st.
Instructions for Handle:
- Ch 6
- Row 1: Work a sc into the second ch from the hook. Work a sc in each ch across.
- Row 2: Ch 1 and turn. Work a sc in each st.
- Row 3: Ch 1 and turn. Work a sc in each of the first two stitches. Ch 1, skip the next stitch, then work a sc in each of the next two stitches.
- Row 4: Ch 1 and turn. Work a sc in each of the next two stitches, then work a sc in the ch 1 space, then work a sc in each of the next two stitches.
- Row 5-23: Ch 1 and turn. Work a sc in each st. Note: you can increase or decrease the number of these rows to change the size of your handle.
- Row 24: Ch 1 and turn. Work a sc in each of the first two stitches. Ch 1, skip the next stitch, then work a sc in each of the next two stitches.
- Row 25: Ch 1 and turn. Work a sc in each of the next two stitches, then work a sc in the ch 1 space, then work a sc in each of the next two stitches.
- Row 26: Ch 1 and turn. Work a sc in each st.
Assembly & Finishing:
- Weave in any ends that remain on the basket and handle.
- Sew a button to either side of the top part of the basket using a matching piece of yarn.
- Alternatively, you can tie a button on with a bow using a scrap piece of matching ribbon for a fancier look (see photo above for example).
- Button the handle onto the basket, and it is ready to fill up!
No comments
Write a comment