How to Crochet an Adorable Easter Bunny

If you're looking to add a touch of charm to your Easter decorations, why not consider crocheting an adorable Easter bunny? Creating a Crochet Easter Bunny can be a fun and rewarding craft project that will bring a smile to your face and those around you. You can personalize it with different colors and sizes to suit your style, making it a unique and thoughtful gift for friends and family. The best part is that crocheting these bunnies is not only enjoyable but also a great way to unwind and express your creativity. So, grab your yarn and crochet hook, and get ready to hop into the Easter spirit with your very own handmade bunny creation!
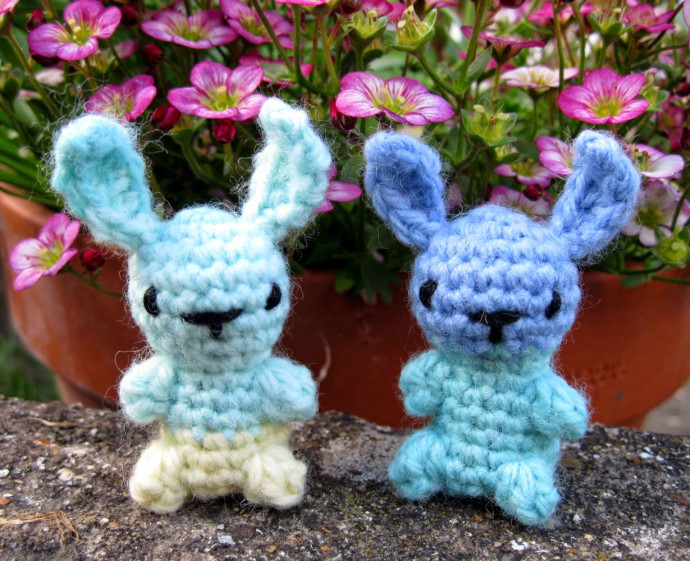
This little bunny will end up about 4.5 cm/1.75" tall, not including ears, depending on the yarn you use.
Abbreviations
ch = chain
st = stitch or stitches
ss = slip stitch
sc = single crochet (US), double crochet (UK)
dc = double crochet (US), treble crochet (UK)
tog = together
sc2tog = decrease by working two sc together
pop = popcorn (see special stitch instructions)
FO = fasten off
General Instructions
Work in rounds unless otherwise stated and do not join rounds unless told to. Use a stitch marker to mark the start of a round - a small piece of different coloured yarn placed under the stitch at the start of the round will do. To start a round, you can use the magic ring method, but I prefer (ch 2, work 6 sc into 1st ch). The first ch is a slip knot so it will expand and if you work the 6 sc over the tail of yarn as well you can use that to pull the hole tight.
Work through both loops of stitches unless otherwise indicated.
Special Stitch Instructions
3 dc Popcorn Stitch
Work 3 dc into 1 st, take hook out leaving loop, put hook through 1st dc & pull loop through. (When changing colour for the tail work the sc before the change until there are two loops left on the hook. Then use the new colour for the final yarn over hook and pull through. When changing back to the main colour after doing a 3dc pop work the last dc of the popcorn until there are two loops left on the hook. Then use the main colour for the final yarn over hook and pull through. Finish making the popcorn st and you will have the main colour on your hook for the next stitch.)
4 dc Popcorn Stitch
Work 4 dc into 1 st, take hook out leaving loop, put hook through 1st dc & pull loop through.
Materials Needed
- Small amount of yarn, any colour you like, in double knitting or worsted weight.
- Small amount of white or cream yarn for tail.
- Small amount of black yarn (or cream and pink for chocolate bunny) for eyes and mouth.
- Small amount of stuffing.
- 3.5mm (E) hook.
Crochet Instructions
Round 1: Ch 2, work 6 sc into 1st ch - 6 st.
Round 2: [2 sc in next st, (sc and ss into next st, (ear) ch 6, sc into 2nd ch from hook, dc into next 3 ch, sc into next ch, ss back into original st), 2 sc in next st] 2 times - 12 st (the ss used to start the ear counts as a st, and you will work into it on the next round).
Round 3: [2 sc in next st, sc in next st] 6 times – 18 st.
Round 4 - 6: (3 rounds) Sc in each st around - 18 st.
Round 7: [Sc2tog, sc in next st] 6 times – 12 st.
Round 8: [Sc2tog, sc in next 2 st] 3 times – 9 st.
Round 9: [2 sc in next st, sc in next 2 st] 3 times – 12 st.
Round 10: Sc in next 5 st, 4dc pop, sc in next 4 st, 4dc pop, sc in next st - 12 st.
Round 11 - 12: Sc in each st around - 12 st.
Round 13: [2 sc in next st, sc in next 3 st] 3 times – 15 st.
Round 14: Sc in next 4 st, change to tail colour yarn, 3dc pop, change back to main yarn, sc in next 4 st, 4dc pop, sc in next 3 st, 4dc pop, sc in next st - 15 st.
Round 15: [Sc2tog, sc in next 3 st] 3 times – 12 st.
Round 16: [Sc2tog] 6 times – 6 sc. FO, leaving a length of yarn.
Stuff head and body and embroider features. Use length of yarn to sew up hole at bottom, pulling yarn upwards through body to make sure the bottom is flat. You can also use this yarn to sew a stitch or two at the bottom of each ear to make sure they're pointing forwards.