


Adorable Crochet Raccoon Glasses Holder — Easy Pattern & Step-by-Step Instructions

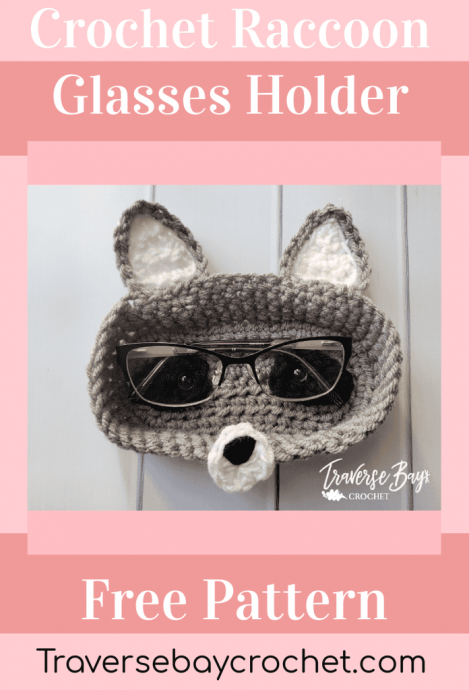
Keep your glasses safe and add a playful touch to your bedside or desk with this Crochet Raccoon Glasses Holder. This small amigurumi-style holder is worked in medium weight yarn and shaped to cradle a pair of spectacles. The pattern below includes full materials, stitch abbreviations, step-by-step construction for the body, ears, eyes, mouth and nose, plus assembly tips so your raccoon fits your glasses perfectly.
Materials:
- Size I, 5.5 mm crochet hook
- Medium weight (size 4) yarn in gray, white, and black
- Tapestry needle
- Safety Eyes
Final Measurement:
The glasses holder measures 6.5″ wide x 4″ long x 1.5″ depth.
Abbreviations:
st(s) - stitch(es)
hk - hook
sc - single crochet
hdc - half double crochet
dc - double crochet
sc2tog - single crochet two together
sl st - slip stitch
BLO - back loop only
Instructions for Body (Gray):
Chain 12
Round 1: Hdc in 2nd ch from hk and next 9 chains. 5 hdc in end ch, hdc next 10 chains down the other side of the foundation ch, 5 hdc in last ch, sl st to join (30).
Round 2: Ch 2 (doesn’t count as a st), hdc next 10 sts, 2 hdc in the next 5 sts, hdc 10, 2 hdc in last 5 sts, sl to join (40).
Round 3: Ch 2 (doesn’t count as a st), hdc next 10 sts, [2hdc in next st, hdc in next st] x 5 times, hdc 10, [2hdc in next st, hdc in next st] x 5 times, sl st to join (50).
Round 4: Ch 1 (doesn’t count as a st), sc in the BLO in each st around. (50).
***You will now work in the round, place stitch marker here if you need to***
Rounds 5-7: Sc in each st around, sl st to join (50).
Fasten off, weave in ends.
Instructions for Ears (Make 2 with White):
Ch 5
Row 1: Sc in 2nd ch from the hk and each st across, turn (4).
Row 2: Ch 1, sc2tog, twice, turn (2).
Row 3: Ch 1, sc in next 2 sts, turn (2).
Row 4: Ch 1, sc2tog (1).
Ch 1, turn,
Continue to sc evenly around the ear with 2 sc in each corner, sl st to join.
Switch to gray yarn, ch 1, sc in the BLO in each st around, sl st to join.
Fasten off, weave in ends.
Cut a piece of gray yarn and sew ears onto the top of the holder on either side with tapestry needle.
Fasten off, weave in ends.
Instructions for Mouth and Nose:
With white yarn, make a magic circle and ch 2, hdc 12 in the circle and pull to close.
Fasten off leaving a long tail.
Cut a long piece of black yarn and with your tapestry needle, sew the nose on in a triangular shape just under the outer stitch.
Fasten off and weave in ends on the back of the mouth.
Sew onto the bottom middle of the holder.
Fasten off, weave in end.
Instructions for Eyes (With Black Yarn Make 2):
Ch 5
Row 1: Sc in 2nd ch from the hk, sc in next, hdc in next, 5 dc in end st,
*working your way back down the other side of the foundation chain*
hdc, sc in last 2 sts, sl st to join.
Fasten off leaving a long tail.
Attach safety eyes to the middle of the thinner side of the eye.
Sew onto holder with the smaller side facing up.
Tip: Lay glasses down first to pick the placement of the eyes before sewing.
Weave in ends.
Assembly & Finishing:
1. Position the ears symmetrically on the top edge and sew them securely with a tapestry needle. 2. Sew the white mouth piece to the lower middle of the holder and add the black triangular nose above it as described. 3. Attach the eye pieces, then secure the safety eyes through the eye pieces and the holder. 4. Weave in and trim all loose ends. Use a stitch marker during assembly to keep placement consistent if needed.
Tips for Fitting Glasses:
- Before permanently sewing on the eyes or facial features, place your glasses on the holder to mark where the temples rest so the holder will cradle them correctly. - If your glasses are larger or heavier than average, consider stuffing the body lightly with scrap yarn or a small amount of fiberfill to add stability (use caution around safety eyes when stuffing).
Care & Variations:
- Spot clean with a damp cloth and mild soap as needed; avoid soaking if safety eyes are used. - Customize colors (e.g., brown, cream) or adjust hook/yarn size to change the finished size. - Add small felt accents or embroidery for different facial expressions.
Enjoy making this charming raccoon glasses holder — it’s a quick gifting project for fellow crafters or a fun addition to your own home organization.
- Funny Pictures
-
 Weekly Treat of Funniest Parenting Memes for Good Laugh out Loud Right Now
-
 Really Funny Pics to End These Weekend Perfectly
-
 Incredibly Relatable Pics for Your Amusement
- Recipes
-
 Chewy Oatmeal Cookies
-
 Tomato Tuna Melt
-
 Instant Pot Broccoli Cheddar and Zucchini Soup
- Lifehacks
-
 Wide Half Double Crochet Stitch Photo Tutorial
-
 How to Crochet a Sunflower Stitch Photo Tutorial
-
 Lemon Peel Crochet Stitch Photo Tutorial
- Crochet Ideas
-
 DIY Crochet Mushroom Keychain — Easy Step-by-Step Pattern with Photos
-
 Make a Leafy Texture: Easy Crochet Sprig Stitch (Free UK Pattern)
-
 Free Crochet Sleep Mask Pattern — Cute DK Cotton Eye Mask (UK Terms, Advanced Beginner)
- DIY
-
 Cozy Crochet: Free Up-and-Down Stripe Cotton Washcloth Pattern (Quick & Easy)
-
 How to Make Realistic Crepe Paper Daffodils — Easy Step-by-Step DIY
-
 Make Adorable Easter Egg Bird Feeders — Easy DIY Seed Ornaments for Your Backyard
- Knitting Ideas
-
 Knit the Fish Scale Stitch: Easy 4-Row Pattern for a Textured, Scaly Look
-
 Knitted Camisole Party Frock — Vintage Pattern with Step-by-Step Instructions
-
 DIY Knitted Cuddly Cat Toy — Free Pattern & Step-by-Step Instructions