

How to Crochet a Beautiful Tortoise (Easy Amigurumi Pattern)

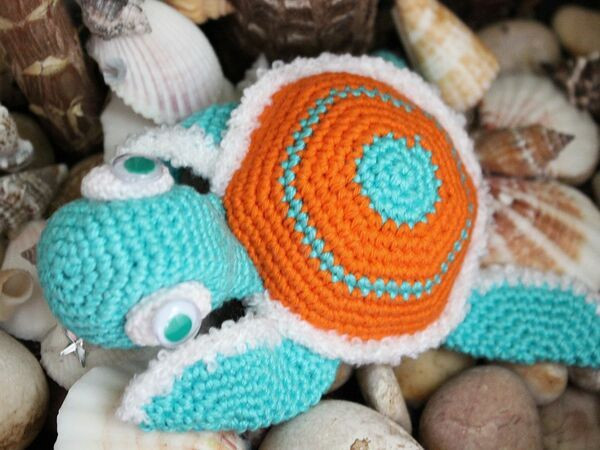
Create a charming crocheted tortoise with this easy amigurumi pattern. Using basic stitches and working in continuous rounds, you'll make a shield (shell), head, eyes and four legs, then assemble them into a cuddly finished toy. This project is suitable for beginners who know single crochet and working in the round; safety eyes or beads add character and fluffy yarn can be used to create a soft edge around the shell.
Follow the pattern below exactly for stitch counts and shaping. Use a stitch marker to keep track of rounds and stuff firmly but not overly tight for the best shape.
Materials
Schachenmayr Catania 125m/50 g, crochet hook C, 2 black beads or a pair of safety eyes, polyester fiber fill stuffing, yarn needle.
Skill Level
Easy
Abbreviations
- Ch = chain
- St = stitch
- Sc = single crochet
- Sl st = slip stitch
- Rnd = round
- Dc = double crochet
- dec = decrease stitch (two single crochets together)
- inc = increase stitch (two single crochets into one stitch)
Notes
- Do not join rounds, work in a continuous spiral.
- Use a stitch marker or a piece of yarn to mark the end or the beginning of a round.
- All stitches are worked into both loops, unless stated otherwise in the pattern.
Instructions
Shield
Rnd 1: 6 sc into Magic Ring
Rnd 2: inc 6 times (12 sts)
Rnd 3: *sc in next st, inc* (18 sts).
Rnd 4: *sc in each of next 2 sts, inc* (24 sts).
Rnd 5: *sc in each of next 3 sts, inc* (30 sts).
Rnd 6: *sc in each of next 4 sts, inc* (36 sts).
Rnd 7: *sc in each of next 5 sts, inc* (42 sts).
Rnd 8: sc in each of next 42 sts.
Rnd 9: *sc in each of next 6 sts, inc* (48 sts).
Rnd 10: *sc in each of next 7 sts, inc* (54 sts).
Rnd 11: *sc in each of next 8 sts, inc* (60 sts).
Rnd 12-13: sc in each of next 60 sts.
Change colour.
Rnd 14 (working in the back loop only): sc in each of next 60 sts.
Rnd 15: *dec, sc in each of next 7 sts* (54 sts).
Rnd 16: *dec, sc in each of next 6 sts* (48 sts).
Rnd 17: *dec, sc in each of next 5 sts* (42 sts).
Rnd 18: *dec, sc in each of next 5 sts* (36 sts).
Rnd 19: *dec, sc in each of next 4 sts* (30 sts).
Rnd 20: *dec, sc in each of next 3 sts* (24 sts).
Stuff the body.
Rnd 21: *dec, sc in each of next 2 sts* (18 sts).
Rnd 22: *dec, sc in next st* (12 sts).
Rnd 23: *dec* 6 times.
Cast off.
With fluffy yarn sc into each st around (working in the front loop of Rnd 13).
Head
Rnd 1: 6 sc into Magic Ring.
Rnd 2: inc 6 times (12 sts).
Rnd 3: *sc in next st, inc* (18 sts).
Rnd 4: *sc in each of next 2 sts, inc* (24 sts).
Rnd 5: *sc in each of next 3 sts, inc* (30 sts).
Rnd 6: *sc in each of next 4 sts, inc* (36 sts).
Rnd 7-11: sc in each of next 36 sts.
Rnd 12: *dec, sc in each of next 4 sts* (30 sts).
Rnd 13: *dec, sc in each of next 3 sts* (24 sts).
Rnd 14: *dec, sc in each of next 2 sts* (18 sts).
Rnd 15-19: sc in each of next 18 sts.
Cast off leaving a long tail for sewing. Stuff the head and sew to the shield.
Eyes
Rnd 1: 6 sc into Magic Ring
Rnd 2: inc 6 times (12 sts)
Rnd 3: *sc in next st, inc* (18 sts)
Rnd 4-5: sc in each of next 18 sts
Rnd 6: *dec, sc in next st* (12 sts).
Stuff the eye.
Rnd 7: *dec* 6 times.
Cast off leaving a long tail for sewing.
Legs (4x)
Rnd 1: 6 sc into Magic Ring.
Rnd 2: inc 6 times (12 sts).
Rnd 3: *sc in next st, inc* (18 sts).
Rnd 4: *sc in each of next 2 sts, inc* (24 sts).
Rnd 5: *sc in each of next 3 sts, inc* (30 sts).
Rnd 6: *sc in each of next 4 sts, inc* (36 sts).
Rnd 7-10: sc in each of next 10 sts, turn.
Fold and with fluffy yarn sew together.
Finishing
Using yarn needle sew legs to the shield.
Decide where you will position eyes and sew them to the head.
Finishing tips: Use safety eyes or securely sew beads in place if the toy will be given to small children. Weave in all ends neatly and hide tails inside the stuffing where possible. A small amount of embroidery can add a mouth or nostrils if desired.
- Funny Pictures
-
 Top Grinch Memes to Get You Into Christmas Spirit
-
 These Lazy Cat Memes are All You Need This Caturday
-
 Perfect Cat Memes to Fulfill the Plan for This Friday
- Recipes
-
 Quinoa Arugula Salad with Pineapple
-
 Chilaquiles Frittata Bake
-
 Fresh Melon and Sugar Snap Pea Salad
- Lifehacks
-
 Crochet pineapple edging
-
 Crochet Cable-Shell Edging
-
 Crochet Long Puff Stitch
- Crochet Ideas
-
 Crochet Pumpkin Bear
-
 Crochet Santa Placemat
-
 Crochet Lightweight Shawl
- DIY
-
 How to Crochet a Cute Cupcake Trinket Box — Free Step-by-Step Pattern
-
 Easy Watercolor Easter Eggs: Mess-Free Marker & Bag Method
-
 Crochet Echoes Pullover: Detailed Pattern & Tips for an Oversized Drop-Shoulder Sweater
- Knitting Ideas
-
 DIY Knitted Waffle Kitchen Towel — Easy Pattern for a Textured, Absorbent Cotton Towel
-
 Chic Knitted Pink Beret — Easy Pattern & Step-by-Step Instructions
-
 Cozy Top‑Down Knitted Raglan Sweater Pattern — Sizes S–L (Merino)