Crochet Cupcake Pillow Project Guide

Introduction
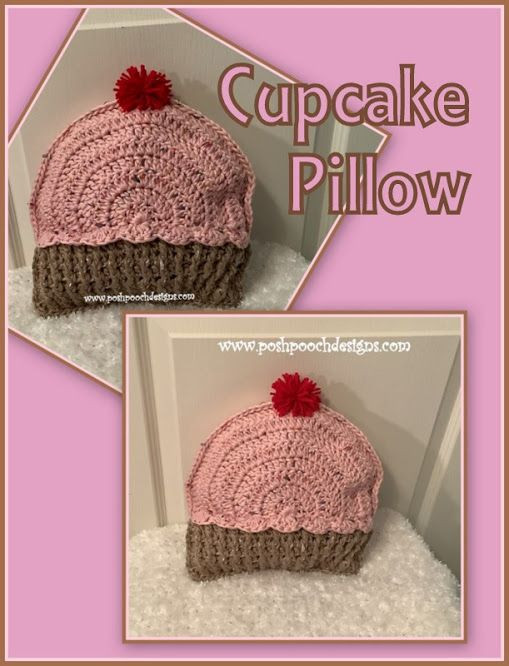
Embrace the coziness with a delightful Crochet Cupcake Pillow! This adorable and charming pillow will add a sweet touch to any room in your home. With its soft texture and eye-catching design, it's perfect for cuddling up with while reading your favorite book or enjoying a relaxing movie night. The Crochet Cupcake Pillow is not just a piece of decor, but a whimsical companion that will bring a smile to your face every time you see it. So go ahead, treat yourself to this cute and cozy addition to your living space!
Skill Level
Skill: Easy to Moderate
Materials Needed
- Crochet Hook – K / 6.5 mm
- Yarn – Bulky (5), I used Eco-Cozy / Loops And Thread, but any Bulky 5 can be used for this project:
- C1 – Light Fleck Pink 5.29 oz
- C2 – Light Taupe Fleck 5.29 oz
- C3 – Red Heart Super Saver (med 4) – red 0.5 oz – For pompom
- Yarn Needle
- Stuffing – Polyfiberfil 8 oz
Stitches Used
- Chain (ch)
- Single Crochet (sc)
- Double Crochet (dc)
- Front Post Double Crochet (fpdc)
- Back Post Double Crochet (bpdc)
- Front Loop Only (FLO)
- Back Loop Only (BLO)
- Shell Stitch (shst) – 4 dc in the same st
- Skip (sk)
- Change to (chgto)
Size
Size: 12 X 12 inches
Notes
Ch 3 counts as dc
Pattern Steps
Make 2
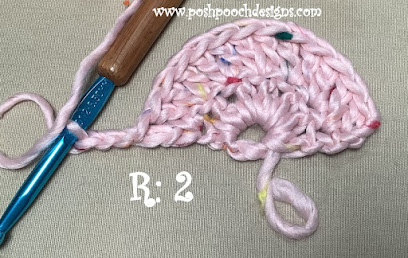
RND 1: With C1, Ch 5, join in a circle, ch 3, 6 dc in the circle, turn, ch 3 (7 dc)

RND 2: 2 dc in each dc, turn, ch 3 (14 dc)
RND 3: *2 dc in the next dc, 1 dc in the next dc* Repeat from * to * across, turn, ch 2 (21 dc)
RND 4: 1 dc in the next dc, *2 dc in the next dc, 1 dc in the next 2 dc* Repeat from * to * across, turn, ch 3 (28 dc)
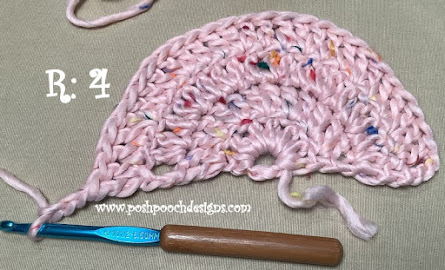
RND 5: 1 dc in the next 2 dc, *2 dc in the next dc, 1 dc in the next 3 dc* Repeat from * to * across, turn, ch 3 (35 dc)
RND 6: 1 dc in the next 3 dc, *2 dc in the next dc, 1 dc in the next 4 dc* Repeat from * to * across, turn, ch 3 (42 dc)
RND 7: 1 dc in the next 4 dc, *2 dc in the next dc, 1 dc in the next 5 dc* Repeat from * to * across, turn, ch 3 (49 dc)
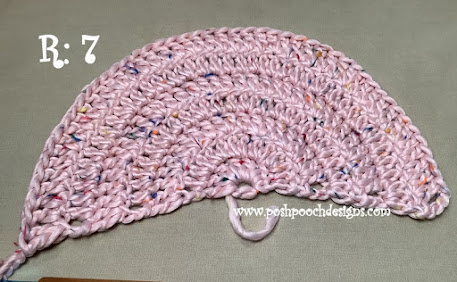
RND 8: 1 dc in the next 5 dc, *2 dc in the next dc, 1 dc in the next 6 dc* Repeat from * to * across, ch 1 (56 dc)
RND 9: Turn working across the edge of the ½ circle, evenly crochet 30 sc across, turn, ch 1 (30 sc)
RND 10: BLO of R: 9, *sc in the 1st sc, sk the next sc, shst in the next sc, sk the next sc, sc in the next sc* Repeat from * to * across, sc in the last sc (7 shsts)
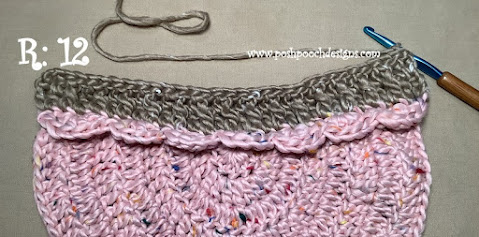
RND 11: Change to C2, turn, BLO of R: 9, 1 dc in each dc across, 2 dc in the last st, turn, ch 3 (31 dc)
RND 12: 1 dc in the 1st 2 dc, *BPDC in the next dc, dc in the next* Repeat from * to * across, 1 dc in the last dc (14 BPDC + 17 DC = 31 sts)
RND 13: 1 dc in the 1st 2 dc, *FPDC in the next dc, dc in the next* Repeat from * to * across, 1 dc in the last dc (14 FPDC + 17 DC = 31 sts)
RND 14: Repeat RND 12
RND 15: Repeat RND 13
RND 16: Repeat RND 12
RND 17: Repeat RND 13, tie off and weave in your ends.
Make 2 Cupcakes, leave the yarn on the 2nd cupcake attached.
Assembly Instructions
Place the 2 cupcakes together, right sides out. We will be stitching the 2 cupcakes together:
- Sc up the side till you reach the cupcake portion
- Change to C1, sc around the top of the cupcake
- Change to C2, sc evenly down the side
- Stuff pillow, sc across the bottom stitching it closed.
Pom Pom Cherry On Top
With C3, make a pom pom and attach to the top of the cupcake.

- Funny Pictures
-
 These are the Pics That Simply Describe Your Life
-
 Hilariously Accurate Parenting Memes That Show the Other Side of Parenthood
-
 Great Pics That Just Depict Our Lives
- Recipes
-
 Crispy Baked Avocado Fries
-
 Baked Beans and Hot Dogs with Biscuit Topping
-
 Roasted Rosemary Lemon Chicken Breasts
- Lifehacks
-
 Crochet Basics: Twisted Fringe
-
 7 Crochet Tips And Tricks
-
 How To Work Crochet Into Denim
- Crochet Ideas
-
 Crochet Snorlax Plushie Doll
-
 Crochet Cat in 1 Row
-
 Crochet Beautiful Penguin Toy
- DIY
-
 Popsicle Stick and Jingle Bell Christmas Tree Ornament
-
 Upcycled Mason Jar Chicken Vase
-
 Crochet Namaste Stephanie Doll
- Knitting Ideas
-
 Knitted Keepsake Bag
-
 Knitted Textured Heart Dishcloth
-
 Knitted Snowfall Dishcloth