

DIY Crochet Textbook Cover: Easy Pattern to Protect & Personalize Your Books

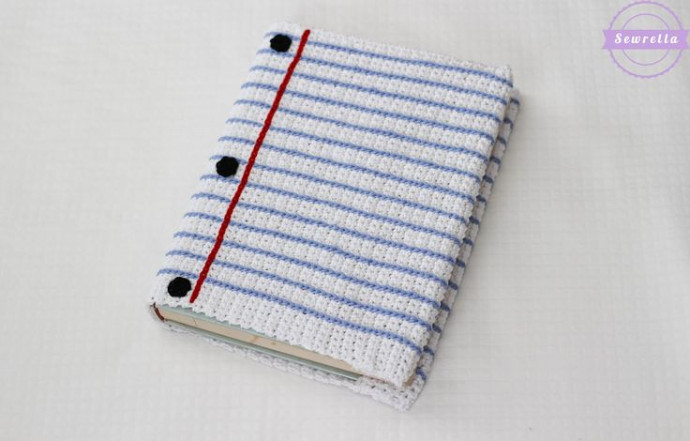
Protect and personalize your textbooks with this simple crochet textbook cover pattern. This project uses basic stitches (single crochet and surface stitch) and a few small motifs to create a snug, reusable cover that keeps books from getting scuffed in bags while giving them a custom look. Suitable for crocheters who are comfortable with single crochet and surface stitching; you can easily adjust the starting chain to fit larger or smaller books.
Below you'll find the full materials list and step-by-step instructions. Read the Notes & Tips section before you begin if you need to alter the size or tweak finishing details.
Notes & Tips
- If your textbook is wider or narrower than the one used for this pattern, adjust the starting chain (Ch 49) so the rectangle matches the width of your closed book. Chain a multiple that gives a similar fabric density and length.
- Work a small swatch to check how many rows equal about 2 inches if you want to match the fold measurement exactly.
- Use stitch markers to mark fold lines and placement of decorative elements before sewing to ensure symmetry.
- Weave in ends securely and block lightly if desired to even out the fabric before sewing it into a cover.
If you're looking to jazz up your textbooks and protect them at the same time, a crochet textbook cover is a fantastic DIY project to tackle! Not only will it add a personal touch to your books, but it can also prevent them from getting scuffed or damaged in your bag. You can choose your favorite colors and patterns to make it uniquely yours. Plus, it's a great way to show off your crochet skills while staying organized for the school year. Get ready to impress your classmates with your stylish and functional textbook covers!
Materials:
- Lion Brand 24/7 Cotton in white (2 skeins), sky (1 skein), red & black (small amounts)
- Size F 3.75mm crochet hook
- Tapestry needle
- Textbook
Instructions:
With white, Ch 49, Sc in 2nd Ch from hook, Sc across, Ch 1, turn.
Rows 2-104: Sc in each st across, Ch 1, turn. Finish off, weave ends.
Creating the Horizontal Design:
Hold your work so that the rectangle is oriented horizontally (your stitch rows look vertical). With sky, surface stitch straight lines horizontally skipping 3 rows of stitches in between each row of sky stitches. After each row finish off and weave ends.
Marking the Red Lines:
Using stitch markers (or bobbi pins!) mark where you want your red lines to lie. To do this, I found the center of my work and counted out in each direction 5 rows of stitches. Place your stitch markers.
Adding Red Lines:
With red, surface stitch straight lines vertically from top to bottom of your work where your markers lie. Finish off after each row and weave ends.
Making the Black Hole Punches:
With black, make a magic ring, Ch 1, 6 Sc inside ring, sl st to join, finish off. Make 6 black “hole punches.”
Sewing the Hole Punches:
Sew each hole punch just inside each of your red lines, one at the top, one in the middle, and one at the bottom on each side.
Final Touches:
Now we need to whip stitch the edges to make the cover fit onto our book – almost done! Flip over your work (looking at the wrong side).
Fold in each end by 12 rows of stitches (about 2 in. long).
Cut a piece of white yarn and thread your tapestry needle. Sew up the overlapping edges at the top and bottom. Repeat on the other side. Weave in all ends.
- Funny Pictures
-
 Top Grinch Memes to Get You Into Christmas Spirit
-
 These Lazy Cat Memes are All You Need This Caturday
-
 Perfect Cat Memes to Fulfill the Plan for This Friday
- Recipes
-
 Quinoa Arugula Salad with Pineapple
-
 Chilaquiles Frittata Bake
-
 Fresh Melon and Sugar Snap Pea Salad
- Lifehacks
-
 Crochet pineapple edging
-
 Crochet Cable-Shell Edging
-
 Crochet Long Puff Stitch
- Crochet Ideas
-
 Crochet Pumpkin Bear
-
 Crochet Santa Placemat
-
 Crochet Lightweight Shawl
- DIY
-
 How to Crochet a Cute Cupcake Trinket Box — Free Step-by-Step Pattern
-
 Easy Watercolor Easter Eggs: Mess-Free Marker & Bag Method
-
 Crochet Echoes Pullover: Detailed Pattern & Tips for an Oversized Drop-Shoulder Sweater
- Knitting Ideas
-
 DIY Knitted Waffle Kitchen Towel — Easy Pattern for a Textured, Absorbent Cotton Towel
-
 Chic Knitted Pink Beret — Easy Pattern & Step-by-Step Instructions
-
 Cozy Top‑Down Knitted Raglan Sweater Pattern — Sizes S–L (Merino)