Crochet Book Reader Toilet Paper Holder Pattern


Introduction
The Crochet Book Reader Toilet Paper Holder is not only practical but also adds a touch of charm to your bathroom! With its handmade crochet design, it brings a cozy and whimsical feel to your space. Say goodbye to boring toilet paper holders and hello to a fun and functional addition to your bathroom decor!
Supplies
- US F / 3.75 mm crochet hook
- Worsted weight 4 cotton yarn (approx. 180 yds)
- Plastic Mesh Canvas (1 sheet)
Note: Pattern can be made without the plastic canvas, but it will not be as sturdy.
Yarn
Lily Sugar’n Cream Cone, weight (4) worsted, 100% cotton, 674 yds / 616 m, 14 oz / 400 g per cone. Shown in color: White
Finished Size
6” (15 cm) wide side to side, 7” (17.5 cm) wide front to back x 3.5” (9 cm) tall at back
Abbreviations (US Terms)
- blo: back loop only
- bpsc: back post single crochet
- ch: chain
- dec: decrease
- FSC: foundation single crochet
- inc: increase (2 sc in same st)
- pm: place marker
- rnd: round
- sc: single crochet
- sl st: slip stitch
- st(s): stitch
Special Stitches
Invisible Decrease (dec): Insert hook into the front loop only of next 2 sts, yo, pull through all 3 loops.
Gauge
4 sts x 4 rows = 1” (2.5 cm) in sc
Skill Level
Beginner to Easy
Notes
- TP holder is worked in parts and sewn together.
- Bottom, back, arms, and book are all reinforced with Plastic Mesh Canvas cut to size.
Free Crochet Pattern: Book Reader Toilet Paper Holder
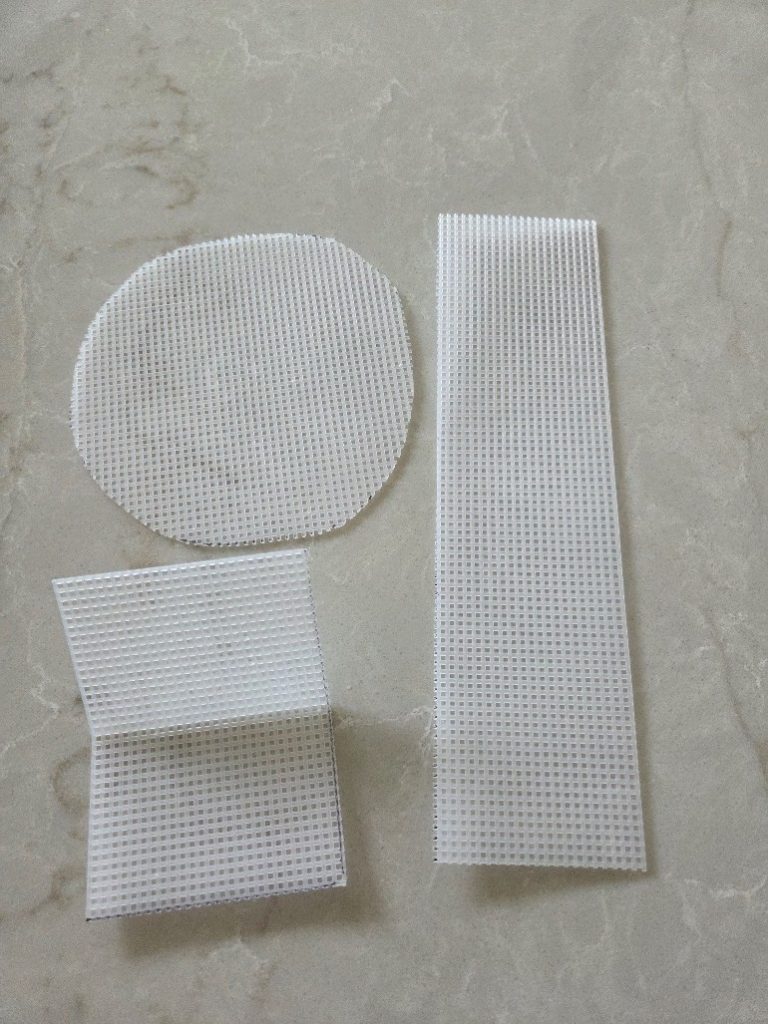
Mesh Canvas
Cut Plastic Mesh Canvas for all pieces before beginning. Pieces do not need to be exact, but aim for close.
- For Base: Cut a circle with a 4.5” diameter
- For Back: Cut a rectangle 8” long and 2” wide
- For Arms: Cut 2 rectangles 3” long and .5” wide
- For Book: Cut a rectangle 3.5” long and 2.75” wide. Fold in half to create a fold for the center of the book
Base: Make 2
Rnd 1: Working into a magic circle, sc 8, pull tight, do not join, mark first st of round and move up with each new round. (8 sts)
Rnd 2: Inc in each st around. (16 sts)
Rnd 3: *Sc 2, inc; rep from * to last st, sc. (21 sts)
Rnd 4: Sc, inc, *sc 2, inc, sc 3, inc; rep from * one more time, sc 2, inc, sc 2 (27 sts)
Rnd 5: *Inc, sc 4; rep from * around to last 2 sts, sc 2. (32 sts)
Rnd 6: Sc 3, inc, *sc 4, inc; rep from * around to last 3 sts, sc 3. (38 sts)
Rnd 7: *Inc, sc 8; rep from * around to last 2 sts, inc, sc. (43 sts)
Rnd 8: Sc 5, inc, *sc 7, inc; rep from * around to last 5 sts, sc 5. (48 sts)
Rnd 9: *Inc, sc 3; rep from * around. (60 sts)
Rnd 10: *Sc 15, inc; rep from * two more times, sc 11, inc. (64 sts)
Rnd 11: Sc 3, *inc, sc 7; rep from * to last 5 sts, inc, sc 4. (72 sts)
Fasten off first circle, do not fasten off second circle.
Lay first circle with WS facing up, thread the center tail onto a tapestry needle and feed it through the center of the plastic mesh circle, then through the center of the second crocheted circle from WS to RS (RS of both circles should be facing out), tie center tail of both circles to secure. Using the attached yarn, sc around outside edge working each st into the blo of each circle (these loops will be on the inside near the plastic). Join to first sc with a sl st. Fasten off and weave in all ends. Set aside.
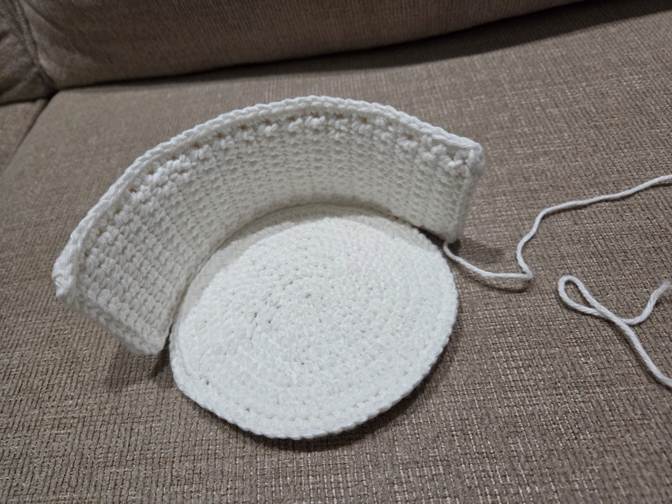
Back: Make 2
Row 1: FSC 10 [or ch 11, sc in 2nd ch from hook and across.] (10 sts)
Row 2: Ch 1, sc across.
Rep Row 2 for 38 total rows. Fasten off first piece, do not fasten off second piece.
As with the base, you will be joining the two pieces with the plastic canvas between the pieces. Using the attached yarn, sc across the last row worked, ch 1, turn to work down the side of the rectangle, sc across the ends of the rows. You want the edging to be clean, and not pucker or ruffle, so you may need to sk a row occasionally to achieve the best edging. Check your work every few inches to verify that the seam is straight. Ch 1, turn and sc across Row 1, ch 1, turn and sc across the last side. When you reach the end of the last side, ch 1, sl st to join to first st. Fasten off leaving a 24” tail.
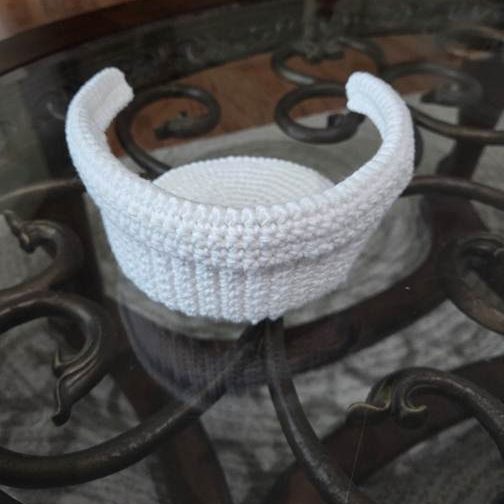
Line up back piece with the base making sure the tail is at the bottom of the back piece. Using the tail and a tapestry needle, seam the back to the base making sure they are secure, and that the back stands on its own. Set aside.
Arms: Make 1
Row 1: Ch 63, sc in 2nd ch and across. (62 sts)
Rows 2 – 6: Ch 1, sc across.
Row 7: Sc 12, pm, sc across.
Fold work in half lengthwise.
Row 8: Ch 1, working into Row 7 and the starting ch, sl st first 12 sts together, working into just Row 7, sl st across to marked st, working into Row 7 and the starting ch, sl st 12 sts together. Fasten off leaving a 24” tail.
Fold plastic canvas pieces in half lengthwise to create a “c” shape and slide one into each seamed end. I found inserting my hook into the opposite end than where I am pushing the canvas piece into and catching the plastic canvas to guide it through made the task easier.
Slip unseamed part of the arms onto the top of the back panel. Using the tail, seam both sides to the back piece to secure. Weave in ends.
Hands:
Rnd 1: Working directly into the opening at the ends of the arms, sc 8. (8 sts)
For the next few rows, you will be working into the “outside stitches” and “inside stitches”.
Outside stitches are the ones that will be on the outside of the arm when the arm is wrapped around the toilet paper. Inside stitches are the ones that will be inside the circle and closest to the toilet paper.
Rnd 2: Inc, in 3 outer sts, sc in remaining 5 sts. (11 sts)
Rnd 3: Working into the 6 inc sts of Rnd 2, [sc, inc] 3 times, sc in remaining 5 sts. (14 sts)
Rnd 4: Working into center 4 outer sts, [inc, sc] 2 times, sc in remaining sts. (16 sts)
Fasten off leaving a 24” tail. Lightly stuff ends of arm and hands. With a tapestry needle and the tail, seam inside sts to outside stitches working through both loops of the inside sts, and the blo (closest to the opening) of the outside sts. Do not weave in ends, you will use this same tail to attach hands to the book.

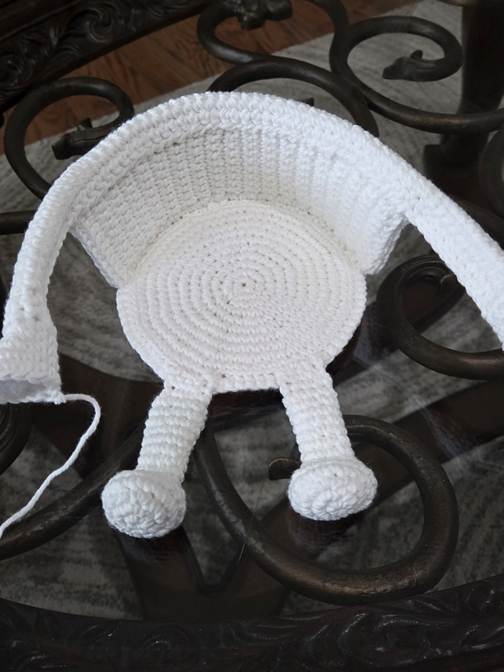
Feet and Legs: Make 2
Rnd 1: Working into a magic circle, sc 6, pull tight, do not join, pm in first st of round and move up with each new round. (6 sts)
Rnd 2: 2 sc in each st around. (12 sts)
Rnd 3: *Sc in first st, 2 sc in next st; rep from * around. (18 sts)
Rnds 4 – 5: Sc around.
Rnd 6: *dec, sc; rep from * around. (12 sts)
Rnd 7: [dec, sc] 3 times, sc 3. (9 sts)
Stuff foot.
Rnds 8 – 15: Sc around
Rnd 16: Sc 7, dec. (8 sts)
Press opening flat with front of foot facing forward. If you are not lined up to start at the side of the leg, sc across until you are. Once you are lined up, proceed to Rnd 17.
Rnd 17: Working through both sides of the leg, sc across. (4 sts)
Rnd 18: Sc across. Fasten off leaving a 6” tail.
Attach legs to the front of the base leaving 6 sts between the legs. The top of the legs should overlap the bottom circle edge. Make sure each leg is secure before weaving in ends.
With a separate piece of yarn and a tapestry needle, seam across the top of the foot, where the stuffing ends and the leg begins to give the feet some definition. Weave in ends.
Book (Back Piece):
Row 1: FSC 13 [or ch 14, sc in 2nd ch from hook and across.] (13 sts)
Rows 2 – 8: Ch 1, sc across.
Row 9: Ch 1, bpsc across.
Rows 10 – 16: Ch 1, sc across.
Fasten off.
The raised ridge created with Row 9 will be the spine of the book (RS).
Book (Inside Piece)
Row 1: FSC 13 [or ch 14, sc in 2nd ch from hook and across.] (13 sts)
Rows 2 – 8: Ch 1, sc across.
Row 9: Ch 1, sc blo across.
Rows 10 – 16: Ch 1, sc across.
Do not fasten off.
The raised ridge created with Row 9 will be on the WS of the piece and will be hidden inside the book.
Place plastic mesh canvas between the two pieces of the book with RS of both pieces facing out. Sc around entire book in same fashion as the back piece.
Using the tails of the hands, seam the hands to the outside of the book. Line up the edge of the hand with the line between the 3rd and 4th row of the book on each side.
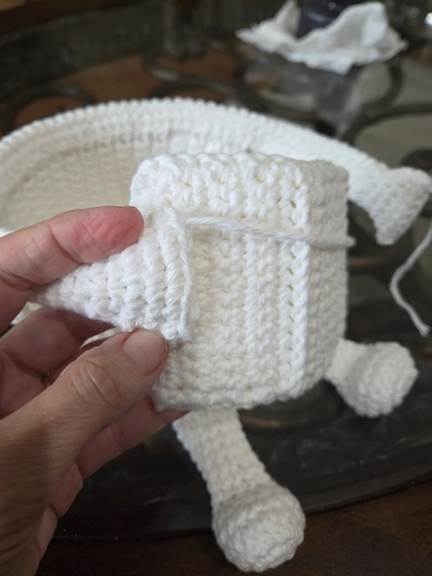
Weave in all ends, and add a roll of toilet paper!
- Funny Pictures
-
 Feline Memes to Feel Better
-
 Best Funny Pics of the Day Especially for You
-
 Pictures That Have No Right to be This Funny
- Recipes
-
 Strawberry Banana Bread
-
 Kraut-Tots
-
 Chocolate Delight Dessert
- Lifehacks
-
 7 Crochet Tips & Tricks
-
 Raspberry Crochet Stitch
-
 Crochet Tutorial: Popcorn Stitch + Printed PDF
- Crochet Ideas
-
 Crochet Snorlax Plushie Doll
-
 Crochet Cat in 1 Row
-
 Crochet Tiny Chick Amigurumi
- DIY
-
 Popsicle Stick and Jingle Bell Christmas Tree Ornament
-
 Upcycled Mason Jar Chicken Vase
-
 Make A Candle Holder From Plastic Spoons
- Knitting Ideas
-
 Knitted Newborn Striped Beanie
-
 Knitted Chunky Newborn Pixie Hat
-
 Knitted Big Bow Hat