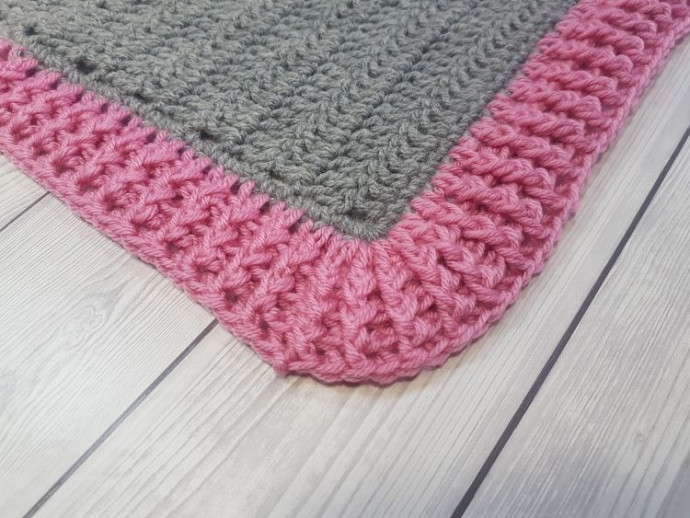
Crochet Rib Border For Any Blanket

Creating a crochet rib border for any blanket is a fun and versatile way to add a finishing touch to your project. Whether you're a newbie or a seasoned crocheter, this technique is easy to learn and can instantly elevate the look of your blanket. By incorporating ribbing, you can give your blanket a clean and polished edge while also adding texture and visual interest. Experiment with different yarn colors and stitch combinations to make your border uniquely yours. So go ahead, grab your hook and yarn, and let your creativity run wild as you finish off your cozy blanket with a beautiful ribbed border!
Supplies Used
- Acrylic Aran Yarn
- 5mm crochet hook
Abbreviations
Pattern written in US terms using Craft Yarn Council abbreviations.
- st(s) – stitch(es)
- ch – chain
- yo – yarn over
- sl st – slip stitch
- dc – double crochet
- fpdc – front post double crochet
- bpdc – back post double crochet
Special Stitches
Front Post Double Crochet (fpdc)
The front post double crochet is constructed just like the regular double crochet stitch, except it is made around the stitch post below rather than in the stitch below.
Step 1:
Yo, insert the hook, from the front side of your work to the back and around the stitch post below, yo and pull up a long loop (3 loops on hook).

Step 2:
Yo and pull through 2 loops on hook (2 loops on hook), yo and pull through the 2 remaining loops on hook.

Back Post Double Crochet (bpdc)
The back post double crochet is constructed just like the regular double crochet stitch, except it is made around the stitch post below rather than in the stitch below.
Step 1:
Yo, insert the hook, from the back of your work back to the front and around the stitch post below, yo and pull up a long loop.

Step 2:
Yo and pull through 2 loops on hook (2 loops on hook), yo and pull through the 2 remaining loops on hook.
Pattern
ch1 at the beginning of the row does not count as a stitch.
IMPORTANT: This pattern is adjusted for base rows that have 3sc in each corner; if you don’t have them, then you can work in the corner stitch and the 2 stitches that are on either side of that corner stitch. Check out my base row border here or watch the video for more details.
TIP: If you want a thicker border and crochet more rows, make 4dc in each of the 3sc in the corner, your border will not curl up if you make more than 4 rows.
This border requires you to have even numbers of stitches.
The section between ** is the section that needs to be repeated.
This border is crocheted in the round without turning, each round is closed with a sl st.
Round 1:
Step 1:
Start in the first sc of the 3sc made in the corner, join the yarn and ch3, 2dc in the same st, 3dc in each of the next 2sts (this is your corner and the clusters will fan out to form the round corner border).
Step 2:
dc in each stitch across the edge until you reach the 3sc you have made in the following corner.
Step 3:
*3dc in each of the next 3sts, dc in each stitch across the edge until you reach the 3sc you have made in the following corner*, repeat from * until you reach the end of the round, sl st into the top ch of the ch3 you made at the beginning of the round.

Round 2:
ch1, *fpdc in the dc post below, bpdc in the following dc post below*, repeat from * until you reach the end of the round, sl st into the first fpdc you made in the round.
Rounds 3 & 4:
ch1, *fpdc around the fpdc post below, bpdc around the bpdc post below*, repeat from * until you reach the end of the round, sl st in the fpdc that you made at the beginning of the round.

- Funny Pictures
-
 Cute Cat Memes That Will Make Your Day Brighter
-
 Spot-on and Funny Memes About Introverts Struggles
-
 Top Wonderful Cat Memes on Their Way to Better Your Day
- Recipes
-
 Creamy Old Fashioned Rice Pudding
-
 Russian Tea Cakes (Snowball Cookies)
-
 Rigatoni with Sausage, Tomatoes, and Zucchini
- Lifehacks
-
 How to Crochet a Harlequin Stitch
-
 Removing The Toughest Stains
-
 Crochet Basics: Crumpled Griddle Stitch
- Crochet Ideas
-
 Crochet Christmas Tree
-
 Crochet Goblet of Fire
-
 Crochet Adorable Ammonite
- DIY
-
 DIY Snowman Wreath
-
 Mini Santa Sleigh Ornament
-
 Crochet Gingerbread House Blanket
- Knitting Ideas
-
 Knitted Easter Bunny
-
 Knitted Mobile Phone/Glasses Case
-
 Knitted Cabled Wallet