Crochet Pooh Teddy Bear Amigurumi: Your Step-by-Step Guide

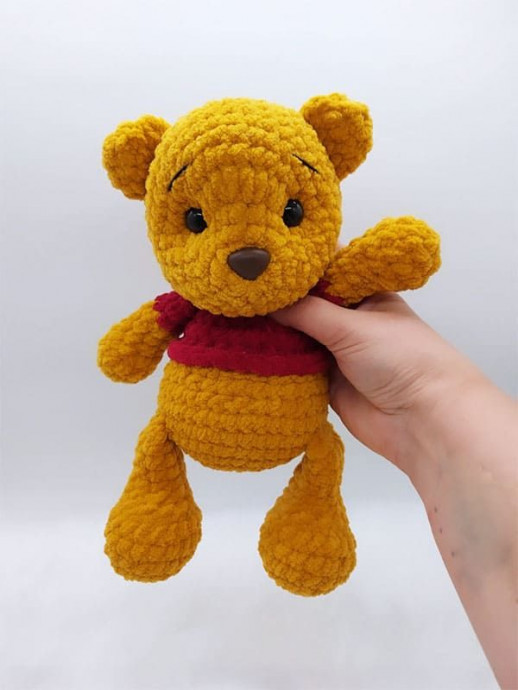
If you're looking to add a touch of coziness and nostalgia to your space, a Crochet Pooh Teddy Bear Amigurumi could be just the thing you need! This adorable handmade creation brings a classic character to life in a charming and cuddly form. Whether you're a fan of crafting, a lover of Pooh Bear, or simply seeking a unique gift idea, this Amigurumi is sure to warm hearts and bring smiles wherever it goes. With its soft yarn texture and sweet design, this Crochet Pooh Teddy Bear Amigurumi is like a hug in toy form – perfect for spreading joy and creating a whimsical atmosphere in any home.
Materials
Plush yarn in yellow and red color.
Little bit of black and white cotton yarn for face sculpting and to embroider the eyes and eyebrows.
You can use hook size and safety eyes matching to your yarn.
Hook size: 3.5mm.
Scissors.
Safety eyes size: 14mm.
Safety nose: 12/14mm.
Needle.
Fiber filling (stuffing).
Stitch marker.
Abbreviations
MR: magic ring
st: stitch
ch: chain
sc: single crochet
inc: single crochet increase (2sc in 1st)
dec: invisible decrease (dec 2 sts together FLO)
hdc: half double crochet
BLO: back loop only
FLO: front loop only
(…)* – repeat instructions in bracket … times
(…) - total number of sts in the round/row
slst: slip stitch
Head
Crochet with yellow. Stuff as you go.
Rnd 1: 6sc in MR (6)
Rnd 2: 6inc (12)
Rnd 3: (1sc, inc)*6 (18)
Rnd 4: (2sc, inc)*6 (24)
Rnd 5: 9sc, 6 hdc inc, 9sc (30)
Insert the safety nose between rounds 1 and 2.
Rnd 6: (4sc, inc)*6 (36)
Rnd 7-12: 36sc (6rds) (36)
Insert the safety eyes between rounds 5 and 6, 5 visible stitches apart. (on each side of hdc of round 5)
Rnd 13: (4sc, dec)*6 (30)
Rnd 14: (3sc, dec)*6 (24)
Rnd 15: (2sc, dec)*6 (18)
Rnd 16: (1sc, dec)*6 (12)
Rnd 17: 6dec (6)
Sew the hole closed. Fasten off and weave in the ends.
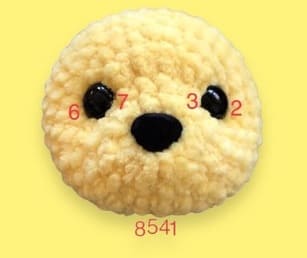
Tightening and Face Sculpting
Follow the numbers from the pictures (see picture). Tighten each end of the thread well and then tighten both ends at once. Embroider mouth, eyelid, and eyebrows.
Ears (x2)
Crochet with yellow. Do not stuff.
Rnd 1: 5sc in MR (5)
Rnd 2: 5inc (10)
Rnd 3: 10sc (10)
Fold the ear and crochet 5sc through both sides. Fasten off and leave a tail for sewing the ears to the head.
Sew the ears on round 11, 5 stitches apart on top of the head.
Arms (x2)
Start with yellow. Stuff lightly as you go until round 5.
Rnd 1: 6sc in MR (6)
Rnd 2: 6inc (12)
Rnd 3: 12sc (12)
Rnd 4: (1sc, dec)*4 (8)
Rnd 5-7: 8sc (3rds) (8)
Change the color to red.
Rnd 8-9: 8sc (2rds) (8)
Fold the arm and crochet 4 sc through both sides. Fasten off and weave in the ends.
Legs (x2)
Crochet with yellow. Stuff as you go until round 9.
Rnd 1: 6sc in MR (6)
Rnd 2: 6inc (12)
Rnd 3: (1sc, inc)*6 (18)
Rnd 4-6: 18sc (3rds) (18)
Rnd 7: 3sc, 6dec, 3sc (12)
Rnd 8: 4sc, 2dec, 4sc (10)
Rnd 9-12: 10sc (4rds) (10)
Fold the leg and crochet 5sc through both sides. Fasten off and weave in the ends.
Body
Start with yellow. Stuff as you go.
Rnd 1: 6sc in MR (6)
Rnd 2: 6inc (12)
Rnd 3: (1sc, inc)*6 (18)
Rnd 4: (2sc, inc)*6 (24)
Rnd 5: (3sc, inc)*6 (30)
Rnd 6: (4sc, inc)*6 (36)
Rnd 7: 36sc (36)
In the next round, connect the legs.
The stitch marker is located on the back.
Rnd 8: 7sc, 5sc with the left leg, 12sc, 5sc with the right leg, 7sc (36)
Rnd 9: 36sc (36)
Rnd 10: (4sc, dec)*6 (30)
Rnd 11: 30sc (30)
Rnd 12: (3sc, dec)*6 (24)
Change the color to red.
Rnd 13: 24sc on BLO (24) Add a stitch marker on the first FLO.
Rnd 14: 24sc (24)
Rnd 15: (2sc, dec)*6 (18)
In the next round, connect the arms.
The stitch marker must be placed on the middle of the back.
Add or remove sc if necessary.
Rnd 16: 3sc, 4sc with the left arm, 5sc, 4sc with the right arm, 2sc (18)
Rnd 17: (4sc, dec)*3 (15)
Fasten off and leave a long yarn. Connect a new red yarn on FLO of round 13 and make 24 slst.
Sew the head on the body.
- Funny Pictures
-
 Hilarious Memes for Those Bored to Tears
-
 Weekly Treat of Funniest Parenting Memes for Good Laugh out Loud Right Now
-
 Really Funny Pics to End These Weekend Perfectly
- Recipes
-
 Crispy Baked Avocado Fries
-
 Scrambled Chickpea and Spinach Pitas
-
 Cinnamon Pancakes
- Lifehacks
-
 Crochet Basics: Aligned Cobble Stitch
-
 Brick Stitch Crochet Tutorial
-
 Crochet Basics: Wattle Stitch
- Crochet Ideas
-
 Crochet Snorlax Plushie Doll
-
 Crochet Beautiful Penguin Toy
-
 Crochet Tiny Snowman
- DIY
-
 DIY Santa Craft For Kids
-
 Paper Plate Angel Craft
-
 Upcycled Mason Jar Chicken Vase
- Knitting Ideas
-
 Knitted Bridger Cowl
-
 Knitted Keepsake Bag
-
 Knitted Cutie Cupcake Dolls