Crochet Teddy Bear Amigurumi: Step-by-Step Guide

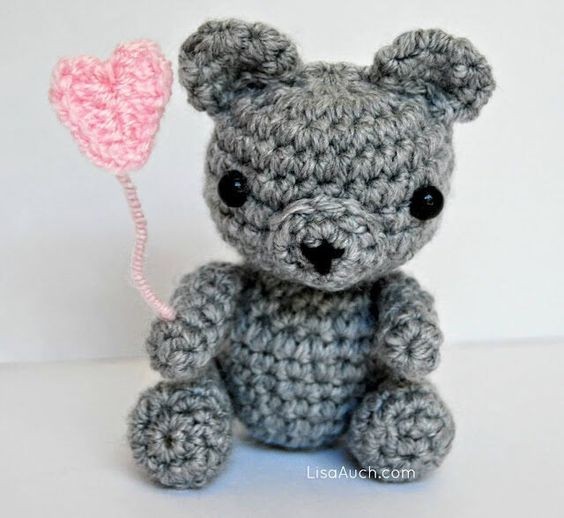
Crochet Teddy Bear Amigurumi is a delightful and cozy craft that brings joy to both the creator and recipient. These cute little bears are perfect for snuggling or adorning a nursery with their charm. With just a few skeins of yarn and a crochet hook, you can bring these adorable creatures to life stitch by stitch. Whether you're a seasoned crocheter or new to the craft, making a Teddy Bear Amigurumi is a fun and rewarding project that allows your creativity to shine. The satisfaction of holding a handmade teddy bear in your hands is truly heartwarming, making it a perfect gift for loved ones of all ages. So grab your yarn, hook, and a cup of tea, and let's crochet some love!
Materials
I used a 2.50mm crochet hook, but if you’re struggling using the smaller hook, use a 3.50mm crochet hook. You will be working in single crochet stitch. You will also need:
- 2 eyes (If making for a child, then remember to use embroidered eyes)
- Tapestry needle
- Filling/stuffing
- If you want to make the little heart on a string, you will need some red yarn and thin wire.
Notes
If you are comfortable working in amigurumi style, I suggest you use the YARN UNDER method. Instead of yarn over, simply yarn under when you would normally yarn over the hook. Working yarn under makes the stitching closer together and hides the ugly holes when decreasing. Use your preferred color in double-knit yarn.
sc – single crochet stitch
2sctog - work 2 single crochets together to decrease.
2sc = increase by 1 by working 2 stitches into the same stitch (make an invisible decrease by working the 2 stitches in the front loops only and single crochet together).
Do not slip to join; we will be working in a spiral. If it makes it easier, I use a stitch marker to help me keep track of the beginning and end of rounds.
You do not need to know how to make a magic circle/magic loop to make this crocheted toy.
*An alternative to working a magic circle is to chain 2 and sc the number of stitches into the first chain created.
You can also make the arms and legs first and join them as you go!
Arms (Make 2)
Rnd 1: work 6 sc into a magic circle, (6)
Rnd 2: sc in each stitch around. (6)
Rnd 3-7: sc around.
Fasten off, leaving a long tail for attaching the arm to the body later.
Legs (Make 2)
Rnd 1: work 6 sc into the magic circle, (6) (OR chain 2 and work ALL into the first chain)
Rnd 2: 2sc in each stitch around (12)
Rnd 3-Rnd 5: sc around
Rnd 6: sc2tog, sc around (11)
Rnd 7: sc2tog, sc around (10)
Rnd 8: sc2tog, sc around (9)
Rnd 9: sc2tog, sc around (8). Fasten off, leaving a long length of yarn for attaching.
Body
Rnd 1: work 5 sc into a magic circle (5) (OR chain 2 and work ALL into the first chain)
Rnd 2: {sc 2tog} around. Fasten off, leaving a long length of yarn for attaching.
Rnd 3: {2sc}, in each stitch around (10)
Rnd 4: {2sc, sc} around (15)
Rnd 5: {2sc, sc 2} around (20)
Rnd 6-9: sc around.
Rnd 10: {sc2tog, sc 5} around.
Rnd 11: {sc2tog, sc 4} around. Stuff the body at this stage.
Head
Rnd 1: Work 10 sc into a magic circle. (OR chain 2 and work ALL into the first chain)
Rnd 2: 2sc around (20)
Rnd 3: sc, 2sc repeat around (30).
Rnd 4-7: sc around (NOTE: if using safety eyes, position them inside at Rnd 6).
Rnd 8: sc2tog every 5th stitch around.
Rnd 9: sc2tog every 4th stitch around.
Rnd 10: sc2tog every 3rd stitch around (stuff head at this point).
Rnd 11: sc2tog around – Fasten off, leaving a long length of yarn for attaching.
Ears (Make 2)
Rnd 1: 6 sc in magic circle.
Rnd 2: 2 sc in each stitch around (12)
Rnd 3: sc in each stitch around (12)
Fasten off and stitch the 2 ends together to make a semi-circle. I usually pull slightly and gather this part to help create a shaped ear.
Leave a long tail and set it aside for when you are ready to position and sew the ears to the head.
Position the legs to the side base of the body, secure them with pins, and sew them together. Sew the eyes and create a little button nose with black yarn.
Alternatively, position the arms to the sides, just below the neck.
Sew the head to the body.
Sew the ears into place.
Nose/Muzzle
Rnd 1: Ch 6
Rnd 2: 2sc around
Rnd 3: sc around.
Fasten off and sew into position on face.
For the Floating Small Heart Balloon
Using red yarn and the 2.50mm hook:
Chain 5, 3 dc in the 3rd chain from hook, 3 hdc in the next stitch, chain 1 (do not turn work along the back on the row just worked hdc), sc, 3 hdc, 3 dc in the last stitch, chain 2, slip stitch into the middle of the ring created.
Fasten off and pull the middle tight.
For the tiny heart on Teddy’s chest, sc 6 in a circle and finish off when sewing onto the teddy shaped into a heart.
- Funny Pictures
-
 Cute Cat Memes That Will Make Your Day Brighter
-
 Spot-on and Funny Memes About Introverts Struggles
-
 Top Wonderful Cat Memes on Their Way to Better Your Day
- Recipes
-
 Creamy Old Fashioned Rice Pudding
-
 Russian Tea Cakes (Snowball Cookies)
-
 Rigatoni with Sausage, Tomatoes, and Zucchini
- Lifehacks
-
 How to Crochet a Harlequin Stitch
-
 Removing The Toughest Stains
-
 Crochet Basics: Crumpled Griddle Stitch
- Crochet Ideas
-
 Crochet Christmas Tree
-
 Crochet Goblet of Fire
-
 Crochet Adorable Ammonite
- DIY
-
 DIY Snowman Wreath
-
 Mini Santa Sleigh Ornament
-
 Crochet Gingerbread House Blanket
- Knitting Ideas
-
 Knitted Easter Bunny
-
 Knitted Mobile Phone/Glasses Case
-
 Knitted Cabled Wallet