Crochet Tiffany Flapper Capper Hat Pattern

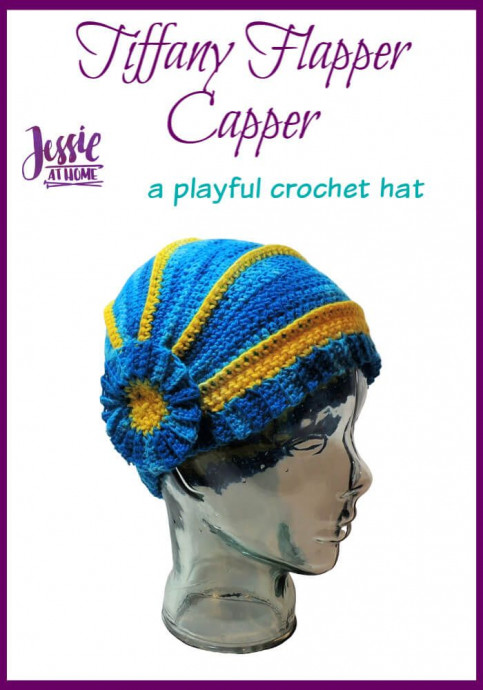
The Crochet Tiffany Flapper Capper Hat is an adorable and stylish accessory that adds a touch of vintage charm to any outfit. With its intricate crochet design and vibrant colors, this hat is sure to turn heads and make you feel like a fashionista from the past! Whether you're heading out for a day of fun with friends or simply want to add a dash of whimsy to your wardrobe, this hat is the perfect choice. So, go ahead, channel your inner flapper, and rock this fabulous hat with confidence and flair!
Size
Adult Medium (fits most women)
Yarn
Furls Whims Merino: (50% fine superwash merino wool, 50% nylon), Size 3 (15 wpi, DK weight), 182 yds / 100 g (yds/g = 1.82)
Dyed Turquoise Ombre: Yarn A – 1 skein, (150 yds / 80 g)
Furls Whims Merino: (50% fine superwash merino wool, 50% nylon), Size 4 (11 wpi, worsted weight), 103 yds / 100 g (yds/g = 1.03)
Dyed Yellow Ombre: Yarn B – 1 skein, (40 yds / 40 g)
Hook
US – 7, 4.5 mm (Furls calls this G+)
Gauge
18 sts x 18 rows = 4” [10 cm] in sc in size 3 yarn
Other Supplies
yarn needle
locking stitch marker
Stitches and Abbreviations
ch – chain
dc – double crochet
hdc – half double crochet
pm – place marker
rnd – round
sc – single crochet
sl st – slip stitch
sp(s) – space(s)
st(s) – stitch(es)
Getting Started
Round/Row counts are at the end of each row after the period, if the count has changed from the previous round.
Chs and sl sts are not included in Round/Row counts unless specified.
Tiffany Flapper Capper Pattern
Tiffany Flapper Capper Wedges (make 5 in Yarn A)
Rnd 1: Ch 41, (sc, ch 2, 2 sc) in second ch from hook, *sc in each of next 7 ch, hdc in each of next 8 ch, dc in each of next 8 ch, hdc in each of next 8 ch, sc in each of next 7 ch**, (2 sc, ch 2, 2 sc) in last ch; begin working on opposite side of chains just worked, repeat from * to **, sc once more in first ch worked into, sl st to top of first sc, sl st in ch-2 sp. {84 sts}
Rnd 2: Ch 1, *(sc, ch 2, 2 sc) in ch-2 sp, sc in each of next 6 sts, hdc in each of next 8 ch, dc in each of next 14 ch, hdc in each of next 8 ch, sc in each of next 6 sts**, (2 sc, ch 2, 2 sc) in ch-2 sp; repeat from * to **, sc once more in ch-2 sp, sl st to top of first sc, sl st in ch-2 sp. {92 sts}
Rnd 3: Ch 1, *(sc, ch 2, 2 sc) in ch-2 sp, sc in each of next 4 sts, hdc in each of next 8 ch, dc in each of next 22 ch, hdc in each of next 8 ch, sc in each of next 4 sts**, (2 sc, ch 2, 2 sc) in ch-2 sp; repeat from * to **, sc once more in ch-2 sp, sl st to top of first sc, sl st in ch-2 sp. {100 sts}

Tiffany Flapper Capper Band
Bottom Half
Row 1: With Yarn A, ch 6, sc in second ch from hook and each remaining ch. {5 sc}
Row 2: Turn, ch 1, sc in back loop only of each st across.
Repeat Row 2 until there are 140 Rows total.
Fasten off then weave in all ends.
Top Half
Row 1 (right side): Working along one long side of Band, join Color B to top right corner, ch 1, 2 sc in same st, [skip 1 sc, 2 sc in side of next sc] 44 times, [skip 1 sc, sc in side of next sc] 25 times, sc in corner. {116 sts}
Row 2 (wrong side): Turn, ch 1, [skip 1, sc in next st] 13 times, sc in each remaining st across. {103 sts}
Row 3: Turn, ch 1, sc in each of next 90 sts, pm, [skip 1, sc in next st] 6 times. {96 sts}
Do not remove marker.
Fasten off leaving end tail long to finish flower then weave in starting tail.

Tiffany Flapper Capper Button
Rnd 1: With Yarn A, ch 4, sl st into first ch made to make a loop, ch 3 (counts as first dc), 11 dc in loop, sl st to top of ch 3. {12 sts}
Fasten off then weave in all ends.
Tiffany Flapper Capper Assembly
Wedges
Hold 2 Wedges together with right sides on the outside, join Yarn B in ch-3 sp through both layers, sc in ch-3 sp through both layers, [sc in next st through both layers] 50 times, sc in ch-3 sp through both layers. Fasten off leaving starting and ending yarn tails hanging.
Join third Wedge to previous Wedge in same manner, then join fourth Wedge to third Wedge and fifth Wedge to fourth wedge in same manner.
Tie 5 starting tails together tightly and weave ends inside, tie 5 ending tails together tightly and weave ends inside.
Band
Hold hat with right side facing, skip first 2 sts of one of edge Wedge sections, with Yarn B, sc through next st (right side to wrong side) and marked st on Band (wrong side to right side), [sc through next st on Wedge and next st on Band] 45 times.
Skip remaining sts on Wedge, skip first 2 sts of next edge Wedge, sc through next st (right side to wrong side) and next st on Band (wrong side to right side), [sc through next st on Wedge and next st on Band] to end of Band.
Fasten off then weave in all ends.
Twirl and Button Attaching
Twirl unattached section of band into a rosette, use tail left from Band Top Half to sew rosette in place, and to sew end of band under rosette. Then weave in ends.
Place button on opposite side of rosette so it covers where all Wedges meet.
With Yarn B, attach button with decorative stitches such as French knots.
Fasten off then weave in all ends.
Final Touch
Wear or give and enjoy!
- Funny Pictures
-
 Relatable and Funny Memes to Distract You From the Routine
-
 Hilarious Cat Snapchats That Will Leave You With the Biggest Smile
-
 Today’s Top Funny Tweets to Scroll Before Bed
- Recipes
-
 Cappuccino Brownies
-
 Chicken Mushroom Tortellini Bake
-
 Spinach Pie
- Lifehacks
-
 8 Necessary Tips for Baking Bread
-
 Tips & Hacks for Clean Carpets
-
 10 Uses For Old TV Armoires
- Crochet Ideas
-
 Crochet Watermelon Amigurumi
-
 Crochet Flower Hat for your Pet
-
 Crochet Shark Applique
- DIY
-
 Crochet Titus the Barn Owl
-
 Crochet Rainbow Bunny
-
 DIY Washer Ornaments
- Knitting Ideas
-
 Knitted Star Square Dishcloth
-
 Knitted Free 2025 Year Dishcloth
-
 Knitted Ribbed Adult Hat