Crochet Rose Granny Squares: A Step-by-Step Guide

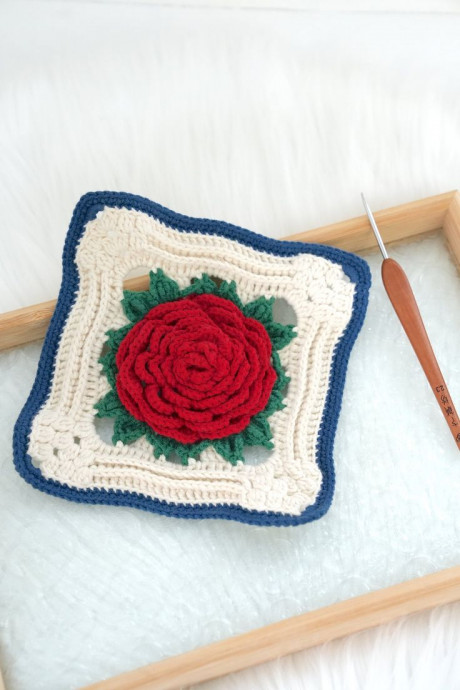
Crochet Rose Granny Squares
Crochet Rose Granny Squares are not only adorable but also a lovely addition to any handmade project. The intricate details and vibrant colors bring a touch of charm and warmth to your creations, making them stand out and brighten up any room. Creating these Granny Squares can be a relaxing and enjoyable activity, perfect for both beginners and experienced crocheters alike. With a little bit of patience and creativity, you can create beautiful pieces that showcase your love for crochet and handmade craftsmanship. So grab your favorite yarn and crochet hook, and let's get crafting some delightful Crochet Rose Granny Squares together!
Materials Needed
- Yarn – Loopara 4ply combed cotton (Beige 03, Green 18, Blue 37 and Red 68)
- Hook – 2.3mm
- Scissors
Step By Step Tutorial
How to Crochet a Rose Granny Square Style II – Step by Step
- R1: Magic ring, 6 sc, sl, ch.
- R2: FLO: [sc, (4 dc)] 3 times, sl, ch.
- R3: BLO: (sc, ch 3) 5 times, sl, ch.
- R4: (Sc, hdc, 2 dc, hdc) 5 times, sl (between first hdc and dc), ch.
- R5: (Sc, ch 4) 6 times, sl, ch (Add one group between dc and hdc on left side of the third petal).
- R6: (Sc, hdc, 3 dc, hdc) 6 times, sl, ch.
- R7: (Sc, ch 4) 7 times, sl, ch.
- R8: (Sc, hdc, 4 dc, hdc) 7 times, sl, ch.
- R9: (Sc, ch 5) 8 times, sl, ch.
- R10: (Sc, hdc, 5 dc, hdc) 8 times, sl, ch.
- R11: (Sc, ch 6) 8 times, sl, ch.
- R12: (Sc, hdc, 6 dc, hdc) 8 times, sl, ch.
- R13: (Sc, ch 6) 8 times, sl.
- R14: (Sc, hdc, 7 dc, hdc) 8 times, sl, ch.
- R15: (Sc, ch 7) 8 times, sl. Fasten off, weave in ends.
- R16: [(Ch 2, dc, tr, dtr, picot, tr, dc, ch 2, sl) twice, (ch 4, dc, tr, picot, ch 3, sl, ch 3, tr, picot, dc, ch 4, sl in next st)] 4 times, fasten off, weave in ends.
- R17: Ch, (sc, ch, 3 tr, ch, sc, ch 4, sc, ch, 3 tr, ch, sc, ch 7) 4 times, sl, fasten off, weave in ends.
- R18: Ch 2, [(2 dc, ch, bo, ch 3, bo, ch, 2 dc), 17 dc] 4 times, 2 sl, ch 2.
- R19: [(Ch, bo, ch, bo, ch 3, bo, ch, bo, ch), 21 bpdc] 4 times, sl, ch 2.
- R20: [(Ch, bo, ch, bo, ch, bo, ch 3, bo, ch, bo, ch, bo, ch), 21 bpdc] 4 times, sl, fasten off, weave in ends.
- R21: (Change color) Ch, [(5 sc), BLO 33 sc] 4 times, sl, ch.
- R22: (2 sc, sc inc, 35 sc) 4 times, sl, fasten off, weave in ends.
Notes
Crochet Tips:
Keep your tension consistent, especially when working the rose petals in rounds 2-15. A slightly tighter tension in the center rounds will help your rose maintain its 3D shape and prevent it from flattening over time.
- Funny Pictures
-
 These are the Pics That Simply Describe Your Life
-
 Hilariously Accurate Parenting Memes That Show the Other Side of Parenthood
-
 Great Pics That Just Depict Our Lives
- Recipes
-
 Crispy Baked Avocado Fries
-
 Baked Beans and Hot Dogs with Biscuit Topping
-
 Roasted Rosemary Lemon Chicken Breasts
- Lifehacks
-
 Crochet Basics: Twisted Fringe
-
 7 Crochet Tips And Tricks
-
 How To Work Crochet Into Denim
- Crochet Ideas
-
 Crochet Snorlax Plushie Doll
-
 Crochet Cat in 1 Row
-
 Crochet Beautiful Penguin Toy
- DIY
-
 Popsicle Stick and Jingle Bell Christmas Tree Ornament
-
 DIY Santa Craft For Kids
-
 Paper Plate Angel Craft
- Knitting Ideas
-
 Knitted Bridger Cowl
-
 Knitted Keepsake Bag
-
 Knitted Cutie Cupcake Dolls