Crochet Swan Coaster: A Delightful DIY Project

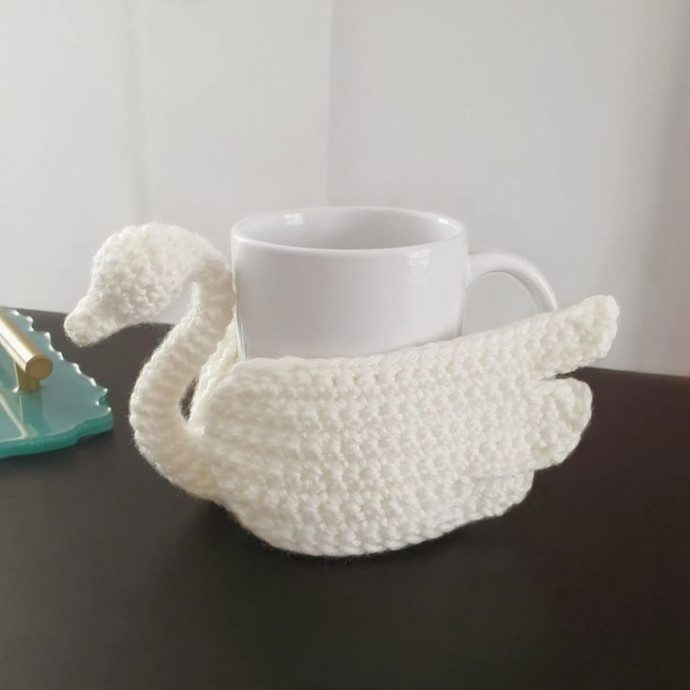
The Crochet Swan Coaster is an adorable and practical addition to your home decor. With its intricate design and charming details, it not only protects your surfaces but also adds a touch of whimsy to your space. Handcrafted with care and creativity, this sweet coaster is sure to bring a smile to your face every time you set down your favorite drink. Whether you're enjoying a cup of tea or hosting a gathering with friends, the Crochet Swan Coaster is a delightful way to showcase your love for handmade treasures.
Materials
- Acrylic or Cotton yarn (1 skein 100 gr is enough, medium yarn weight)
- 5 mm crochet hook
- Stainless craft wire 1.5 mm (14.5 cm long)
- Polyester fiberfill for stuffing
Abbreviations
- ch: chain
- sc: single crochet
- inc: increase
- dec: decrease
- hdc: half double crochet
- sl st: slip stitch
The gauge is: 5 x 5 cm = 8 stitches x 8 rows (in sc).
The Swan’s Body
Start with a magic circle.
Round 1: 6 sc (6)
Round 2: 6 sc inc (12)
Round 3: (1 sc, sc inc) x 6 (18)
Round 4: (1 sc, sc inc, 1 sc) x 6 (24)
Round 5: (3 sc, sc inc) x 6 (30)
Round 6: (2 sc, sc inc, 2 sc) x 6 (36)
Round 7: (5 sc, sc inc) x 6 (42)
You should have an 8 cm diameter round at this point.
Now it’s time to take your craft wire. We will work the next round around it. Firstly, leave a long tip of the wire out, to later use it for the swan’s neck, as shown in the picture below.
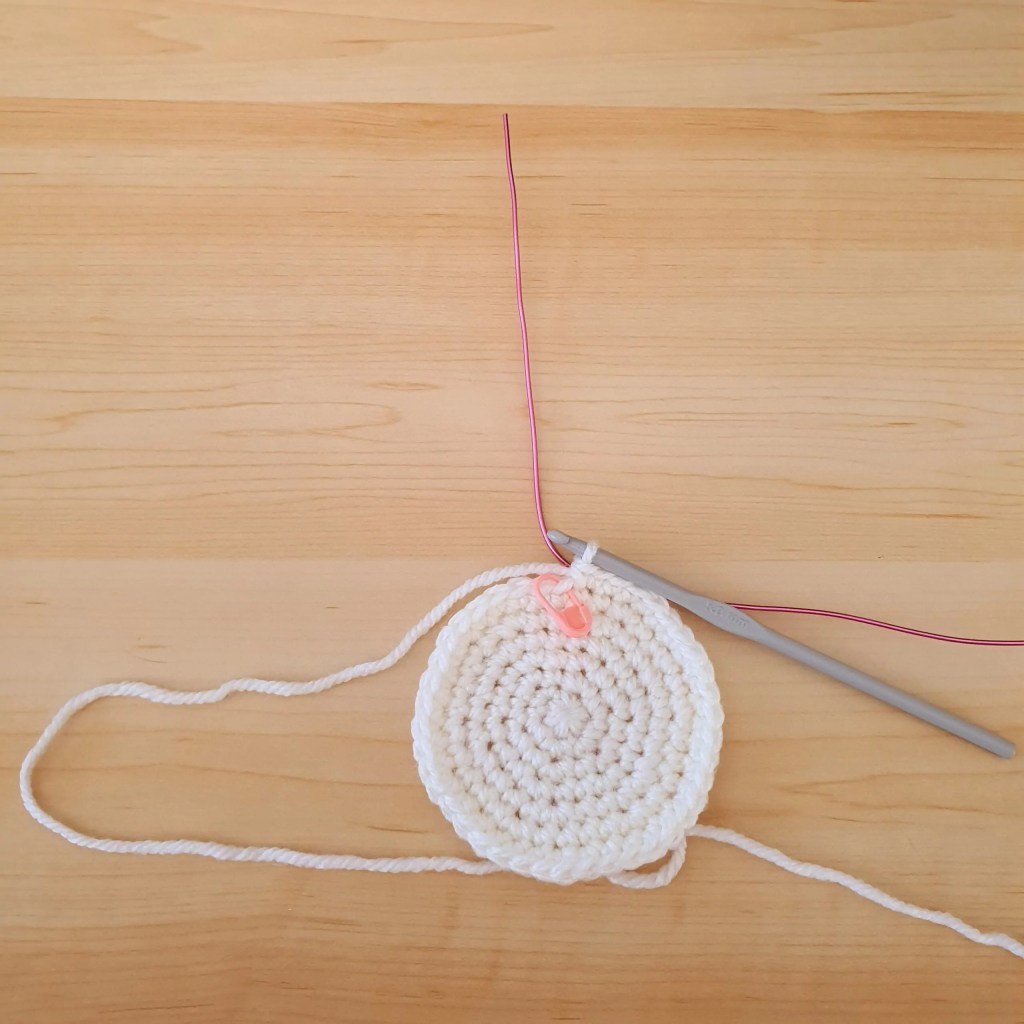
Round 8: (3 sc, sc inc, 3 sc) x 6 (48)
Twirl the rest of the wire around the tail we left off before.
Rounds 9 to 13: 48 sc (48)
Add 1 hdc at the end of round 13, then sl st in the next stitch. Cut the yarn and weave in the ends.
The Swan’s Neck
Start with a magic circle.
Round 1: 4 sc (4)
Round 2: (1 sc, sc inc) x 2 (6)
Round 3: 6 sc (6)
Round 4: sc inc x 2, 4 sc (8)
Round 5: sc inc, 1 sc, sc inc, 5 sc (10)
Round 6: 1 sc, sc inc x 2, 1 sc, sc inc x 2, 4 sc (14)
Rounds 7 to 8: 14 sc (14)
Round 9: 2 sc, sc dec, 3 sc, sc dec, 5 sc (12)
Round 10: 1 sc, sc dec x 4, 1 sc, sc inc x 2 (10)
Round 11: 1 sc, sc dec x 3, 1 sc, sc inc, 1 sc (8)
Round 12: 1 sc, sc dec x 2, 3 sc (6)
Rounds 13 to 27: 6 sc (6)
Round 28: (1 sc, sc inc) x 3 (9)
Round 29: (2 sc, sc inc) x 3 (12)
Rounds 30 to 31: 12 sc (12)
Cut yarn and leave a tail for sewing. Fill the head as you go with some polyester fiber, as well as the bottom of the neck. Slide the craft wire we left from the body inside the neck, then sew the bottom of the neck to the body.
The Wings
Please note that each row ends with a ch 1 then turn, unless indicated otherwise.
Ch 16, starting from the 2nd loop from the hook:
Row 1: 14 sc, sc inc, ch 3 then turn (16)
Row 2: 15 sc, sc inc (17)
Row 3: 13 sc, ch 6 then turn (19 – the chain here counts as stitches)
Row 4: skip the 1st loop from the hook, sc inc in the 2nd loop, 1 sc in each of the 4 remaining loops, 12 sc, sc inc (20)
Row 5: 19 sc, sc inc (21)
Row 6: sc inc, 20 sc (22)
Row 7: 22 sc, ch 3 then turn (22)
Row 8: sc dec x 2, 18 sc (20)
Row 9: 18 sc, ch 5 then turn (23 – the chain here counts as stitches)
Row 10: skip the 1st loop from the hook, sc inc in the 2nd loop, 1 sc in each of the 3 remaining loops, 16 sc, sc dec (22)
Row 11: sc dec, 20 sc, ch 4 then turn (21)
Row 12: sc dec, 15 sc, sc dec x 2 (18)
Cut yarn and weave in the ends. Make 2 wings this way. Block the wings and make them stiff by using a liquid fabric stiffener. You can also use other methods to stiffen them up: mix clear water with some white fabric glue, soak the wings in it, and use a piece of cardboard and some pins to block the wings while they dry. A hair dryer can expedite the process.
Once dried, sew the wings on both sides of the body.
The Swan’s Tail
Start with a magic circle.
Round 1: 3 sc (3)
Round 2: sc inc x 3 (6)
Round 3: (1 sc, sc inc) x 3 (9)
Round 4: sc inc, 1 sc, sc inc, 1 sc, sc inc, 4 sc (12)
Round 5: 12 sc (12)
Cut yarn and leave a tail for sewing. Fill the tail with some polyester fiber, then sew it on the back of the body (opposite side of the neck).
And you’re done!
- Funny Pictures
-
 Relatable and Funny Memes to Distract You From the Routine
-
 Hilarious Cat Snapchats That Will Leave You With the Biggest Smile
-
 Today’s Top Funny Tweets to Scroll Before Bed
- Recipes
-
 Cappuccino Brownies
-
 Chicken Mushroom Tortellini Bake
-
 Spinach Pie
- Lifehacks
-
 8 Necessary Tips for Baking Bread
-
 Tips & Hacks for Clean Carpets
-
 10 Uses For Old TV Armoires
- Crochet Ideas
-
 Crochet Watermelon Amigurumi
-
 Crochet Flower Hat for your Pet
-
 Crochet Shark Applique
- DIY
-
 Yarn Wrapped Christmas Wreath Ornaments
-
 Egg Carton Snowman Ornament
-
 Stick Peppermint Candy Ornament
- Knitting Ideas
-
 Knitted Star Square Dishcloth
-
 Knitted Free 2025 Year Dishcloth
-
 Knitted Ribbed Adult Hat