Crochet Valentine Penguin: A Cute DIY Project for Valentine's Day

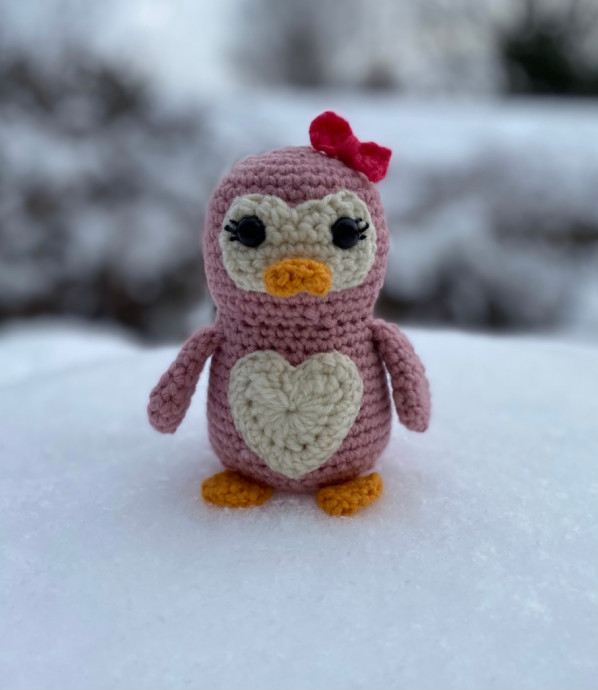
If you're looking to add a touch of love and cuteness to your Valentine's Day decor, the Crochet Valentine Penguin is just the thing for you! This adorable little penguin, with its heart-shaped belly and sweet eyes, will bring a smile to anyone's face. Whether you're gifting it to a loved one or treating yourself, this crocheted creation is sure to warm hearts all around. So grab your yarn and hook, and get ready to spread some penguin love this Valentine's Day!
Supplies Needed
G – hook (4 mm)
Worsted weight yarn in main color, second color, small amount of orange for feet and beak
Poly-fil stuffing
Yarn needle
10 mm safety eyes
Black embroidery floss or thin yarn (optional)
Terms
ch – chain
sc – single crochet
inc – increase
dec – decrease
hdc – half double crochet
dc – double crochet
tr – triple crochet
slp st – slip stitch
Face Mask Instructions
In second color:
- ch 10
- Starting in second ch from hook, sc across - 9
- ch 1, turn, sc across - 9
- ch 1, turn, sc across - 9
- ch 1, turn, dc, dc, hdc, sc, slp st, sc, hdc, dc, dc
Body Instructions
In main color:
- 6 sc in a magic circle - 6
- 2 sc in each st around - 12
- (sc, inc) 6x - 18
- (sc 2, inc) 6x - 24
- (sc 3, inc) 6x - 30
- Rows 6-8: sc around - 30 each row
- (sc 4, inc) 6x - 36
- Rows 10-14: sc around - 36 each row
- (sc 4, dec) 6x - 30
- (sc 3, inc) 6x - 24
- In front loops only: (sc 3, inc) 6x - 30
- Rows 18-19: sc around - 30 each row
- Now attach the eyes. Place the eyes in center of the round spots on the face mask, push the posts through the head as well before attaching the backs.
- Start stuffing now, stuff the head firmly. There is no need to sew the mask down now, you can do it at the end. The eyes will hold it in place while you work.
- (sc 4, inc) 6x - 36
- Rows 21-24: sc around - 36 each row
- (sc 5, inc) 6x - 42
- Rows 26-29: sc around - 42 each row
- (sc 5, dec) 6x - 36
- (sc 4, dec) 6x - 30
- In back loops only: (sc 3, dec) 6x - 24
- Firmly stuff body
- (sc 2, dec) 6x - 18
- (sc, dec) 6x - 12
- dec 6 - 6
- Fasten off, weave in end.
Arms Instructions
In main color - make two:
- 5 sc in magic circle - 5
- 2 sc in each st around - 10
- (sc, inc) 5x - 15
- sc around - 15
- (sc, dec) 5x - 10
- sc around - 10
- (sc 3, dec) 2x - 8
- Rows 8-9: sc around - 8 each row
- Fasten off, leave a tail for sewing, do not stuff
Feet Instructions
In orange - make two:
- ch 5
- Starting in second ch from hook: sc 3, inc in last st
- Continue around the back of the ch: sc 3, inc - 10
- sc around - 10
- (sc 3, dec) 2x - 8
- sc around - 8
- Fasten off, leave a tail for sewing, do not stuff
Beak Instructions
In orange:
- ch 5
- Starting in second ch from hook: sc 4, continue around the back of ch: sc 4 - 8
- sc around - 8
- Fasten off, leave tail for sewing, do not stuff
Bow Instructions
- ch 6
- Starting in second ch from hook: sc 5 - 5
- ch 1, turn, sc 5 - 5
- Fasten off, weave in ends.
- Use a matching piece of yarn: wrap around center of piece to form bow shape, tie tight and leave a tail for sewing.
Belly Heart Instructions
In second color:
- In a magic ring: 3 tr, 4 dc, tr, 4 dc, 3 tr
- Pull the ring closed, ch 2 and slp st into hole. Make sure you’ve pulled your magic ring tight or you will have a hole in the center.
- sc, 2 hdc in next st, 3 hdc in next st, 2 hdc in next st, hdc 1 in next 3 sts, (hdc, dc, hdc) in next st, 2 hdc in next st, hdc 1 in next 3 sts, 2 hdc in next, 3 hdc in next, 2 hdc in next, ch 2, slp st into center.
- Fasten off, leave a tail for sewing.
Assembly Instructions
- Sew down the face mask.
- Line up and sew on the beak.
- Sew the heart to the belly.
- Sew the arms to the sides of the body.
- Line the feet up to the front loops of row #32 on the body, sew into place.
- Sew on the bow (if using) and eye lashes with black if wanted.
All done!
- Funny Pictures
-
 Hilarious Memes for Those Bored to Tears
-
 Weekly Treat of Funniest Parenting Memes for Good Laugh out Loud Right Now
-
 Really Funny Pics to End These Weekend Perfectly
- Recipes
-
 Crispy Baked Avocado Fries
-
 Scrambled Chickpea and Spinach Pitas
-
 Cinnamon Pancakes
- Lifehacks
-
 Crochet Basics: Aligned Cobble Stitch
-
 Brick Stitch Crochet Tutorial
-
 Crochet Basics: Wattle Stitch
- Crochet Ideas
-
 Crochet Snorlax Plushie Doll
-
 Crochet Beautiful Penguin Toy
-
 Crochet Tiny Snowman
- DIY
-
 DIY Santa Craft For Kids
-
 Paper Plate Angel Craft
-
 Upcycled Mason Jar Chicken Vase
- Knitting Ideas
-
 Knitted Bridger Cowl
-
 Knitted Keepsake Bag
-
 Knitted Cutie Cupcake Dolls