Crochet Christmas Penguin Amigurumi Pattern

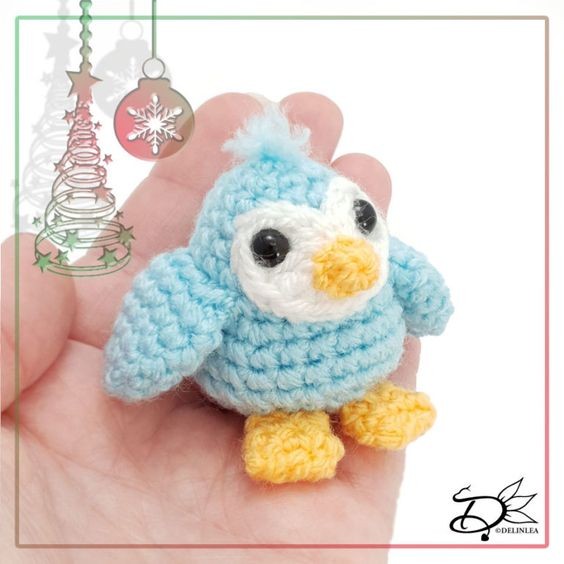
If you're looking to add some extra cuteness to your holiday decor or gift-giving, a Crochet Christmas Penguin Amigurumi is a perfect choice! This charming little penguin is sure to bring a smile to anyone's face with its festive scarf and cheerful demeanor. Whether you're an experienced crocheter or just starting out, creating this adorable amigurumi can be a fun and rewarding project. Imagine the joy of seeing this handmade penguin sitting proudly on a mantel or tucked into a Christmas stocking. So gather your yarn and crochet hook, and get ready to spread some holiday cheer with this delightful Crochet Christmas Penguin Amigurumi!
Materials Needed
For this pattern you’ll need:
- ♥ Yarn in the colors Light Blue, White, and Yellow/Orange. (I used Stylecraft Special DK)
- ♥ Crochet hook. (I used 3mm)
- ♥ Stuffing.
- ♥ Yarn Needle.
- ♥ Sewing Pins.
- ♥ Stitch Marker.
- ♥ Safety Eyes, 6mm.
Stitches Used
Stitches used (US Terms):
- Magic Ring.
- CH = Chain.
- SLST = Slip Stitch.
- SC = Single Crochet.
- HDC = Half Double Crochet.
- DC = Double Crochet.
- TR = Treble Crochet.
- ST = Stitch.
- Inc = Increase.
- Dec = Decrease.
- (…) = Repeat the space in brackets the given number of times.
- […] = Total number of stitches.
This pattern is made with continuous rounds unless stated otherwise. Use a stitch marker to mark your first/last stitch of your row.
Pattern: Christmas Penguin
Face
Use the color White.
Crochet in a Magic Ring; Ch2, 2TR, 1DC, 1HDC, 3SC, 1HDC, 1DC, 2TR, CH2, SlSt and pull the ring tight.
Fasten off and leave a long tail for sewing.
Body
Use the color Light Blue.
Prepare 3 strings of Light Blue yarn of about 8cm, tie these together.
- 1: 6SC in a Magic Ring. [6]
- Add the 3 strings of White yarn to the magic ring, then close it up.
- 2: 2SC in each st around. [12]
- 3: (3SC, inc) 3 times. [15]
- 4: (4SC, inc) 3 times. [18]
- 5: 18SC. [18]
- 6: (5SC, inc) 3 times. [21]
- Add the safety eyes between row 4 and 5, but make sure to add the ‘face’ in between the eyes and the body.
- 7: 21SC. [21]
- 8: (6SC, inc) 3 times. [24]
- 9: 24SC. [24]
- 10: 24SC. [24]
- 11: 24SC. [24]
- 12: (2SC, dec) 6 times. [18]
- 13: (1SC, dec) 6 times. [12]
- Stuff the body.
- 14: Dec all around. [6]
- Fasten off and weave in the tail.
Beak
Use the color Orange/Yellow.
- 5SC in a Magic Ring, SlSt in the first st. [5]
- Fasten off and leave a long tail for sewing.
Feet (Make 2)
Use the color Orange/Yellow.
- 1: 6SC in a Magic Ring. [6]
- 2: 6SC. [6]
- 3: (2SC, inc) 2 times. [8]
- Fasten off and flatten the piece, sew the last row together.
Wings (Make 2)
Use the color Light Blue.
- 1: 6SC in a Magic Ring. [6]
- 2: (1SC, inc) 3 times. [9]
- 3: (2SC, inc) 3 times. [12]
- 4: 12SC. [12]
- 5: 12SC. [12]
- 6: 12SC. [12]
- Fasten off and leave a long tail for sewing.
Assembling
Whenever I start assembling amigurumi, I like to use sewing pins to position all parts first until I’m happy. Then I will sew them on. I recommend you do so as well.
First, sew along the edge of the face to secure it better. Cut his ‘hair’ to the length you want and unraffle the yarn with a needle to make it fluffy. Then sew on his beak, feet, and wings nicely.
If you want to hang it, don’t forget to add a loop to the top.
- Funny Pictures
-
 Hilarious Memes for Those Bored to Tears
-
 Weekly Treat of Funniest Parenting Memes for Good Laugh out Loud Right Now
-
 Really Funny Pics to End These Weekend Perfectly
- Recipes
-
 Crispy Baked Avocado Fries
-
 Baked Beans and Hot Dogs with Biscuit Topping
-
 Roasted Rosemary Lemon Chicken Breasts
- Lifehacks
-
 Crochet Basics: Twisted Fringe
-
 7 Crochet Tips And Tricks
-
 How To Work Crochet Into Denim
- Crochet Ideas
-
 Crochet Snorlax Plushie Doll
-
 Crochet Cat in 1 Row
-
 Crochet Beautiful Penguin Toy
- DIY
-
 Popsicle Stick and Jingle Bell Christmas Tree Ornament
-
 DIY Santa Craft For Kids
-
 Paper Plate Angel Craft
- Knitting Ideas
-
 Knitted Bridger Cowl
-
 Knitted Keepsake Bag
-
 Knitted Cutie Cupcake Dolls