Crochet Valentine's Apron Pattern

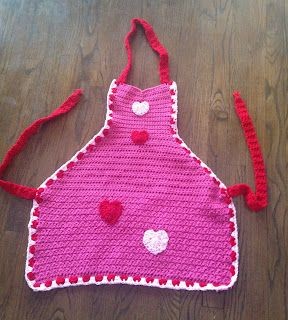
The Crochet Valentine's Apron is a delightful addition to any kitchen or crafting session. Its charming design with heart motifs and festive red and pink colors makes it perfect for spreading love during the Valentine's season. Whether you're preparing a special meal for your loved ones or simply looking to add a touch of romance to your everyday routine, this apron is the perfect accessory. With its handmade feel and intricate crochet work, it's sure to bring a smile to your face every time you put it on. So why not treat yourself or someone special to this sweet and stylish apron, and let love radiate through every stitch!
Size
Approximately 25" length
Gauge
Not important
Materials
- 6.0mm hook (for the apron, straps, and 2 hearts) and 3.5mm hook (for the 2 smaller hearts)
- 1 skein of Crafter's Secret yarn in Passion, Red, and Pink (or #4 worsted weight yarn of your choice)
- Tapestry needle for weaving ends
U.S. Stitch Abbreviations
- Ch: chain
- Sl st: slip stitch
- St: stitch(es)
- SC: single crochet
- HDC: half double crochet
- HHDC: herringbone half double crochet
- DC: double crochet
- TC: triple crochet
- SC2tog: single crochet 2 stitches together (creates a decrease)
- HDC2tog: half double crochet 2 stitches together (creates a decrease)
- MR: magic ring
- Rep: repeat
- Sk: skip
- FO: fasten off
Special Stitch
1. HHDC: Yarn over and insert hook into the next stitch; yarn over and pull through the stitch and first loop on the hook. Yarn over and pull through the 2 remaining loops on the hook.
Special Notes
- The apron is worked from the bottom up.
- I made the top portion of my apron taper to 8" wide.
- If you want the top portion of your apron to be wider, then do not complete as many decrease rows as I did.
Directions
- With Passion yarn and 6.0mm hook, Ch61. HDC in 2nd ch from hook and across or you can complete 60 FHDC. Ch1 and turn. (60)
- HHDC in each st across. Ch1 and turn. (60)
- SC in the first st, HHDC in the next st. Rep across. Ch1 and turn. (60)
- Rows 4-29: Rep rows #2 and #3.
- 30. HHDC in each st across. Ch1 and turn. (60)
Decrease Rows
- 31. HDC2tog, HDC in each of the next 56 st, HDC2tog. Ch1 and turn. (58)
- 32. HDC2tog, HDC in each of the next 54 st, HDC2tog. Ch1 and turn. (56)
- 33. HDC2tog, HDC in each of the next 52 st, HDC2tog. Ch1 and turn. (54)
- 34. HDC2tog, HDC in each of the next 50 st, HDC2tog. Ch1 and turn. (52)
- 35. HDC2tog, HDC in each of the next 48 st, HDC2tog. Ch1 and turn. (50)
- 36. HDC2tog, HDC in each of the next 46 st, HDC2tog. Ch1 and turn. (48)
- 37. HDC2tog, HDC in each of the next 44 st, HDC2tog. Ch1 and turn. (46)
- 38. HDC2tog, HDC in each of the next 42 st, HDC2tog. Ch1 and turn. (44)
- 39. HDC2tog, HDC in each of the next 40 st, HDC2tog. Ch1 and turn. (42)
- 40. HDC2tog, HDC in each of the next 38 st, HDC2tog. Ch1 and turn. (40)
- 41. HDC2tog, HDC in each of the next 36 st, HDC2tog. Ch1 and turn. (38)
- 42. HDC2tog, HDC in each of the next 34 st, HDC2tog. Ch1 and turn. (36)
- 43. HDC2tog, HDC in each of the next 32 st, HDC2tog. Ch1 and turn. (34)
- 44. HDC2tog, HDC in each of the next 30 st, HDC2tog. Ch1 and turn. (32)
- 45. HDC2tog, HDC in each of the next 28 st, HDC2tog. Ch1 and turn. (30)
- 46. HDC2tog, HDC in each of the next 26 st, HDC2tog. Ch1 and turn. (28)
- 47. HDC2tog, HDC in each of the next 24 st, HDC2tog. Ch1 and turn. (26)
- 48. HDC2tog, HDC in each of the next 22 st, HDC2tog. Ch1 and turn. (24)
- 49-64. SC in each st across. Ch1 and turn. (24)
- 65. HDC in the first 11 st. SC2tog. HDC in the last 11 st. Ch1 and turn. (23)
- 66. HDC in the first 11 st. Sl st in next st. HDC in the last 11 st. Ch1 and turn. (23)
- 67-69. Rep #66. At the end of Row 69, FO and weave ends.
Neck Strap
(Note: It's a good idea to measure as you go; you may not require as many rows as I did for my strap or you may require more rows)
- Join Red yarn in the first st of Row 69 and ch1. HDC in the same st and into the next 2 st. Ch1 and turn. (3)
- HDC across. Ch1 and turn. (3)
- Rows 3-55: Rep #2. At the end of Row 55, FO and leave a long enough tail to attach the end to the opposite side of Row 69 of the apron.
Border
- Join Red yarn on the side of Row 69 of the apron and Ch1. *4 HDC in the same st, Ch1, sk 3 st,* rep from * to * around the apron until you reach the opposite side of Row 69. (You may have to manipulate this by skipping an extra stitch or 2 to get this to work out evenly and that's okay.) FO and weave ends.
- Join Pink yarn and Ch1. *SC in the middle of the previous row's 4 HDC cluster, then 3 HDC st in the 2nd st of the sk 3,* continue to rep this around. FO and weave ends.
Side Straps (Make 2)
(Note: It's a good idea to measure as you go; you may not require as many rows as I did for each side strap or you may require more rows)
- With Red yarn, Ch4. HDC in 2nd ch from hook and across. Ch1 and turn. (3)
- HDC in each st across. Ch1 and turn. (3)
- Rows 3-50: Rep #2. At the end of Row 50, FO and leave a long enough tail for attaching to the side of the apron at Rows 28-30.
Repeat for 2nd strap.
Hearts
2 small (3.5mm hook) and 2 large (6.0mm hook) - the hearts are made the same way, with the exception of the hook size.
- 9 DC into MR. Pull to tighten the center and sl st join to the first st.
- Ch3. 2 TC into the same st as Ch3, DC into the next st. 1 HDC into the next 2 st. Ch1, TC, Ch1 into the next st. 1 HDC into the next 2 st. 3 DC into the next st. 3 TC into the last st. Sl st to the first DC st of Round 1. FO and leave a long tail for attaching to the apron. (See pics for placement or place where you desire.)
And, that's it for this simple Valentine's Apron that can be made with love and used year-round. I hope you all will enjoy this pattern....
- Funny Pictures
-
 Hilarious Memes for Those Bored to Tears
-
 Weekly Treat of Funniest Parenting Memes for Good Laugh out Loud Right Now
-
 Really Funny Pics to End These Weekend Perfectly
- Recipes
-
 Crispy Baked Avocado Fries
-
 Scrambled Chickpea and Spinach Pitas
-
 Cinnamon Pancakes
- Lifehacks
-
 Crochet Basics: Aligned Cobble Stitch
-
 Brick Stitch Crochet Tutorial
-
 Crochet Basics: Wattle Stitch
- Crochet Ideas
-
 Crochet Snorlax Plushie Doll
-
 Crochet Beautiful Penguin Toy
-
 Crochet Tiny Snowman
- DIY
-
 DIY Santa Craft For Kids
-
 Paper Plate Angel Craft
-
 Upcycled Mason Jar Chicken Vase
- Knitting Ideas
-
 Knitted Bridger Cowl
-
 Knitted Keepsake Bag
-
 Knitted Cutie Cupcake Dolls