How to Make a Crochet Pumpkin Towel Topper for Your Kitchen

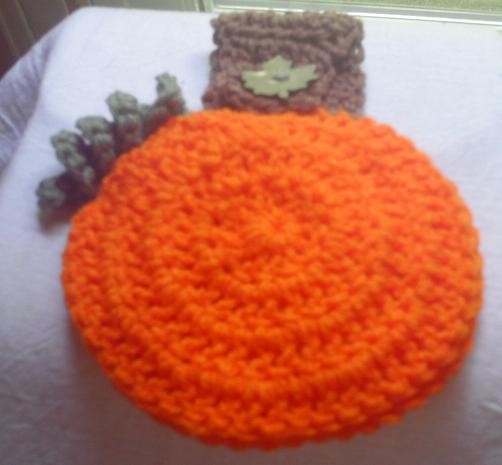
If you're looking to add a touch of fall charm to your kitchen, a Crochet Pumpkin Towel Topper is the perfect project to try! This delightful creation combines the practicality of a towel with the whimsy of a crocheted pumpkin, making it both functional and festive. Not only does it make a wonderful addition to your own kitchen decor, but it also makes a thoughtful handmade gift for friends and family. With its vibrant colors and cozy design, this Crochet Pumpkin Towel Topper is sure to bring a smile to anyone who sees it hanging in your home. So grab your crochet hook and some yarn, and let's get crafting some autumn magic for your kitchen!
Ingredients
To create your Crochet Pumpkin Towel Topper, you will need the following materials:
- Green, Orange, Brown Yarn
- I hook
- 1 Button
- 1 small plastic kid's bracelet (used to be called Jelly Bracelets) or a wire ring 3"
- Yarn needle
- Green towel or towel of choice
The Bow
Front of Pumpkin:
Using orange yarn and I hook:
- Chain 4
- 12 DC into the 4 chain from hook. Join with slip stitch. (12 DC)
- Chain 3
- 2 DC in each stitch around. Join with slip stitch (24 DC)
- Chain 3
- 2 DC in the first stitch * 1 DC in the next stitch 2 DC in the next stitch. Continue around * Join with slip stitch. (36 DC)
- Chain 3
- 2 DC in the first stitch * 1 DC in the next 2 stitches 2 DC in the next stitch. Continue around * Join with slip stitch (48 DC)
- Fasten off yarn and weave in ends.
Back of Pumpkin:
Using orange yarn:
- Chain 4
- 12 DC into the 4 chain from hook. Join with slip stitch. (12 DC)
- Chain 3
- 2 DC in each stitch around. Join with slip stitch (24 DC)
- Chain 3
- 2 DC in the first stitch * 1 DC in the next stitch 2 DC in the next stitch. Continue around * Join with slip stitch. (36 DC)
- Chain 3
- 2 DC in the first stitch * 1 DC in the next 2 stitches 2 DC in the next stitch. Continue around * Join with slip stitch (48 DC)
- Fasten off yarn and leave a long tail to sew back to front.
Towel Ring:
Using orange yarn:
- Attach yarn to ring/bracelet.
- Single crochet around the ring/bracelet.
- Chain 1
- Slip stitch around each stitch. Fasten off and leave long tail to attach to the pumpkin.
- Sew the top half of the ring/bracelet to the 3rd round of the back of the pumpkin.
Assembling the Pumpkin:
Place the front and back of the pumpkin together and sew halfway around, leaving the bottom open.
Vine:
Using green yarn:
- Attach yarn to the top of the pumpkin.
- Chain 15
- 3 sc in each chain. Fasten off and weave in ends.
Hanger/Stem:
- Attach brown yarn to the top of the pumpkin and work 7 SC across (7 SC).
- *Turn, chain 2, HDC across row (7 HDC).
- Repeat * for 4 rows.
- Turn, chain 2, HDC decrease the first 2 stitches, HDC the next 3 stitches, HDC decrease the last 2 stitches (5 HDC).
- Turn, chain 2, HDC in each stitch across row (5 HDC).
- Turn, chain 2, HDC in the first stitch, chain 2, skip the next 2 stitches, HDC in the last 2 stitches (3 HDC, 2 chains).
- Turn, chain 1, SC in each stitch across including chain 2 (5 SC).
- Fasten off and weave in ends.
Finishing Touches:
Sew the button to the bottom of the back of the stem. ***If you are using a decorative button like I did in the picture, sew the button to the bottom of the front of the stem.***
Fold the hanger/stem in half and fasten to the button.
- Funny Pictures
-
 Hilarious Memes for Those Bored to Tears
-
 Weekly Treat of Funniest Parenting Memes for Good Laugh out Loud Right Now
-
 Really Funny Pics to End These Weekend Perfectly
- Recipes
-
 Crispy Baked Avocado Fries
-
 Scrambled Chickpea and Spinach Pitas
-
 Cinnamon Pancakes
- Lifehacks
-
 Crochet Basics: Aligned Cobble Stitch
-
 Brick Stitch Crochet Tutorial
-
 Crochet Basics: Wattle Stitch
- Crochet Ideas
-
 Crochet Snorlax Plushie Doll
-
 Crochet Beautiful Penguin Toy
-
 Crochet Tiny Snowman
- DIY
-
 DIY Santa Craft For Kids
-
 Paper Plate Angel Craft
-
 Upcycled Mason Jar Chicken Vase
- Knitting Ideas
-
 Knitted Bridger Cowl
-
 Knitted Keepsake Bag
-
 Knitted Cutie Cupcake Dolls