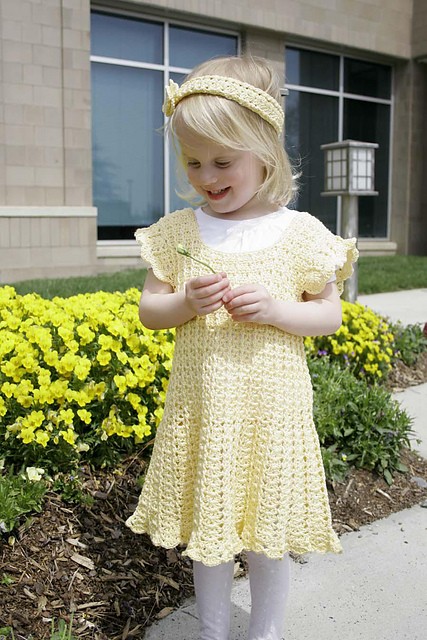
Crochet Dress Pattern: Yoke and Skirt Instructions

You’ll Need:
3 (4, 4) Balls of AUNT LYDIA’S® "Fashion Crochet Thread" yarn in 423 Maize color;
Crochet hook 3.5mm;
Yarn needle;
8 split-lock stitch markers;
Three 9/16" buttons, sewing needle and thread.
Size:
Directions are for size 2; changes for sizes 4 and 6 are in parentheses.
Stitches Control:
18 x 13 rows = 10 x 10 cm.
Finished Chest Measurements:
21 (23, 25)".
Note:
Dress yoke is worked from the high waist to shoulders, and then skirt is worked down from waist.
Instructions
Dress Yoke
Ch 96 (105, 114).
Row 1 (Wrong Side): Hdc in 2nd ch from hook and in each ch across; turn – 95 (104, 113) hdc.
Row 2: Ch 2, hdc in first 2 hdc, [fpdc around next hdc, hdc in next 2 hdc] 31 (34, 37) times; turn.
Row 3: Ch 2, hdc in each st across; turn.
Row 4: Ch 2, hdc in first 2 hdc, [fpdc around next fpdc, hdc in next 2 hdc] 31 (34, 37) times; turn.
Rows 3 and 4 form pattern.
Rep Rows 3 and 4 until 2 (2 1/2, 3)" from beginning, end Row 4, increase (0, decrease) 1 st on last row – 96 (104, 112) sts.
Divide Right Back
Ch 2, hdc in first 20 (22, 24) sts; turn.
Keeping continuity of pattern, work even until 3 (3 1/2, 4)" from beginning, ending by working a right side row. Fasten off.
Right Back Strap
With wrong side facing, skip next 8 (10, 12) sts on last long row for underarm, attach thread in next st; ch 2, hdc in same st and in each st to end; turn – 12 hdc. Work even in pattern until 4 1/2 (5, 5 1/2)" from beginning. Fasten off.
Front
With wrong side facing, skip next 8 sts on last long row for underarm, attach thread in next st; ch 22, hdc in same st and in next 39 (43, 47) sts; turn – 40 (44, 48). Work even in pattern until 3 1/2 (4, 4 1/2)" from beginning, ending by working a right side row.
Right Front Strap
Ch 2, hdc in first 12 sts; turn. Work even until armhole measures 4 1/2 (5, 5 1/2)".
Fasten off.
Left Front Strap
With wrong side facing, skip next 16 (20, 24) sts of last long row of Front, attach thread in next st; ch 2, hdc in same st and in each st to end; turn – 12 hdc. Work even until armhole measures 4 1/2 (5, 5 1/2)".
Fasten off.
Left Back
With wrong side facing, skip next 8 sts of last long row for underarm, attach thread in next st; ch 2, hdc in same st and in each st to end; turn – 20 (22, 24) hdc. Work even until 3 (3 1/2, 4)" from beginning, ending with a right side row.
Left Back Strap
Ch 2, hdc in first 12 sts; turn. Work even until armhole measures 4 1/2 (5, 5 1/2)".
Fasten off.
Finishing of Yoke
Sew shoulder seams; tack bottom edges together, overlapping 2 sts of Left Back over 2 sts of Right Back.
Skirt
Row 1 (Right Side): Turn finished yoke upside down so beginning ch is at top, attach thread at overlapped hdc and work in remaining loops of beginning ch; ch 3, * fpdc around next fpdc of yoke **, dc in next st, ch 1, dc in next st; repeat from * around, end at **; join with a sl st in top of ch-3; turn.
Row 2: Sl st to space, (ch 4, dc) all in same space – beginning shell made; * bpdc around next fpdc **; (dc, ch 1, dc) all in next ch-1 space – shell made; repeat from * around, end at **; join with a sl st in 3rd ch of ch-4; turn.
Row 3: Beginning shell in first space, * fpdc around next bpdc **, shell in next space; repeat from * around, end at **; join in 3rd ch of ch-4; turn.
Row 4: Beginning shell in first space, * bpdc around next fpdc **, shell in next space; repeat from * around, end at **; join in 3rd ch of ch-4; turn.
Rows 5-12: Repeat Rows 3 and 4 four more times.
Row 13: Sl st to space, (ch 3, dc, ch 1, 2 dc) all in same space – beginning double shell made; * fpdc around next bpdc **; (2 dc, ch 1, 2 dc) all in next ch-1 space – double shell made; repeat from * around, end at **; join in top of ch-3; turn.
Row 14: Beginning double shell in first space, * bpdc around next fpdc **, double shell in next space; repeat from * around, end at **; join; turn.
Rows 14-20: Repeat Rows 13 and 14 three more times.
Row 21: Sl st to space, (ch 4, dc, [ch 1, dc] twice) all in same space – beginning lacy shell made; * fpdc around next bpdc **; (dc, [ch 1, dc] 3 times) all in next space – lacy shell made; repeat from * around, end at **; join in 3rd ch of ch-4; turn.
Row 22: Beginning lacy shell in center (2nd) ch-1 space, * bpdc around next fpdc **, skip next space, lacy shell in next space; repeat from * around, end at **; join in 3rd ch of ch-4; turn.
Repeat Rows 21 and 22 until skirt measures 10 1/2 (11 1/2, 12 1/2)" from yoke or 1 1/2" less than desired length, ending Row 22.
Next Row (Right Side): Beginning lacy shell in center (2nd) space, * lacy shell in next post st **, skip next ch-1 space, lacy shell in next ch-1 space; repeat from * around, end at **; join; turn.
Last Row: (Beginning lacy shell, ch 1, dc) all in center (2nd) space, * skip next two ch-1 spaces, (dc, [ch 1, dc] 4 times) all in next ch-1 space (center space of lacy shell); repeat from * around; join.
Fasten off.
Arm-Holes Ruffles
Row 1: With right side facing, begin and end in the 5th row ends above underarm, mark armhole for 8 evenly spaced double shells. Attach yarn in 3rd row end above underarm; ch 1, sc in same place, ch 3, double shell at marker, [dc in row end midway between markers, double shell at next marker] 7 times, ch 3, skip next row end, sc in next row end; turn.
Row 2: Ch 3, [double shell in ch-1 space, bpdc around dc] 7 times; double shell in ch-1 space, ch 3, sc in sc; turn.
Row 3: Ch 4, double shell in space, [fpdc around bpdc, double shell in space] 7 times, ch 4, sc in sc. Fasten off.
Row 4: With right side facing, attach thread in first sc of Row 1; [ch 1, dc] 6 times all in ch-4 space, * sc in next ch-1 space, ([dc, ch 1] 5 times, dc) all in next fpdc; repeat from * 6 more times; sc in next ch-1 space, [ch 1, dc] 6 times all in ch-4 space, sl st in last sc of Row 1.
Fasten off.
Assembly
With right side facing, begin at overlapped sts center back, attach thread and work sc evenly up Left Back, working three ch-2 button loops evenly spaced, sc around neck and down Right Back. Sew buttons opposite button loops.
Tie: Make a ch 50" long; turn and hdc in 2nd ch from hook and in each ch across. Fasten off. With center of tie at center front of dress, thread tie under each posted st at waist. Tie in bow at back.
- Funny Pictures
-
 Hilarious Memes for Those Bored to Tears
-
 Weekly Treat of Funniest Parenting Memes for Good Laugh out Loud Right Now
-
 Really Funny Pics to End These Weekend Perfectly
- Recipes
-
 Crispy Baked Avocado Fries
-
 Scrambled Chickpea and Spinach Pitas
-
 Cinnamon Pancakes
- Lifehacks
-
 Crochet Basics: Aligned Cobble Stitch
-
 Brick Stitch Crochet Tutorial
-
 Crochet Basics: Wattle Stitch
- Crochet Ideas
-
 Crochet Snorlax Plushie Doll
-
 Crochet Beautiful Penguin Toy
-
 Crochet Tiny Snowman
- DIY
-
 DIY Santa Craft For Kids
-
 Paper Plate Angel Craft
-
 Upcycled Mason Jar Chicken Vase
- Knitting Ideas
-
 Knitted Bridger Cowl
-
 Knitted Keepsake Bag
-
 Knitted Cutie Cupcake Dolls
Would like instructions for the Alpine stitch
Here you are: www.craftorator.com/4010-helping-our-users-crochet-alpine-stitch.html
looks so lovely on a beautiful young lady
What level of crocheting is this cute dress? I would love to do this for my granddaughter but I've never done anything like this before.
Advanced Beginner