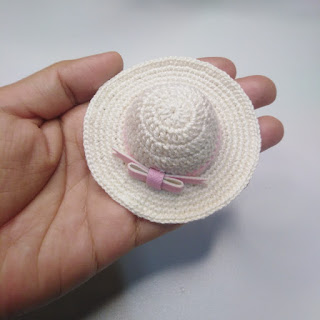
Handmade Crochet Floppy Hat: A Stylish Summer Accessory


Crochet floppy hats are the perfect accessory that effortlessly combines style and comfort. These versatile hats offer a charmingly laid-back vibe while providing excellent sun protection for those sunny days. Whether your doll is strolling through a farmer's market or lounging at the beach, a crochet floppy hat adds a touch of bohemian chic to any outfit. The hand-crafted nature of these hats gives them a unique and personalized feel, making each piece a one-of-a-kind treasure. So, go ahead and embrace the carefree spirit of summer with a crochet floppy hat - you'll be both trendy and sun-safe in no time!
Materials
- 3 ply monaco mercerized cotton (lace weight yarn)
- 1.25 mm hook
- Scissors
- Piece of leatherette
- Fabric glue
- Needle for weaving ends
Stitches and Abbreviations
- Chain = ch
- Double crochet = dc
- Single crochet = sc
- Half double crochet = hdc
- Slip stitch = sl.st.
- Round = rd
- (**) = stitch count
- Increase = dc on the same stitch
Make a magic circle.
Note: ch2 is not counted as dc.
Pattern Instructions
Round 1
Ch 2, make 12 dc inside the magic circle, sl.st. on the first dc. (12)
Round 2
Ch 2, 2 dc in each of the stitches.
Round 3
Ch 2, dc on the same st., increase on the next, *dc, increase on the next* repeat this ** until you reach the last st. (36) sl.st. on the 1st dc.
Round 4
Ch 2, dc on the same st., dc on the next 10 sts., increase on the next, 11 dc, increase, 11 dc, increase (39) sl.st. on the 1st dc.
Round 5
Ch 2, 39 dc. sl.st. on the 1st dc.
Change color of yarn, do not cut the 1st yarn color; we will continue it later.
Round 6
Ch 2, 39 hdc.
Round 7
Ch 1, 39 sc.
For the Brim
Back on the 1st color of yarn. You can cut the 2nd color.
Round 8
Working on the front loops. Ch 1, sc on the same st., sc on the next, increase on the next. *sc, sc, increase* repeat ** until you reach the last st. sl.st. on the 1st sc.
Round 9
Both loops ch 1, sc all around. sl.st.
Round 10
Ch 1, *sc, increase* repeat ** all around. sl.st.
Rounds 11 - 12
Ch 1, sc all around.
Round 13
Ch 1, *sc, sc, increase* repeat ** all around.
Round 14
Ch 1, sc all, sl.st. and cut the yarn.
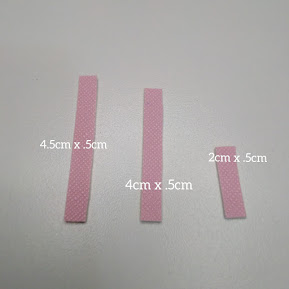
Cut the leatherette into 3 pcs. see the picture below.
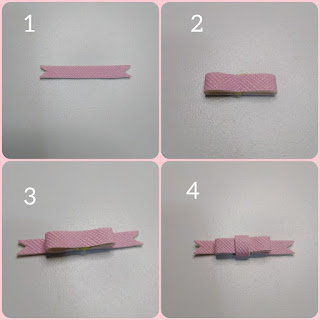
Just follow this step-by-step picture to make the ribbon for the hat.
Just glue it on the side of the hat and we're done!!
- Funny Pictures
-
 Hilarious Memes for Those Bored to Tears
-
 Weekly Treat of Funniest Parenting Memes for Good Laugh out Loud Right Now
-
 Really Funny Pics to End These Weekend Perfectly
- Recipes
-
 Crispy Baked Avocado Fries
-
 Scrambled Chickpea and Spinach Pitas
-
 Cinnamon Pancakes
- Lifehacks
-
 Crochet Basics: Aligned Cobble Stitch
-
 Brick Stitch Crochet Tutorial
-
 Crochet Basics: Wattle Stitch
- Crochet Ideas
-
 Crochet Snorlax Plushie Doll
-
 Crochet Beautiful Penguin Toy
-
 Crochet Tiny Snowman
- DIY
-
 DIY Santa Craft For Kids
-
 Paper Plate Angel Craft
-
 Upcycled Mason Jar Chicken Vase
- Knitting Ideas
-
 Knitted Bridger Cowl
-
 Knitted Keepsake Bag
-
 Knitted Cutie Cupcake Dolls