How to Crochet a Cute Cupcake Pin Cushion

If you're looking to add a touch of charm to your sewing supplies, why not try crocheting a cupcake pin cushion? This fun and practical project is perfect for both beginners and seasoned crocheters alike. With just a few basic crochet stitches and some colorful yarn, you can create a sweet and adorable pin cushion that will make your sewing sessions even more enjoyable. Plus, the cupcake design adds a whimsical flair to your crafting space. Whether you're making it for yourself or as a thoughtful gift for a fellow crafter, crocheting a cupcake pin cushion is a delightful way to combine creativity and functionality. So grab your crochet hook, pick out your favorite yarn colors, and get ready to whip up a sprinkle of cuteness!
Materials Needed
Before we dive into the crochet stitches, gather the following materials:
- Worsted weight yarn in cupcake and frosting colors
- Crochet hook appropriate for your yarn weight
- Fiberfill or stuffing material
- Yarn needle
- Scissors
- Stitch markers
Cupcake Base
Begin by crocheting the cupcake base. You can use a simple amigurumi-style technique, starting with a magic ring and working in continuous rounds. Increase stitches gradually to form a cupcake shape. Choose a color that resembles the cake portion of a cupcake.
Frosting Top
Switch to the frosting color and crochet the delicious swirl atop your cupcake. This is a great opportunity to experiment with different stitch patterns, like popcorn stitches or shell stitches, to add texture. Be creative with color choices to make your cupcake uniquely yours.
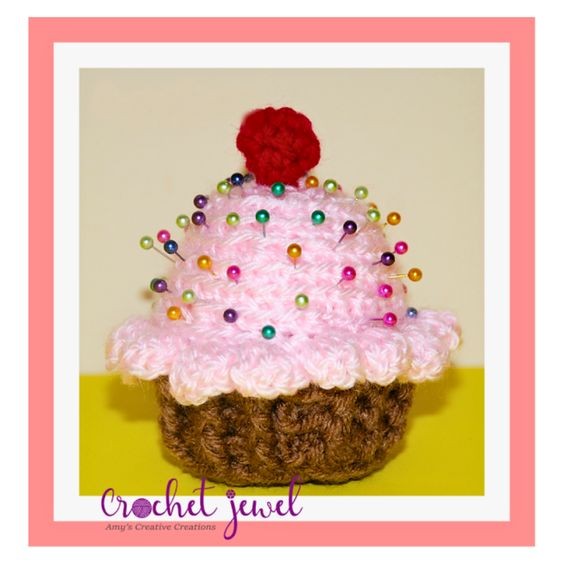
Material
- I and H hook
- Red Heart Brown and Red yarn
- Baby Pink yarn
- Colorful Pins
Abbreviations
- ch=chain
- sc=single crochet
- sl st=slip stitch
- 2sctog decrease= 2 single crochet together decrease
Instructions
Cupcake Base Instructions
Rnd 1: Start with Brown Yarn, this is the bottom of the cupcake. Work 5 sc in the Magic Circle, sl st
Rnd 2: Ch 1, work 2 sc in each sc around, sl st — 10 sc
Rnd 3: Ch 1, work 2 sc in each sc around, sl st — 20 sc
Rnd 4: Ch 1, *work sc, 2 sc in the next sc,* Repeat around, sl st — 30 sc
Rnd 5: Ch 1, sc in the back loops, sl st — 30 sc
Rnd 6: Ch 2 (counts as first dc), *front post dc around the sc, back post dc around the sc,* Repeat around, sl st
Rnd 7: Ch 2 (counts as first dc), *front post dc, back post dc,* Repeat around, sl st
Rnds 8–9: Repeat round 7, for a total of two more times.
Rnd 10: Sl st with Pink Yarn, sc around, sl st
Rnd 11: Work 2 sc in back loops, sc in the next 3 sc in the back loops, *Repeat around. Work in continual rounds without slip stitches now.
Rnds 12–13: Sc in each back loop around, *Repeat for a total of two rounds.
Rnd 14: Work 2 sc in back loops, sc in the next 3 sc in the back loops, *Repeat around
Rnds 15–16: Sc in each back loop around, *Repeat for a total of two rounds. Take Pink Yarn or stuffing and begin to stuff your cupcake as full as you can.
Rnds 17–18: 2sctog decrease in each sc around, *Repeat this round for a total of two rounds. Fasten off, weave in the ends.
Shell Trim Instructions
Shell Trim on Rnd 10: With Pink yarn sl st into round 10 sc, sc in the same stitch, work 4 dc in the next sc, ch 2, sl st in the same stitch, sc in the next sc, work 4 dc in the next sc, ch 2, sl st in the same stitch, *Repeat around, sl st. Fasten off, weave in the ends.
Cherry
Cherry Instructions: H Hook, Red yarn
Rnd 1: Work 5 sc in the Magic Circle, sl st
Rnd 2: Work 2 sc in each sc around, sl st
Rnd 3: Sc in each sc around, sl st
Rnd 4: 2sctog decrease 5 times, sl st. Fasten off. Stuff the cherry with some red yarn and attach the cherry on top of the pink cupcake.
Pins
Push the colorful pins all over the pink part of the cupcake. I hope you enjoyed this free cupcake crochet pattern!
- Funny Pictures
-
 Cute Cat Memes That Will Make Your Day Brighter
-
 Spot-on and Funny Memes About Introverts Struggles
-
 Top Wonderful Cat Memes on Their Way to Better Your Day
- Recipes
-
 Creamy Old Fashioned Rice Pudding
-
 Russian Tea Cakes (Snowball Cookies)
-
 Rigatoni with Sausage, Tomatoes, and Zucchini
- Lifehacks
-
 How to Crochet a Harlequin Stitch
-
 Removing The Toughest Stains
-
 Crochet Basics: Crumpled Griddle Stitch
- Crochet Ideas
-
 Crochet Christmas Tree
-
 Crochet Goblet of Fire
-
 Crochet Adorable Ammonite
- DIY
-
 DIY Snowman Wreath
-
 Mini Santa Sleigh Ornament
-
 Crochet Gingerbread House Blanket
- Knitting Ideas
-
 Knitted Easter Bunny
-
 Knitted Mobile Phone/Glasses Case
-
 Knitted Cabled Wallet