Create a Beautiful Afghan Square Using the Boucan Stitch in Crochet


Create a beautiful Afghan square using the intricate Boucan stitch in crochet. This unique stitch adds texture and visual interest to your project, making it stand out from traditional crochet patterns. The Boucan stitch is perfect for those looking to add a touch of elegance and sophistication to their crochet work. By following a simple pattern, you can easily create a stunning Afghan square that will impress all who see it. Whether you're a beginner looking to expand your crochet repertoire or an experienced crafter wanting to try something new, the Boucan stitch Afghan square is the perfect project to showcase your skills and creativity.
Measurements
Approximately 7"x7"
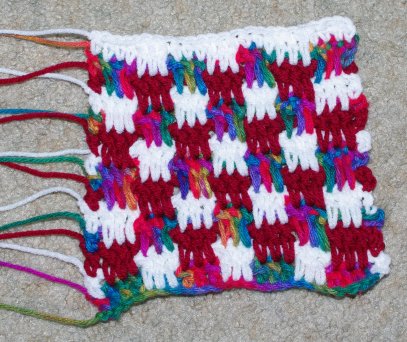
NOTE: This square has many loose yarn tails that need to be weaved in. If you aren't fond of weaving in yarn tails, you might not enjoy this pattern.
Materials Needed
- Caron Simply Soft
- CA = Embroidery Print
- Red Heart Super Saver - 4ply Worsted Weight
- CB = White
- CC = Burgundy
- Hook Size G
Stitches Used
- ch
- hdc
- dc
- ldc
- sc
- sl st
Difficulty Level
Medium difficulty
Instructions
Row 1
With CA, ch25. DC in the 4th ch from the hook. Dc in next 2 chs. Ch3. Sk 3 chs. (Dc in next 3 chs, ch3. Sk next 3 chs) twice. Dc in last 4 chs.
Fasten Off (Right Side)
Row 2
With Right Side facing, join CB with a sl st in top of the first st. Ch6. Sk 3 dc. *Ldc in next 3 foundation chs on R1. Ch3. Sk next 3 dc. Rep from * twice more. Dc in last dc.
Fasten off.
Row 3
With Right Side facing, join CC with a sl st in the 3rd ch of the beg ch6 of R2. Ch3. *Ldc in next 3 dc on R1. Ch3, Sk next 3 dc. Rep from * twice more. Ldc in next 3 dc on R1. Dc in last dc.
Fasten off.
Row 4
With Right Side facing, join CA with a sl st in the top of the beg ch3. Ch6. Sk next 3 dcs. *Ldc in next 3 dcs on row before last. Ch3, sk next 3 dcs. Rep from * across to last dc. Dc in last dc.
Fasten off.
Row 5
With Right Side facing, join CB with a sl st in the 3rd ch of the beg ch6. Ch3. *Ldc in the next 3 dcs on row before last. Ch3. Sk next 3 dcs. Rep from * across to last ch-sp. Ldc in next 3 dcs on row before last. Dc in last dc.
Fasten off.
Row 6
Rep Row 4 using CC.
Row 7
Rep Row 5 using CA.
Row 8
Rep Row 4 using CB.
Row 9
Rep Row 5 using CC.
Row 10
Rep Row 4 using CA.
Row 11
Rep Row 5 using CB.
Row 12
Rep Row 4 using CC.
Row 13
Rep Row 5 using CA.
Final Row
With Right Side facing, join CB with a sl st in the top of the beg ch3. Ch2, hdc in next 3 dc. *Ldc in the next 3 dc on row before last. Hdc in next 3 dcs. Rep from * across to the last dc. Hdc in the last dc.
Fasten off.
Edging
With right side facing, join CC in the top of the beg ch2. Sc in ea st across to corner. Work 3 sc in the corner stitch. Working in row ends: Sc around the hdc. 2 sc around the next dc. *Sc around the next dc. 2 sc around the next dc. Rep from * to the corner. Work 3 sc in the corner. Sc in the unworked loop of ea foundation ch. Working in row ends: 2 sc around the next dc. *Sc around the next dc. 2 sc around the next dc. Rep from * across to last row. Sc around the hdc on the last row. Place 2 more sc in the same corner as joining. Join with a sl st in the first sc made.
Fasten off.
- Funny Pictures
-
 Hilarious Memes for Those Bored to Tears
-
 Weekly Treat of Funniest Parenting Memes for Good Laugh out Loud Right Now
-
 Really Funny Pics to End These Weekend Perfectly
- Recipes
-
 Crispy Baked Avocado Fries
-
 Scrambled Chickpea and Spinach Pitas
-
 Cinnamon Pancakes
- Lifehacks
-
 Crochet Basics: Aligned Cobble Stitch
-
 Brick Stitch Crochet Tutorial
-
 Crochet Basics: Wattle Stitch
- Crochet Ideas
-
 Crochet Snorlax Plushie Doll
-
 Crochet Beautiful Penguin Toy
-
 Crochet Tiny Snowman
- DIY
-
 DIY Santa Craft For Kids
-
 Paper Plate Angel Craft
-
 Upcycled Mason Jar Chicken Vase
- Knitting Ideas
-
 Knitted Bridger Cowl
-
 Knitted Keepsake Bag
-
 Knitted Cutie Cupcake Dolls