Create Your Own Cozy Crochet Pot Holders

Create Your Own Set of Cozy Pot Holders
Create your own set of cozy pot holders with a thick crochet design. These pot mitts are perfect for protecting your hands while handling hot pots and pans in the kitchen. The thick crochet pattern provides extra insulation to keep your hands safe from burns and heat. You can choose your favorite colors and yarn types to customize your pot mitts to match your kitchen decor. Crocheting thick pot mitts is a fun and practical project for any crochet enthusiast. You can experiment with different stitches and patterns to create a unique and functional accessory for your kitchen. These pot mitts also make great gifts for friends and family members who love to cook or bake. With just a few skeins of yarn and a crochet hook, you can whip up a set of pot mitts in no time. So grab your supplies and get started on your next crochet project today!
Supplies Needed for This Crochet Pot Mitt’s Pattern
Yarn – Any worsted-weight yarn in colors of your choice. This prototype used 24/7 cotton – Worn weight, #4 lightweight (100% cotton, 186 yd/170 m per 3.5 oz/100g skein).
Estimated Yardage = 30 yards for the pair.
Hook = 5 mm Crochet Hook
Gauge
Gauge isn’t essential for this project.
Crochet Pot Handle Holder Pattern Notes
- Please kindly read through the pattern before starting.
- Any #4 weight of yarns can be substituted.
- Chains at the beginning of rounds or rows do not count as a stitch.
Skill Level: Easy
Terms: US Terminology
Stitches:
- Chain(s) – ch(s)
- Single Crochet – sc
- Half Double Crochet – hdc
- Slip Stitch – sl st
- Magic Ring – MR
- Third Loop
Finished Measurement: 3” by 3” when folded on each other.
How to Crochet This Thick Crochet Pot Mitt’s Pattern
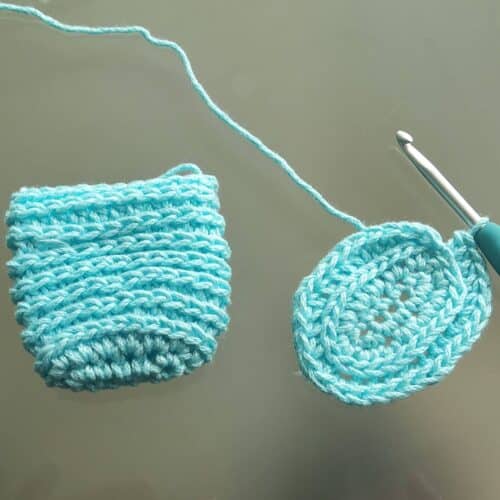
Smaller Part
Round 1: Ch 6, sc in 2nd ch from hook, and in next 3 chs, 3 sc in last ch, do not turn, continue to work into the base of the other loops of the foundation chain, sc in next 3 loops, 2 sc in last loop (same loop you started with), sl st to first sc, do not turn. 12 sc.
Round 2: Ch 1 (does not count as a stitch), 2 hdc in each st around, sl st to the beginning chain. 24 hdc
From here on, crochet in the BLO in a spiral. Place a stitch marker in the first st and move after each round.
Rounds 3 – 8: in BLO, hdc in each st around
Round 9: in BLO, sc in each st around, sl st into next 2 sts, to close the height difference.
Fasten off.
Set aside.
Bigger Part
Round 1: Ch 6, sc in 2nd ch from hook, sc in next 3 chs, 3 sc in last ch, do not turn, continue to work into the base of the other loops of the foundation chain, sc in next 3 loops, 2 sc in last free loop, sl st to first sc, do not turn. 12 sc.
Round 2: Ch 1 (does not count as a stitch), 2 hdc in each st around, sl st to the beginning chain. 24 hdc
Crocheting in the BLO from here on and in a spiral, place a stitch marker in the first st and move after each round.
Round 3: Ch 1, in BLO, *hdc in next st 3 sts, 2 hdc in next, rep from* to end, join. 30 hdc
Rounds 4 – 8: in BLO, hdc in each st around
Round 9: in BLO, sc in each st around, sl st into next 2 sts, to close the height difference.
To Join the Two Halves Together
Place both panels with the last rounds next to each other.
The aim is to sew just one side together –
With your hook, sc over both in the next 8-10 sts.

Fasten off.
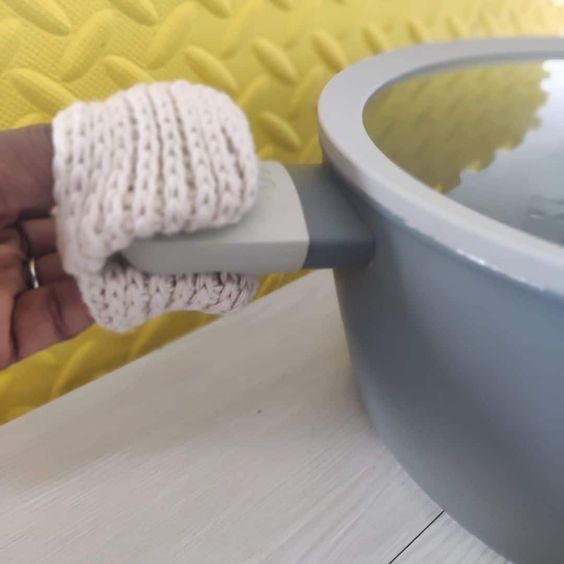
How to Use This Thick Crochet Pot Mittens
The thumb goes into the small panel, and the remaining 4 fingers into the larger panel with the pot handle in-between the panels.
- Funny Pictures
-
 Hilarious Memes for Those Bored to Tears
-
 Weekly Treat of Funniest Parenting Memes for Good Laugh out Loud Right Now
-
 Really Funny Pics to End These Weekend Perfectly
- Recipes
-
 Crispy Baked Avocado Fries
-
 Scrambled Chickpea and Spinach Pitas
-
 Cinnamon Pancakes
- Lifehacks
-
 Crochet Basics: Aligned Cobble Stitch
-
 Brick Stitch Crochet Tutorial
-
 Crochet Basics: Wattle Stitch
- Crochet Ideas
-
 Crochet Snorlax Plushie Doll
-
 Crochet Beautiful Penguin Toy
-
 Crochet Tiny Snowman
- DIY
-
 DIY Santa Craft For Kids
-
 Paper Plate Angel Craft
-
 Upcycled Mason Jar Chicken Vase
- Knitting Ideas
-
 Knitted Bridger Cowl
-
 Knitted Keepsake Bag
-
 Knitted Cutie Cupcake Dolls