Crochet Little Christmas Angels Amigurumi

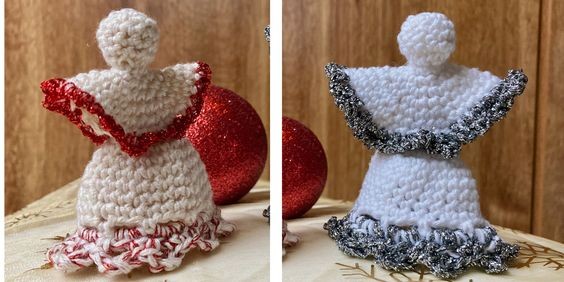
Create your own adorable Christmas decorations with these charming crochet little angels! These tiny amigurumi figures are perfect for adding a festive touch to your holiday decor or for giving as thoughtful handmade gifts to friends and family. With just a few basic crochet stitches and some yarn, you can bring these sweet angels to life in no time. Customize them with different colors and embellishments to make each one unique and special. Whether you're an experienced crocheter or just starting out, this pattern is easy to follow and suitable for all skill levels. Hang them on your tree, use them as gift toppers, or display them around your home to spread some holiday cheer. Get creative and let your imagination soar as you crochet these delightful little angels that are sure to become treasured keepsakes for years to come.
CROCHET LITTLE CHRISTMAS ANGELS Amigurumi
MATERIALS
Amigurumi Cotton Yarn, the color you like for:
Head, Body, Wings, Dress - white or light beige (color A)
Border - silver, gold or red or any color you like (color B)
The pattern was made with:
Johanka yarn: 55% cotton + 45% acrylic, 50 g / 160 m
Terezka yarn: 100 % bavlna, 50g / 155 m
LAME, Lang Yarns: 75% Viscose, 25% Polyester, 25 GRAMM, 224 Silver Glitter Yarn
Drops GLITTER
2.5 mm, 3.0 and 3.5 mm crochet hook
Scissors
Stuffings
Sewing/Embroidery and yarn needle/tapestry needle for sewing pieces together and weaving in ends
Markers

Difficulty Level: Level 1 – Easy, for beginners
US crochet terms:
SlSt – slip stitch
CH/s – chain/s
SC - single crochet
DS - double crochet
TR - treble
SK - skip
T - turn
ST/s - stitch(es)
REP – repeat
SC2TOG = 2 single crochets together
Special stitches used:
Single Crochet Decrease (sc2tog)
A crochet decrease makes the current row or round that you are working on shorter than the one previous to it.
1. Insert hook into the first stitch.
2. Yarn over and draw through the loop.
3. Do not complete the stitch as normal.
4. Instead, insert the hook into the next stitch.
5. Yarn over and draw through the loop.
6. There should now be three loops on your hook
7. Yarn over and draw through all three loops on the hook
8. You should now have two single crochet stitches side-by-side, joined together into one stitch at the top.
This pattern requires familiarity with stitches used, attaching yarn, changing yarn colors, sewing parts together with a sewing needle.
CROCHET LITTLE CHRISTMAS ANGELS AmigurumiPATTERN NOTES
1) A ch1 at beg of the row DOESN'T count as a stitch
2) Magic ring = the starting point for crocheting in a spiral. Use which ever method you prefer.
3) Continuous rounds - HEAD, BODY, DRESS parts are worked up in continuous rounds, which means that you will not be joining the last stitch of the round with the first one. Instead you will need to keep track of where each round started and how many stitches you have made because after each round you will continue right on to the stitches of the next round (with no join). It is useful to use a stitch marker or piece of yarn to mark the start or end of each round.
4) Working in rows - BORDERS parts are worked in rows.
5) ( ) – The number of stitches that should be in a completed round/row are placed in brackets at the end of that round’s/row’s instructions.
6) This CROCHET LITTLE CHRISTMAS ANGELS Amigurumiesmeasure:
The finished size will depend on what yarn you use, as well as your tension and hook (as with any amigurumi).
7) You can make the CROCHET LITTLE CHRISTMAS ANGEL Amigurumibigger with a thicker yarn or a larger hook size.
CROCHET LITTLE CHRISTMAS ANGEL Amigurumi
THE WRITTEN PATTERN
HEAD
Colour A
Ch1 at the beginning of round don't count as a stitch.
This part is worked in spiral rounds, without joining rounds. Do not join rounds
Make a magic ring
R1: ch1, 6sc in magic ring (6sc)
R2: *2sc in each sc from R1 around* rep from * to * till end of round (12 sc)
R3-R5: R6: 1 sc in each st around (12 sc)
Stuff the HEAD well.
STUFFING
The exact moment for starting filling and stuffing the toy depends on every single person. I prefer filling the toy with the work almost finished. It’s a bit more difficult to fill, but more comfortable to crochet. You should make proofs until finding the more suitable moment of filling for you.
R6: *sc2tog* rep from * to * till end of round (6 sc)
Stuff more if needed.
BODY
R7: 1 sc in each st around (6 sc)
R8: *2sc in each sc around* rep from * to * till end of round (12 sc)
R9: *1sc in next st, 2sc in next st * rep from * to * till end of round (18 sc)
R10: *1sc in next 2st, 2sc in next st * rep from * to * till end of round (24 sc)
R23: ch1, *1sc in next st, picot (ch3+1dc in 1st st), sk 1sc, 1sc in next st* rep from * to * till end of round, join the round with a slip stitch in 1st ch from beg (10 picots)
Fasten off, hide all loose tails in the back of your work and you are all done my friends.
And voila! You made a LITTLE CHRISTMAS ANGEL.
- Funny Pictures
-
 Hilarious Memes for Those Bored to Tears
-
 Weekly Treat of Funniest Parenting Memes for Good Laugh out Loud Right Now
-
 Really Funny Pics to End These Weekend Perfectly
- Recipes
-
 Crispy Baked Avocado Fries
-
 Scrambled Chickpea and Spinach Pitas
-
 Cinnamon Pancakes
- Lifehacks
-
 Crochet Basics: Aligned Cobble Stitch
-
 Brick Stitch Crochet Tutorial
-
 Crochet Basics: Wattle Stitch
- Crochet Ideas
-
 Crochet Snorlax Plushie Doll
-
 Crochet Beautiful Penguin Toy
-
 Crochet Tiny Snowman
- DIY
-
 DIY Santa Craft For Kids
-
 Paper Plate Angel Craft
-
 Upcycled Mason Jar Chicken Vase
- Knitting Ideas
-
 Knitted Bridger Cowl
-
 Knitted Keepsake Bag
-
 Knitted Cutie Cupcake Dolls