Creating Heavenly Angels with Crocheted Heart Wings


If you're looking for a delightful and unique craft project, why not try your hand at creating heavenly angels with crocheted heart wings? This creative endeavor combines the beauty of crochet with the symbolism of angels, resulting in a truly enchanting finished product. Admire your handiwork as you see the angels come to life, their heart-shaped wings symbolizing love, protection, and grace. These crocheted angels make wonderful decorations for your home, thoughtful gifts for loved ones, or even meaningful ornaments for special occasions like weddings or christenings. This whimsical project combines the art of crochet with the ethereal beauty of angels, resulting in enchanting creations that will captivate anyone who lays eyes on them.
Read notes at bottom of pattern before beginning.
Small Angel Pin or Magnet
Size:
2.125 inches across wing
Materials:
- Worsted weight yarn
- H (5.0mm) crochet hook
- ¾ inch round head plug
- Gold seed (10/0) beads for hair
- Hot glue sticks and gun
- Tacky glue
- Round toothpick
- Ribbon for trim
- Round acrylic jewel or rosebud
- Pin back or magnet for back
Body:
Ch 3, 10 dc in 3rd ch from hook. Join in top of first dc with a slipstitch. Fasten off.
Wing:
Chain 4, make all stitches in the 4th chain from hook. 3 tr, 3 dc, chain 1, 1 trc, chain 1, 3 dc, 3 tr, chain 2 slipstitch. Fasten off.
Large Angel Ornament
Size:
3.5 inches across wing
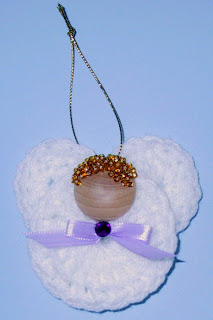
Materials:
- Worsted weight yarn
- H (5.0mm) crochet hook
- 1 inch round head plug
- Gold seed (10/0) beads for hair
- Hot glue sticks and gun
- Tacky glue
- Round toothpick
- Round acrylic jewel or rosebud
- Ribbon for trim
- Gold cord for hanging
Body:
Ch 4, 15 tr in 4th ch from hook. Join in top of first tr with a slipstitch. Fasten off, weave in ends.
Wing:
Round 1:
Chain 4, make all stitches in the 4th chain from hook, 3 tr, 3 dc, chain 1, 1 tr, chain 1, 3 dc, 3 tr, chain 2 slip stitch.
Round 2:
Chain 3, in first tr make sc and hdc, in next stitch 3 hdc, in next stitch 2 hdc, sc in next 3 stitches, sc in ch 1 space, chain 1 dc in tr, chain 1, sc in ch 1 space, sc in next 3 stitches, 2 hdc in next stitch, 3 hdc in next stitch, hdc and sc in next stitch, chain 3 and slipstitch in joining. Fasten off, weave in ends.
Finishing Both Sizes:
Apply Tacky glue to area of wooden plug where hair is desired. Dip plug in seed beads. Allow to dry.
With hot glue attach body to wing (placing the join on head at the center top), with edge of body slightly below dip in wing.
Glue head to top of body, with top of head slightly above top of body.
Make a bow out of ribbon, and with hot glue attach bow to body, just under the head.
When glue has cooled, apply a small amount of Tacky glue to center of bow and press acrylic jewel or rosebud to center of bow.
For small size, glue pin back or magnet to angel back.
For large size, cut about a 6 inch length of gold cord and run it through a stitch at the center of wing. Tie the cord in an overhand knot.
Notes:
The angel could be assembled using only hot glue, but for me the combination of Tacky and hot glue works best.
When gluing the head to the body pressing down on the head for a few seconds gives best results.
When gluing the ribbon trim, I pressed down with a round toothpick for a few seconds to be sure it was secure.
- Funny Pictures
-
 Cute Cat Memes That Will Make Your Day Brighter
-
 Spot-on and Funny Memes About Introverts Struggles
-
 Top Wonderful Cat Memes on Their Way to Better Your Day
- Recipes
-
 Creamy Old Fashioned Rice Pudding
-
 Russian Tea Cakes (Snowball Cookies)
-
 Rigatoni with Sausage, Tomatoes, and Zucchini
- Lifehacks
-
 How to Crochet a Harlequin Stitch
-
 Removing The Toughest Stains
-
 Crochet Basics: Crumpled Griddle Stitch
- Crochet Ideas
-
 Crochet Christmas Tree
-
 Crochet Goblet of Fire
-
 Crochet Adorable Ammonite
- DIY
-
 DIY Snowman Wreath
-
 Mini Santa Sleigh Ornament
-
 Crochet Gingerbread House Blanket
- Knitting Ideas
-
 Knitted Easter Bunny
-
 Knitted Mobile Phone/Glasses Case
-
 Knitted Cabled Wallet