How to Crochet an Adorable Easter Bunny Amigurumi


Dive into the world of crochet and embark on a fun-filled journey to make your very own little Easter bunny amigurumi. This charming creation will surely capture the hearts of both young and old alike. With its soft and cuddly texture, it's the perfect gift for Easter or a delightful addition to your home decor. Let your creativity soar as you choose the colors and details that will make your bunny truly unique. Crocheting this adorable amigurumi will not only bring joy to your Easter festivities but also provide a relaxing and rewarding experience for craft enthusiasts.
Materials Needed
FOR TOY:
- Cotton yarn – Yarn Art Jeans (160m – 50 g (174 yds – 50 g)) or another yarn in the following colors (or colors you like):
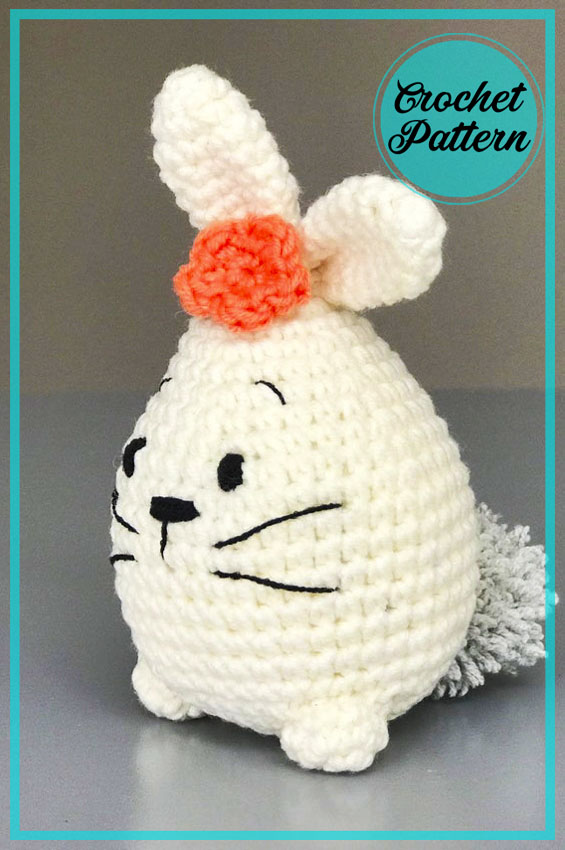
- Milk color (#3) for a bunny
- Gray color (#49) for a bunny
- Green color (#52) for a cap
- Orange color (#23) for a flower
- Black color (#53) for embroidery on the bunny’s face
- Fiber filler
Tools
- 2 mm crochet hook
- Large needle
- Scissors
Abbreviations
AR - Amigurumi Magic ring
MR - Amigurumi Magic ring
App - Application
ll - Lift loop
sc - Single Crochet
inc - Increase
dec - Decrease
tr - Triple Crochet/Treble Crochet
st - Stitch
dc - Double Crochet
hdc - Half Double Crochet
sl-st - Slip Stitch
ch - Chain
..in - Make increase into same stitch as many as the number given in front of “inc” abbreviation (e.g., 3inc, 4inc).
FLO - Crochet into front loops only
BLO - Crochet into back loops only
BL - Bobble Stitch - do 5dc all in the same stitch then yarn over and pull through all loops on your hook (the original loop + 1 loop for each partially completed dc).
Bunny Boy Instructions
Use the gray yarn and the 2 mm crochet hook.
- R 1: MR (6)
- R 2: inc *6 (12)
- R 3: (1 sc, inc) * 6 (18)
- R 4: 18 sc
- R 5: (2 sc, inc) * 6 (24)
- R 6: 24 sc
- R 7: (3 sc, inc) * 6 (30)
- R 8: 30 sc
- R 9: (4 sc, inc) * 6 (36)
- R 10: 36 sc
- R 11: (5 sc, inc) * 6 (42)
- R 12-18: 42 sc (7 rounds)
- R 19: (5 sc, dec) * 6 (36)
- R 20: (4 sc, dec) * 6 (30)
- R 21: (3 sc, dec) * 6 (24)
- Stuff the piece.
- R 22: (2 sc, dec) * 6 (18)
- R 23: (1 sc, dec) * 6 (12)
- R 24: dec * 6 (6)
Cut the thread (leave a tail of 10 cm (4 inches)). Draw the thread through the 6 front post loops. Tighten the thread and secure it.
Ears (2 Pieces)
Use the gray yarn.
- R 1: MR (5)
- R 2: 5 sc (5)
- R 3: inc * 5 (10)
- R 4-8: 10 sc (5 rounds)
- R 9: (dec, 3 sc) * 2 (8)
Fold in half, crochet 3 sc. Leave a tail for sewing. Make 2 pieces.
Fold the ears in half and sew each together. Sew the ears to the magic ring on the bunny’s body.
Legs (2 Pieces)
Use the gray yarn.
- R 1: MR (5)
- R 2: inc * 5 (10)
- R 3: 10 sc, sl st. Leave a tail for sewing. Cut the thread.
Make 2 pieces. Sew the legs between the 3rd and 6th rounds from the bottom of the body (distance between legs – 7 sc in the 5th round).
Pom-Pom
Use the milk yarn and scissors.
Ties for the Pom-Pom
Cut 30 cm (11 inches) of the thread and fold it two times (this will be enough for ties). Put it off.
How to Make a Pom-Pom
Wrap the yarn in 50 turns around two fingers, remove it, and tie it tightly in the middle with the ties thread. Cut on the sides and shape into a ball.
Tie the pom-pom at the back of the body in the 8th round.
Embroidery for the Bunny’s Face
With the black thread, embroider the eyes in the 10th round (distance 5 sc) and the nose. Divide the black thread in half and embroider the tendrils and eyebrows with thin black threads.
Cap
Use the green yarn.
- R 1: MR (6)
- R 2: inc * 6 (12)
- R 3: 12 sc (12)
- R 4: 12 sc (12)
- R 5: (4 sc, dec) * 2 (10)
- Turn, continue crocheting by rows.
- R 6: 1 sc, inc, 2 sc (5)
- R 7: ch, skip one loop, 3 sc, sl st.
- Funny Pictures
-
 Hilarious Memes for Those Bored to Tears
-
 Weekly Treat of Funniest Parenting Memes for Good Laugh out Loud Right Now
-
 Really Funny Pics to End These Weekend Perfectly
- Recipes
-
 Crispy Baked Avocado Fries
-
 Scrambled Chickpea and Spinach Pitas
-
 Cinnamon Pancakes
- Lifehacks
-
 Crochet Basics: Aligned Cobble Stitch
-
 Brick Stitch Crochet Tutorial
-
 Crochet Basics: Wattle Stitch
- Crochet Ideas
-
 Crochet Snorlax Plushie Doll
-
 Crochet Beautiful Penguin Toy
-
 Crochet Tiny Snowman
- DIY
-
 DIY Santa Craft For Kids
-
 Paper Plate Angel Craft
-
 Upcycled Mason Jar Chicken Vase
- Knitting Ideas
-
 Knitted Bridger Cowl
-
 Knitted Keepsake Bag
-
 Knitted Cutie Cupcake Dolls