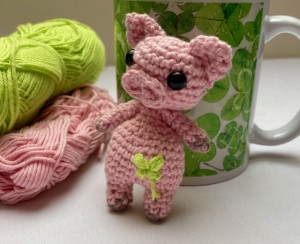
Create Your Own Adorable Miniature Lucky Piggy Amigurumi

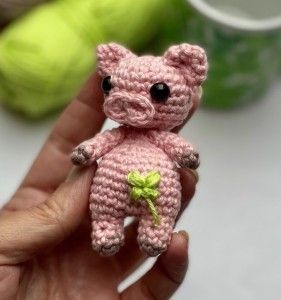
Create your very own adorable miniature lucky piggy amigurumi using the art of crochet and incorporating a charming cloverleaf design. This fun and creative project will allow you to showcase your crochet skills while also bringing a touch of luck and whimsy into your life. The finished product will be a cute and unique addition to your amigurumi collection, perfect for gifting or keeping as a lucky charm. Crafting this crochet mini lucky piggy with a cloverleaf twist will not only provide you with a fun and rewarding creative outlet but also allow you to personalize your amigurumi collection with a touch of charm and luck. The intricate details of the cloverleaf design will add an extra element of whimsy to your creation, making it stand out from traditional amigurumi pieces. Whether you are a seasoned crochet enthusiast or a beginner looking for a new project, this mini lucky piggy amigurumi with cloverleaf is sure to bring joy and a bit of luck into your crafting endeavors.
Materials Required
Amigurumi Cotton Yarn, in the color you like for:
Color Assignments
- Head, Body, Hands, Legs, Tail, Ears - pig color (Color A)
- Paws - grey / brown (Color B)
Yarn and Tools
- Terezka yarn: 1 skein / ball, 100% cotton, 50 g / 160 m
- 2.5 mm crochet hook
- 8 mm plastic safety eyes - 2 pieces
- Scissors
- Stuffings
- Sewing/Embroidery and yarn needle/tapestry needle for sewing pieces together and weaving in ends
- Markers
- Pins
Difficulty Level: Level 1 – Easy, for beginners
US Crochet Terms
- SlSt – slip stitch
- CH/s – chain/s
- SC - single crochet
- SK - skip
- T - turn
- ST/s - stitch(es)
- REP – repeat
SC2TOG = 2 single crochets together
Special Stitches Used
Single Crochet Decrease (sc2tog)
A crochet decrease makes the current row or round that you are working on shorter than the one previous to it.
1. Insert hook into the first stitch.
2. Yarn over and draw through the loop.
3. Do not complete the stitch as normal.
4. Instead, insert the hook into the next stitch.
5. Yarn over and draw through the loop.
6. There should now be three loops on your hook.
7. Yarn over and draw through all three loops on the hook.
8. You should now have two single crochet stitches side-by-side, joined together into one stitch at the top.
This pattern requires familiarity with stitches used, attaching yarn, sewing parts together with a sewing needle.
Crochet Happy Little Piggy Pattern Notes
- A ch1 at the beginning of the row does NOT count as a stitch.
- Magic ring = the starting point for crocheting in a spiral. Use whichever method you prefer.
- Continuous rounds - HEAD, LEGS + BODY, HANDS, EARS parts are worked up in continuous rounds, meaning you will not be joining the last stitch of the round with the first one. Instead, track where each round started and how many stitches you have made. A stitch marker or a piece of yarn can mark the start or end of each round.
- Working in rows - when you reach the end of the row, chain, turn your work, and continue working in stitches from the previous row.
- ( ) – The number of stitches that should be in a completed round/row are placed in brackets at the end of each round’s/row’s instructions.
- This CROCHET HAPPY LITTLE PIGGY Amigurumi measures:
- 9 cm / 3.5 inch tall
- 6 cm / 2.3 inch wide
- The finished size will depend on the yarn used, as well as your tension and hook size (as with any amigurumi).
- You can make the CROCHET HAPPY LITTLE PIGGY Amigurumi bigger with a thicker yarn or a larger hook size.
- There is some sewing involved: you will sew the head onto the body, the ears onto the head, the hands and the legs, and the tail onto the body. This is easy to do; there are no tricks.

Crochet Happy Little Piggy
The Written Pattern
Head
Color A
Crochet hook 2.5 mm.
Ch1 at the beginning of the round does NOT count as a stitch.
This part is worked in spiral rounds, without joining rounds. Do not join rounds.
Make a magic ring.
Row Instructions
- R1: ch1, 6sc in magic ring (6sc)
- R2: *2sc in each sc from R1 around* rep from * to * till end of round (12 sc)
- R3: *1sc in next st, 2sc in next st* rep from * to * till end of round (18 sc)
- R4: *1sc in next 2st, 2sc in next st* rep from * to * till end of round (24 sc)
- R5: 1 sc in each st around (24 sc)
- R6 - R11: REPEAT R5 (24 sc)
- R12: *1sc in next 2st, sc2tog* rep from * to * till end of round (18 sc)
- Add safety eyes size 8 mm between row 7 and 8, skipping 6 stitches apart.
- The eyes are 6 stitches apart from each other.
- Stuff the HEAD well.
- R13: *1sc in next st, sc2tog* rep from * to * till end of round (12 sc)
- R14: *sc2tog* rep from * to * till end of round (6 sc)
- Stuff more if needed before finishing round R14.
- R15: join all stitches together.
- Cut yarn color A and fasten off, weaving all ends in.
Stuffing Instructions
The exact moment for starting filling and stuffing the toy depends on personal preference. It’s a bit more difficult to fill, but more comfortable to crochet when the work is almost finished. Test until finding the moment of filling that suits you best.
Stuff head and body firmly and full, shaping as you stuff, making sure to shape the nose too. Use a stuffing stick or the back end of a pencil to push the stuffing into the right spots.
The Ears
Color A
Crochet hook 2.5 mm.
Ch1 at the beginning of the round does NOT count as a stitch.
This part is worked in spiral rounds, without joining rounds. Do not join rounds.
Make a magic ring.
Ear Row Instructions
- R1: ch1, 3sc in magic ring (3sc)
- R2: *2sc in each sc from R1 around* rep from * to * till end of round (6 sc)
- R3: *1sc in next st, 2sc in next st* rep from * to * till end of round (9 sc)
- R4: *1sc in next st, 2sc in next 2 st* rep from * to * till end of round (12 sc)
Fold the ear in half, the wrong side inside, joining the end of the bottom fold to make the ear so it stays on the head folded.
Cut the yarn and leave a longer tail to sew the ear onto the head.
Repeat the pattern for the second ear.
The Nose
Color A
Crochet hook 2.5 mm.
Make a magic ring.
Nose Row Instructions
- R1: ch3, in 2nd ch from hook: (2sc, 3hdc), in 1st ch at beg: (2sc, 3hdc, 2sc), in 2nd ch: 2sc. Join the row with an invisible slip stitch.
- Cut the yarn and leave a longer tail to sew the NOSE onto the HEAD.
The Hands
Color A
Ch1 at the beginning of round does NOT count as a stitch.
This part is worked in spiral rounds, without joining rounds. Do not join rounds.
Crochet hook 2.5 mm.
Make a magic ring.
Hand Row Instructions
- R1: ch1, 5sc in magic ring (5 sc)
- Crochet hook 2.5 mm.
- R2-R5: 1 sc in each st around (5 sc)
- Cut the yarn and leave a longer tail to sew the hand to the body later.
- Repeat the pattern for the second HAND.
The Body and Legs
This pattern is made by joining two leg parts together followed by crocheting the body.
Leg 1
Crochet hook 2.5 mm.
Ch1 at the beginning of the round does NOT count as a stitch.
This part is worked in spiral rounds, without joining rounds. Do not join rounds.
Make a magic ring.
Color B
Leg 1 Row Instructions
- R1: ch1, 6sc in magic ring (6sc)
- Color A
- R2: 1sc in each st around (6sc)
- R3- R5: repeat R2
Leg 2
- R1: ch1, 6sc in magic ring (6sc)
- Color A
- R2: 1sc in each st around (6sc)
- R3- R5: repeat R2
Body Instructions
- Round 6: Join two legs together:
- 2sc in each st (12 sc) and continue to increase on Leg 2: 2sc in each (12 sc), 24 sc in total.
- Round 7 - 10: 1 sc in each st around. (24)
- R11: *1sc in next 4st, sc2tog* rep from * to * till end of round (20 sc)
- Stuff the body well.
- R12: *1sc in next 3 st, sc2tog* rep from * to * till end of round (16 sc)
- R13: *1sc in next 2 st, sc2tog* rep from * to * till end of round (12 sc)
- Stuff more if needed before finishing round R13.
- R14: *sc2tog* rep from * to * till end of round (6 sc)
- R15: 1sc in each st around (6 sc)
- Cut yarn A and leave a longer tail to sew the BODY to the HEAD later.
- To join the Head to the Body, use a sewing needle in front and back loops of each stitch around and pull as tight as you can.
Finishing Instructions
Make sure the head and the body are stuffed well before sewing, but not so firm that you can see the stuffing through the stitches. Work around the entire round.
Start sewing the HEAD on the top of the BODY, ensuring the center of the head is aligned with the body. Work around the entire neck.
Sew the EARS to the HEAD on the top of the head, 2 rows from the magic ring. Shape the ears and stretch them up.
Sew the HANDS on the sides of the BODY under the neck.
Hide the yarn tails inside the body.
And voila! You made a HAPPY LITTLE PIGGY!
- Funny Pictures
-
 Cute Cat Memes That Will Make Your Day Brighter
-
 Spot-on and Funny Memes About Introverts Struggles
-
 Top Wonderful Cat Memes on Their Way to Better Your Day
- Recipes
-
 Creamy Old Fashioned Rice Pudding
-
 Russian Tea Cakes (Snowball Cookies)
-
 Rigatoni with Sausage, Tomatoes, and Zucchini
- Lifehacks
-
 How to Crochet a Harlequin Stitch
-
 Removing The Toughest Stains
-
 Crochet Basics: Crumpled Griddle Stitch
- Crochet Ideas
-
 Crochet Christmas Tree
-
 Crochet Goblet of Fire
-
 Crochet Adorable Ammonite
- DIY
-
 DIY Snowman Wreath
-
 Mini Santa Sleigh Ornament
-
 Crochet Gingerbread House Blanket
- Knitting Ideas
-
 Knitted Easter Bunny
-
 Knitted Mobile Phone/Glasses Case
-
 Knitted Cabled Wallet