Handmade Card and Coin Purse Using Crocheting Techniques

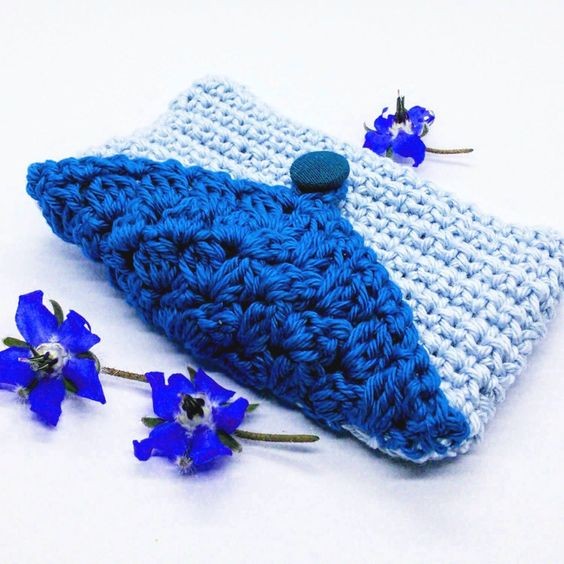
Create your very own handmade card and coin purse with the art of crocheting. This versatile craft allows you to customize the size, color, and design of your purse to perfectly suit your style and needs. Whether you're a beginner or an experienced crocheter, this project is a fun and rewarding way to showcase your skills and creativity. With just a few basic stitches and some yarn, you can create a practical and stylish accessory that will be the envy of all your friends. The compact size of the purse makes it perfect for carrying your cards, coins, and other small items while on the go. Plus, the handmade touch adds a special charm that you just can't get from store-bought accessories. So grab your crochet hook and get ready to make a one-of-a-kind purse that will be both practical and stylish.
Materials
- 2.5 mm crochet hook
- 2 x Yarn and Colors Must Have 10g – Ice Blue
- Yarn and Colors Must Have 10g – Petroleum
- Bodkin
- Button (approx. 1 cm diameter)
- Stitch Markers
Pattern Notes
The pattern is written using UK terminology.
Special Stitches
- 3trcl – 3 treble cluster
- sl – slip stitch
- [stitches written in brackets like these are worked into the same stitch or chain space.]
Instructions
Foundation: Using Ice Blue, chain 20 plus 1 to turn.
Rows 1 to 30: 1 dc in every stitch along. At end of each row, chain 1 to turn. Fasten off.
Now fold the material in half with the right sides facing in. Use stitch markers to hold in place, and crochet using slip stitches down each side leaving the mouth open. Fasten off and turn the pocket so that the right side is facing out.
Trim: Select one side to be the front and work the trim into it starting from the seam on the right. Using Petroleum: 1 dc, chain 1, skip 1. Repeat until you get to the next seam. You will make the final dc into the seam. Fasten off.
Flap
Turn the pocket so that you are working on the back.
Row 1: Attach Petroleum with a slip stitch in the 8th stitch from the right. Chain 1, skip 1, 3trcl, chain 2, 3trcl, chain 1, skip 1, sl, chain 1, sl, chain 1, turn.
Row 2: Work 3trcl into ch-1-space next to cluster on Row 1, chain 1, [3trcl, chain 2, 3trcl] into ch-2-sp, chain 1, 3trcl into ch-1-sp, chain 1, skip 1, sl, chain 1, skip 1, sl, chain 1, turn.
Row 3: Work 3trcl into ch-1-space next to cluster on Row 2, chain 1, 3trcl into next ch-1-sp, chain 1 [3trcl, chain 2, 3trcl] into ch-2-sp, chain 1, 3trcl into next ch-1-sp, chain 1, 3trcl into next ch-1-sp, chain 1, sl, chain 1, skip 1, sl, chain 1, turn.
Row 4: Work 3trcl into ch-1-space next to cluster on Row 3, chain 1, 3trcl into next ch-1-sp, chain 1, 3trcl into next ch-1-sp, chain 1, [3trcl, chain 2, 3trcl] into ch-2-sp, chain 1, 3trcl into next ch-1-sp, chain 1, 3trcl into next ch-1-sp, chain 1, 3trcl into next ch-1-sp, chain 1, sl, chain 1, skip 1, sl, chain 1, turn.
Row 5: Work 3trcl into ch-1-space next to cluster on Row 4, chain 1, 3trcl into next ch-1-sp, chain 1, 3trcl into next ch-1-sp, chain 1, 3trcl into next ch-1-sp, chain 1, [3trcl, chain 2, 3trcl] into ch-2-sp, chain 1, 3trcl into next ch-1-sp, chain 1, 3trcl into next ch-1-sp, 3trcl into next ch-1-sp, chain 1, 3trcl into next ch-1-sp, chain 1, sl, chain 1, skip 1, sl, chain 1.
Round 6: Sl (you may find you need to make an extra sl so that the petroleum joins the trim on the front). Chain 1 and turn. Dc into all sl, *dc into ch-1-sp, dc into top of cluster. Do from * 5 times in total. Dc into top of cluster. [2 dc, chain 7, 2 dc] in chain-2-s. *dc into top of cluster, dc into ch-1-sp. Do from * 5 times in total. Dc into sl. You may also want to make additional dcs over the seam to reach the trim on the front. Fasten off and sew button in place.
- Funny Pictures
-
 Cute Cat Memes That Will Make Your Day Brighter
-
 Spot-on and Funny Memes About Introverts Struggles
-
 Top Wonderful Cat Memes on Their Way to Better Your Day
- Recipes
-
 Creamy Old Fashioned Rice Pudding
-
 Russian Tea Cakes (Snowball Cookies)
-
 Rigatoni with Sausage, Tomatoes, and Zucchini
- Lifehacks
-
 How to Crochet a Harlequin Stitch
-
 Removing The Toughest Stains
-
 Crochet Basics: Crumpled Griddle Stitch
- Crochet Ideas
-
 Crochet Christmas Tree
-
 Crochet Goblet of Fire
-
 Crochet Adorable Ammonite
- DIY
-
 DIY Snowman Wreath
-
 Mini Santa Sleigh Ornament
-
 Crochet Gingerbread House Blanket
- Knitting Ideas
-
 Knitted Easter Bunny
-
 Knitted Mobile Phone/Glasses Case
-
 Knitted Cabled Wallet