Crochet Little Santa Bag: A Festive DIY Project

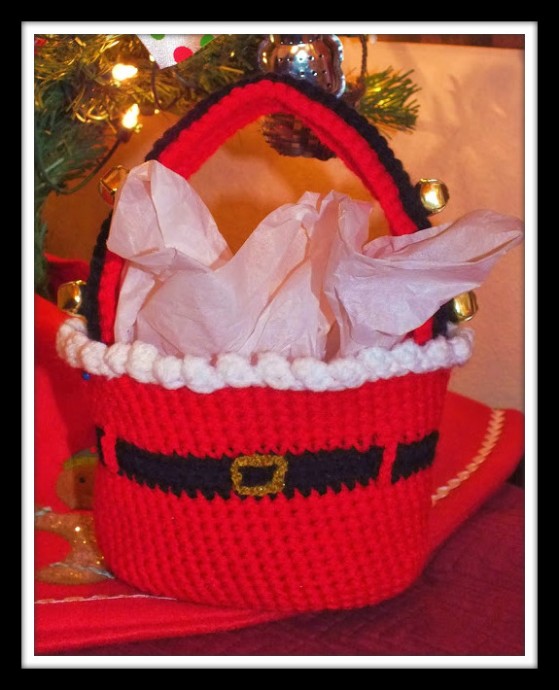
The Crochet Little Santa Bag is an adorable and festive accessory perfect for the holiday season. This charming bag is designed with intricate crochet stitches that give it a delightful texture and appearance, making it a fun and unique addition to your winter wardrobe. Whether you use it to hold your small gifts, treats, or even just as a cute accessory to carry around, this Santa bag is sure to bring a smile to your face and those around you. With its bright red color, fluffy white trim, and mini pom-pom details, this bag captures the essence of Christmas in a playful and stylish way. Get ready to spread some holiday cheer with this lovely Crochet Little Santa Bag!
To Make the Santa Bag
With an F Hook:
Ch 9
Bag Construction
Rows Instructions
Row 1: 1sc in 7sts, 3 sc in the last st, 1sc in 6 sts, 2 sc in the last.
Row 2: 1 sc in 7 sts, 2 sc in the next 3 sts, 1 sc in next 6 sts, 2 sc in the next 3 sc sts.
Row 3: 1 sc in the 7 sts, 2 sc in the next 3 sts, 1 sc in the next 9 sts, 2 sc in next 5 sts.
Row 4: 1 sc in 9 sts, 2 sc in 5 sts, 1 sc in the next 18 sts.
Row 5: 1 sc in each st around.
Row 6: 1 sc in 9 sts, 2 sc in next st, 1 sc in next 2 sts, 2 sc in next st, 1 sc in the next 2 sts, 2 sc, 1 sc in next 2 sts, 2 sc, 1 sc in the next 2 sts, 1 sc in the next 9 sts, 2 sc, 1 in the next 2 sts, 2 sc, 1sc in 2 sts, 2 sc, 1 sc in the next 2, 2 sc, 1 sc.
Row 7: 1 sc in each st around.
Row 8: 1 sc in the next 10 sts, 2 sc, 1 sc in next 2 sts, 2 sc, 1 sc in the next 2, 2 sc, 1 in next 2 sts, 2 sc, 1 sc in next 2 sts, 2 sc in next st, 1 sc in the next 9 sts, 2 sc, 1 sc in the next, 2 sc, 1 in the next 2 sts, 2 sc, 1 sc in the next 2, 2 in the next, 1 sc in the next 5 sts, FO.
This is the bottom of the bag, you want the oval to lay flat. But don’t worry if it curls a little. Now to make the sides of the bag.
Making the Sides
Row 9: 1 sc in each st around, when bag measures about 2 1/2 inches FO.
Attach black yarn with a sl st on the sides or the back of the bag.
Ch 3
Row 1: wk 1hdc all the way around, join with a sl st, ch 3 and turn.
Row 2: Repeat row 1 and FO.
Attach red yarn with a sl st, ch 1 and wk 1sc all the way around until bag measures about 5 inches and FO.
Belt Loops and Buckle
To make the belt loops with a C Hook:
Attach red yarn with a sl st and place hook sideways, ch 5 and FO. With a tapestry needle, pull both ends of yarn to the inside of the bag. Weave the loose ends inside and FO. I made 2 loops on mine.
For the belt buckle: I used a gold shimmer yarn. With a C hook, ch 14 or 15 and FO. With a needle and thread, sew the belt buckle in place.
Creating the Trim
To make the trim around the bag with an F Hook:
Attach white yarn with a sl st, ch 3, wk 3dc bobble sts into the 1st st, sl st into the same st, wk 1 sc in the next st. Repeat all the way around the bag and FO.
Making the Handle
With an F Hook and black yarn:
Ch 58
Wk 1sc in 56 sts, 3sc in the last st, now working on the other side wk 1sc in each st, wk 2sc in the last st and FO.
With red yarn:
Repeat with red yarn what you did with the black, only don't FO yet.
Wk 2sc in the next 2 sts, wk 1sc in the next 54 sts, 2sc in the next 3 sts, 1sc in the next 55 sts, sl st in the next st and FO. Sew the bells to the black and then sew the two pieces together. I only put 2 bells so there would be room for handling it.
- Funny Pictures
-
 Hilarious Memes for Those Bored to Tears
-
 Weekly Treat of Funniest Parenting Memes for Good Laugh out Loud Right Now
-
 Really Funny Pics to End These Weekend Perfectly
- Recipes
-
 Crispy Baked Avocado Fries
-
 Scrambled Chickpea and Spinach Pitas
-
 Cinnamon Pancakes
- Lifehacks
-
 Crochet Basics: Aligned Cobble Stitch
-
 Brick Stitch Crochet Tutorial
-
 Crochet Basics: Wattle Stitch
- Crochet Ideas
-
 Crochet Snorlax Plushie Doll
-
 Crochet Beautiful Penguin Toy
-
 Crochet Tiny Snowman
- DIY
-
 DIY Santa Craft For Kids
-
 Paper Plate Angel Craft
-
 Upcycled Mason Jar Chicken Vase
- Knitting Ideas
-
 Knitted Bridger Cowl
-
 Knitted Keepsake Bag
-
 Knitted Cutie Cupcake Dolls