Pattern for the Crochet Butterfly Applique

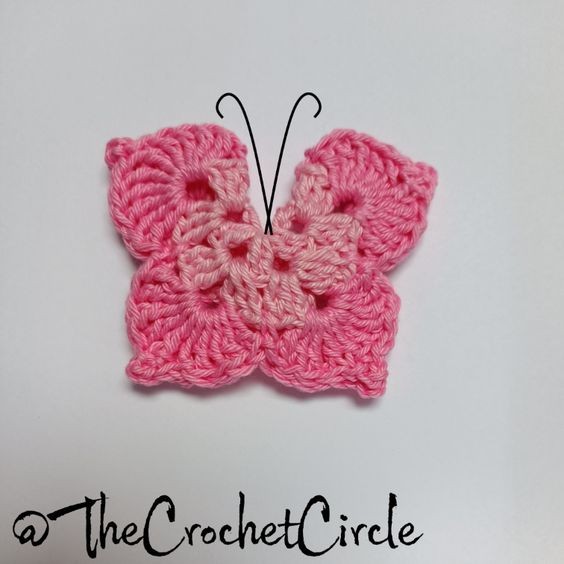
Create a stunning and delicate crochet butterfly applique that will add a touch of whimsy and elegance to any project. With just a few simple stitches and some colorful yarn, you can bring this beautiful creature to life. Start by selecting your favorite shades of yarn, whether you prefer vibrant and bold colors or soft and pastel hues. Whether you choose to use your crochet butterfly applique on a hat, a bag, or as a standalone decoration, it is sure to be a delightful addition that will catch everyone's eye.

With the size of your crochet hook and thickness of your yarn you can adjust the size of your butterfly. The smaller the crochet hook and the thinner the yarn the more delicate the crochet butterfly will be. For example, while I was using a 1.75mm crochet hook and lace cotton yarn, the butterfly came out about 5cm (2in) wide, and while using a 3.5mm crochet hook, the butterfly was about 10cm (4in) wide at the wingspan.
The Stitches Used in This Pattern for the Crochet Butterfly
- sl st – slip stitch
- ch – chain stitch
- sc – single crochet stitch
- dc – double crochet stitch
- tr - triple/treble crochet stitch
Materials Needed for the Project
- Cotton yarn (I am using 2 different colors)
- Crochet hook (3.5mm)
- Scissors
- Needle
Before you begin, just do not panic and have in mind that the end butterfly comes out flat. You will have a bit of a hard time crocheting in the round but just stick to it. If you need, you can always adjust your work by folding it.
Notes for Crochet Butterfly Applique
- Crochet butterfly is done in 3 rows
- Each row is a multiple of 8 spaces
- When the last row is done, you simply fold the crochet butterfly in half (you will get 4 of the "corners" on each side)
- You can leave out the picot stitch in Row 3 for more rounded wings
- If you opt for skipping the picot stitch, you can make Row 4 with single crochet stitches all around in even a different color
- If you make Row 4, you can add the picot there; there are many options for altering the pattern
- I like my butterfly to be a bit more fixed, so I leave a longer end tail and sew the two halves together, but not too tight
Pattern Steps for the Crochet Butterfly
- R0: Magic ring
- R1: ch3 (counts as 1dc), {ch2, 2dc}x7, ch2, dc – join in the 3rd chain of ch3 from the beginning
slip stitch into the ch2 space
- R2: (ch3 (counts as 1dc), 2dc, ch2, 3dc),({3dc, ch2, 3dc}x7) – join in the 3rd chain of ch3 from the beginning
change color
- R3: Begin in between two 3dc of the previous row make ch1, sc, {(5tr, picot, 5tr) in ch2 space of the previous row, sc in between two 3dc of the previous row} x8, join invisible at the end
Diagram Pattern for Crochet Butterfly
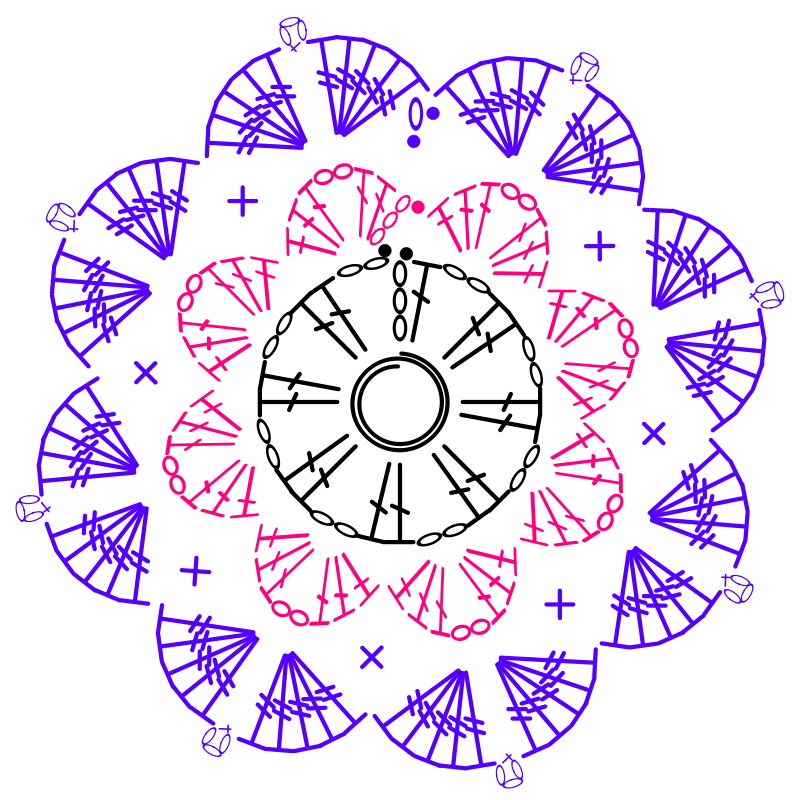
If you look at it, it resembles a crochet doily pattern. To be honest, I do prefer having a diagram with the stitches when working on a flat item.
In this diagram, you will also see each row colored differently so you know where the row begins and where it ends.
You can make the crochet butterfly in a single color, use two colors, or even three. The choice is yours.
Happy crafting!
- Funny Pictures
-
 Hilarious Memes for Those Bored to Tears
-
 Weekly Treat of Funniest Parenting Memes for Good Laugh out Loud Right Now
-
 Really Funny Pics to End These Weekend Perfectly
- Recipes
-
 Crispy Baked Avocado Fries
-
 Scrambled Chickpea and Spinach Pitas
-
 Cinnamon Pancakes
- Lifehacks
-
 Crochet Basics: Aligned Cobble Stitch
-
 Brick Stitch Crochet Tutorial
-
 Crochet Basics: Wattle Stitch
- Crochet Ideas
-
 Crochet Snorlax Plushie Doll
-
 Crochet Beautiful Penguin Toy
-
 Crochet Tiny Snowman
- DIY
-
 DIY Santa Craft For Kids
-
 Paper Plate Angel Craft
-
 Upcycled Mason Jar Chicken Vase
- Knitting Ideas
-
 Knitted Bridger Cowl
-
 Knitted Keepsake Bag
-
 Knitted Cutie Cupcake Dolls