Crochet Adorable Butterfly


Creating a crochet adorable butterfly can be a delightful and fulfilling experience. These tiny beauties add a whimsical touch to any project you choose to include them in. With their vibrant colors and intricate designs, they are sure to bring a smile to anyone's face. Whether you're a beginner or an experienced crocheter, crafting these delicate creatures can be a fun and relaxing way to spend your time. So, grab your yarn, hook, and patience, and let's get started on creating some charming crochet butterflies to spread joy and creativity wherever they flutter!
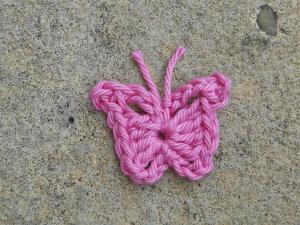
This butterfly is made in cotton DK with a 3 mm hook, and measures one and a quarter inches across at the widest point, or 3 cm.
Follow pattern instructions for either US or UK terminology - and see some explanatory pix below!
Pattern:
US Terms:
Ch 7, sc into 3rd chain from hook.
Skip next three chain.
Into the end chain - which will be the center of your butterfly - work the following, crocheting over the tail end of your yarn as you go:
4 dc, ch 3, ss, (first half of butterfly made) ch 4, 4 dc, ch 3, sc into 3rd chain from hook, ch 3, ss into center again to finish.
Snip off working end of yarn and tie off. Then snip your two yarn ends evenly to make the antennae.
UK Terms:
Ch 7, dc into 3rd chain from hook.
Skip next three chain.
Into the end chain - which will be the centre of your butterfly - work the following, crocheting over the tail end of your yarn as you go:
4 tr, ch 3, ss, (first half of butterfly made) ch 4, 4 tr, ch 3, dc into 3rd chain from hook, ch 3, ss into centre again to finish.
Snip off working end of yarn and tie off. Then snip your two yarn ends evenly to make the antennae.
Visual Instructions:
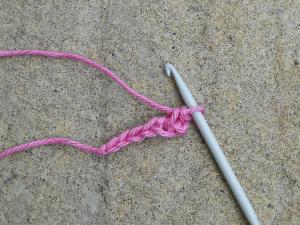
Chaining 7 and stitching into the 3rd ch from hook:
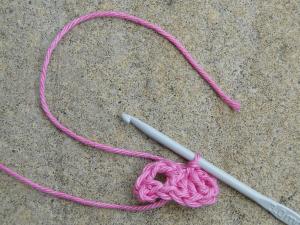
Then round to the half way point. We're starting to work over the tail end of the yarn to keep things neat:
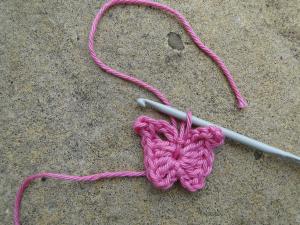
Last slip stitch into the middle... and we're ready to snip the working end of the yarn and pull it through the loop on our hook!
Pull the yarn tightly through the slip stitch, then snip both ends to your desired length:
Tip:
Even up the top corners of the wings by pulling them out gently if necessary.
- Funny Pictures
-
 Hilarious Memes for Those Bored to Tears
-
 Weekly Treat of Funniest Parenting Memes for Good Laugh out Loud Right Now
-
 Really Funny Pics to End These Weekend Perfectly
- Recipes
-
 Crispy Baked Avocado Fries
-
 Scrambled Chickpea and Spinach Pitas
-
 Cinnamon Pancakes
- Lifehacks
-
 Crochet Basics: Aligned Cobble Stitch
-
 Brick Stitch Crochet Tutorial
-
 Crochet Basics: Wattle Stitch
- Crochet Ideas
-
 Crochet Snorlax Plushie Doll
-
 Crochet Beautiful Penguin Toy
-
 Crochet Tiny Snowman
- DIY
-
 DIY Santa Craft For Kids
-
 Paper Plate Angel Craft
-
 Upcycled Mason Jar Chicken Vase
- Knitting Ideas
-
 Knitted Bridger Cowl
-
 Knitted Keepsake Bag
-
 Knitted Cutie Cupcake Dolls