Create Your Very Own Adorable Blue Butterfly Amigurumi

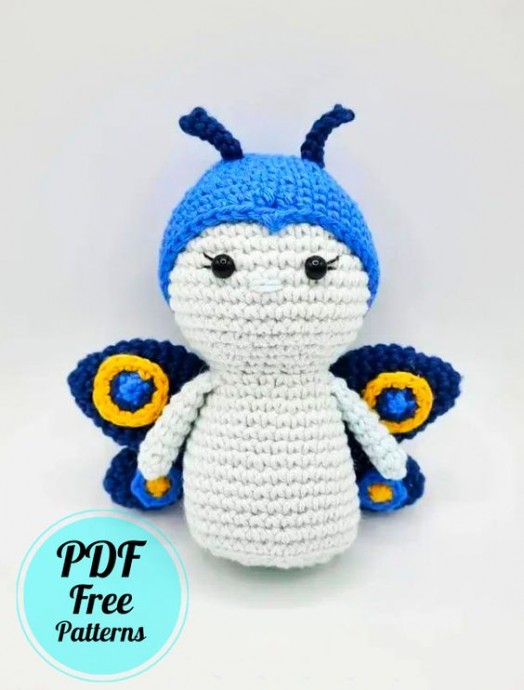
Create your very own adorable blue butterfly amigurumi with the art of crochet! This delightful craft project allows you to bring a touch of whimsy and charm into your home. With just a few simple stitches and some colorful yarn, you can transform a plain ball of thread into a beautiful butterfly that will brighten up any space. Crocheting this butterfly is not only a fun and relaxing activity but it also allows you to create a unique piece of art that can be cherished for years to come. Whether you display it on a shelf, use it as a decorative accent, or gift it to a loved one, this crochet blue butterfly amigurumi is sure to bring joy and beauty wherever it goes. So grab your crochet hook, select your favorite shade of blue, and let your imagination take flight as you embark on this delightful crochet project.
Materials
Cotton ricorumi: Light blue (033), medium blue (032), navy (035), yellow (063)
Crochet hook: 3mm
6mm safety eyes. You may need to use smaller/larger eyes, depending on hook/yarn size.
Yarn needle
Black embroidery thread
Fiberfill for stuffing
Scissors
Size with the materials above will be about 9cm
Abbreviations
AR – Amigurumi Magic ring
MR – Amigurumi Magic ring
3in1 – Crochet 3 columns in one loop
sc : Single Crochet
inc : Increase
dec : Decrease
tr : Triple Crochet/Treble Crochet
st : Stitch
dc : Double Crochet
hdc : Half Double Crochet
sl-st or Slst : Slip Stitch
ch : Chain
tch : Turn in chain crochet
..in : Make increase into the same stitch as many as the number which is given in front of “inc” abbreviation (e.g., 3inc, 4inc..).
FLO : Crochet into front loops only
BLO : Crochet into back loops only
Head & Body
Stuff as you go along your work. In light blue.
Rnd 1: MR, 6*sc [6]
Rnd 2: Inc* [12]
Rnd 3: (1 sc, inc)* [18]
Rnd 4: (2 sc, inc)* [24]
Rnd 5: (3 sc, Inc)* [30]
Rnd 6: (4 sc, inc)* [36]
Rnd 7 – 9: 36 sc [36]
Rnd 10: (5 sc, inc)* [42]
Rnd 11 – 14: 42 sc [42]
Insert the security eyes between Rnd 10 and 11.
Rnd 15: (5 sc, dec)* [36]
Rnd 16: (4 sc, dec)* [30]
Rnd 17: (3 sc, dec)* [24]
Rnd 18: (2 sc, dec)* [18]
Rnd 19: (2 sc, Inc)* [24]
Rnd 20: 24 sc [24]
Rnd 21: (3 sc, inc)* [30]
Rnd 22 – 24: 30 sc [30]
Rnd 25: (4 sc, inc)* [36]
Rnd 26 – 29: 36 sc [36]
Rnd 30: (5 sc inc)* [42]
Rnd 31: 42 sc [42]
Rnd 32: Through back loops only (5 sc, dec)* [36]
Finish to stuff.
Rnd 33: (2 sc, dec)* [27]
Rnd 34: (1 sc, dec)* [18]
Rnd 35: (dec)* [9]
Rnd 36: (1 sc, dec)* [6]
Fasten off and close.
Wings
In navy.
Little Wings (x2)
Rnd 1: MR, 6 sc [6]
Rnd 2: 8 sc [6]
Rnd 3: (1 sc, inc)* [9]
Rnd 4: 9 sc [9]
Rnd 5: (2 sc, inc)* [12]
Fasten off.
Big Wings (x2)
Rnd 1: MR, 6 sc [6]
Rnd 2: 6 sc [6]
Rnd 3: (1 sc, inc)* [9]
Rnd 4: 9 sc [9]
Rnd 5: (2 sc, inc)* [12]
Rnd 6: (3 sc, inc)* [15]
Rnd 7: (4 sc, inc)* [18]
Rnd 8 – 9: 18 sc [18]
Now join the wings by crocheting 1 sc in the little wing (this sc will be the first sc of the round).
Rnd 7: 1 sc (join), 29 sc [30]
Rnd 8: (3 sc, dec)* [24]
Rnd 9: 5 sc, dec, 10 sc, dec, 5 sc [22]
Rnd 10: 5 sc, dec, 9 sc, dec, 4 sc [20]
Rnd 11: 4 sc, dec, 8 sc, dec, 4 sc [18]
Rnd 12: 4 sc, dec, 7 sc, dec, 3 sc [16]
Rnd 13: 16 sc [16]
Rnd 14: 3 sc, dec, 7 sc, dec, 3 sc [14]
Close the wings by crocheting 7 sl st through both sides.
Spots
(x8)
Big Spots (x4)
Rnd 1: Start in medium blue - MR, 4 sc [4]
Rnd 2: In navy – (inc)* [8]
Rnd 3: In yellow – (3 sc, inc) [10]
Little Spots (x4)
Rnd 1: Start in yellow – MR, 4 sc [4]
Rnd 2: In medium blue – (1 sc, sc)* [6]
Sew/glue the spots to the wings.
Arms
(x2) In light blue.
Rnd 1: MR, 4 sc [4]
Rnd 2: (1 sc, sc)* [6]
Rnd 3 – 7: 6 sc [6]
Sew the wings and arms to the body.
Antennas
(x2) In navy.
Ch 7,1 sc in the second stitch, 5 sl st [6]
Hat
Chlpicot: Ch1 and slst back into the loop and the upper bar of the previous us stitch (see on Internet if necessary)
In medium blue.
Rnd 1: MR, 6 sc [6]
Rnd 2: (inc)* [12]
Rnd 3: (1 sc, inc)* [18]
Rnd 4: (2 sc, inc)* [24]
Rnd 5: (3 sc, inc)* [30]
Rnd 6: (4 sc, inc)* [36]
Rnd 7 – 9: 36 sc [36]
Rnd 10: (5 sc, inc)* [42]
Rnd 11 – 13: 42 sc [42]
Rnd 14: 19 sc, 1 hdc, 1 dc, ch1picot, 1 dc, hdc, 19 sc
Sew the antennas on the top of the head.
- Funny Pictures
-
 Hilarious Memes for Those Bored to Tears
-
 Weekly Treat of Funniest Parenting Memes for Good Laugh out Loud Right Now
-
 Really Funny Pics to End These Weekend Perfectly
- Recipes
-
 Crispy Baked Avocado Fries
-
 Baked Beans and Hot Dogs with Biscuit Topping
-
 Roasted Rosemary Lemon Chicken Breasts
- Lifehacks
-
 Crochet Basics: Twisted Fringe
-
 7 Crochet Tips And Tricks
-
 How To Work Crochet Into Denim
- Crochet Ideas
-
 Crochet Snorlax Plushie Doll
-
 Crochet Cat in 1 Row
-
 Crochet Beautiful Penguin Toy
- DIY
-
 Popsicle Stick and Jingle Bell Christmas Tree Ornament
-
 DIY Santa Craft For Kids
-
 Paper Plate Angel Craft
- Knitting Ideas
-
 Knitted Bridger Cowl
-
 Knitted Keepsake Bag
-
 Knitted Cutie Cupcake Dolls