How to Knit Beautiful Cashmere Gloves


You’ll Need:
75g of 100% cashmere yarn (112m/725g);
Double-pointed knitting needles 4;
Straight knitting needles 4.5.
Size:
7⁄8.
Used Patterns
Stockinette stitch: all knit sts;
1 x 1 rib;
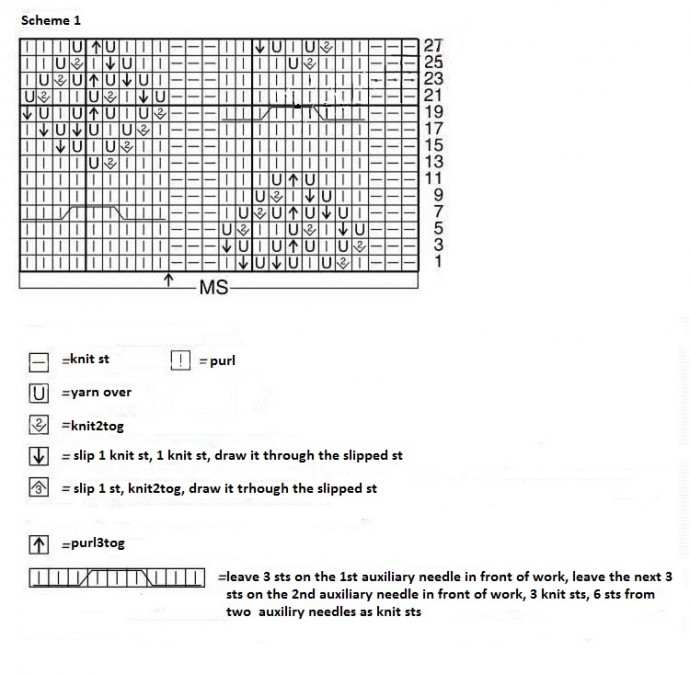
Main pattern: the quantity of sts is multiple of 24 + 15 sts. Work due to the scheme 1. Make WS rows due to the ornament, yarn overs – as purls. Repeat the pattern twice, finish with sts before arrow. Repeat 1st-28th rows in height.
Stitches Control
Main pattern with knitting needles 4.5: 23.5 sts x 31 rows = 10 x 10 cm.
Instructions
Right Glove
Start with stockinette stitch. Knit each finger separately, starting with the minimal quantity of sts. On middle, first, and ring fingers, make 18 sts; for the small finger – 14 sts. Then, divide them into one-piece work, connecting the sts between fingers. You should get 56 sts.
After knitting 4 cm of one-piece work, increase 1 st x 2 of stockinette stitch in every 2nd row for the thumb from both sides. Make 1 circle row with this pattern and leave the sts.
Make thumb with 20 sts. After knitting 4.5 cm height, increase: make 2 sts from the 1st and last sts in every 2nd row. Make 1 more row and leave the sts. Include them in one-piece work with knit2tog. Make the main pattern on the central part of the back side, the remaining sts – with stockinette stitch.
Continue work, decreasing sts for the thumb in every even row. Total, 20 sts should be decreased. Make cuff due to the ornament on the remaining 56 sts. After 16 cm, turn to rib. After 3 cm, bind off the sts due to the ornament.
Left Glove
In the same way, as the right glove.
Assembly
Fasten the yarn, make all the seams.
- Funny Pictures
-
 Hilarious Memes for Those Bored to Tears
-
 Weekly Treat of Funniest Parenting Memes for Good Laugh out Loud Right Now
-
 Really Funny Pics to End These Weekend Perfectly
- Recipes
-
 Crispy Baked Avocado Fries
-
 Baked Beans and Hot Dogs with Biscuit Topping
-
 Roasted Rosemary Lemon Chicken Breasts
- Lifehacks
-
 Crochet Basics: Twisted Fringe
-
 7 Crochet Tips And Tricks
-
 How To Work Crochet Into Denim
- Crochet Ideas
-
 Crochet Snorlax Plushie Doll
-
 Crochet Cat in 1 Row
-
 Crochet Beautiful Penguin Toy
- DIY
-
 Popsicle Stick and Jingle Bell Christmas Tree Ornament
-
 DIY Santa Craft For Kids
-
 Paper Plate Angel Craft
- Knitting Ideas
-
 Knitted Bridger Cowl
-
 Knitted Keepsake Bag
-
 Knitted Cutie Cupcake Dolls