How to Create a Crochet Tunic and Bag with Flap


You’ll Need:
250g of purple 100% cotton yarn (320m/75g);
100g of black yarn (50% wool, 50% acryl; 250m/100g);
Crochet hooks 1.25 and 3;
6 cm of adhesive tape.
Size:
S.
Instructions
Tunic
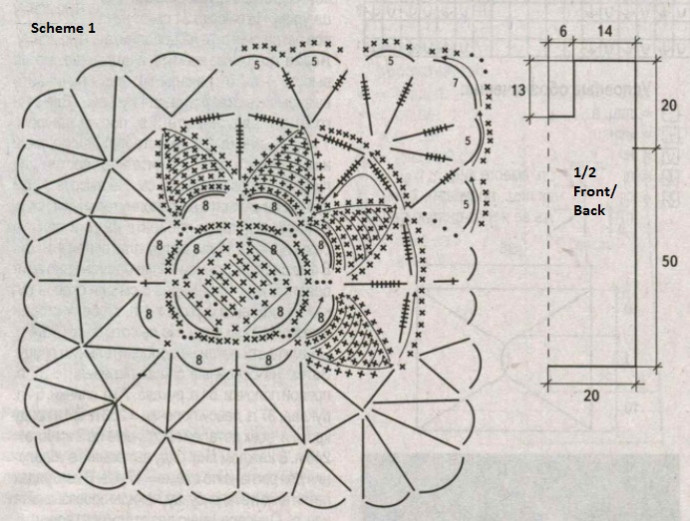
At first, make 29 squares due to the scheme: 15 squares for the back and 14 squares for the front.
Assembly
Connect squares between one another in the process of making the last row due to the scheme. For side cuts, leave 1 lower square open from both sides. For arm-holes, leave 1.5 upper squares open from both sides from back and front. Fasten arm-holes with 5 rows of single crochets, neck-hole with 4 rows of single crochets and 1 row of “shrimp stitch.” Fasten lower edge and side cuts with 5 rows of single crochets.
Bag with Flap
Make a chain of 18 cm long with black yarn in 2 threads and make 42 cm of single crochets. Make 2 squares due to the scheme with purple yarn and connect them from one side.
Fasten the obtained rectangle with 1 row of single crochets. Then, fasten the long sides of the rectangle due to the scheme. The size of the rectangle is 28 x 18 cm.
Assembly
Sew the obtained purple rectangle to the 2/3 black detail – this will be the flap and back side of the bag. Fold the rest 14 cm of the black detail inside under the flap. Make sides from both sides in the following way: 1 row of “shrimp stitch” and 3 rows of single crochets from the right side (RS).
Sew sides to the back part of the bag. Twist a cord of 20 threads of yarn in the following way: measure threads of 3 m 10 cm long, twist, fold in half and make a knot.
Sew the cord to the sides of the bag; the rest part of the cord, which isn’t sewn – will become the handle. Sew 2 pieces of adhesive tape to the inner side of the flap of the lower part of the back and to the bag itself, as a fastener.
- Funny Pictures
-
 Hilarious Memes for Those Bored to Tears
-
 Weekly Treat of Funniest Parenting Memes for Good Laugh out Loud Right Now
-
 Really Funny Pics to End These Weekend Perfectly
- Recipes
-
 Crispy Baked Avocado Fries
-
 Scrambled Chickpea and Spinach Pitas
-
 Cinnamon Pancakes
- Lifehacks
-
 Crochet Basics: Aligned Cobble Stitch
-
 Brick Stitch Crochet Tutorial
-
 Crochet Basics: Wattle Stitch
- Crochet Ideas
-
 Crochet Snorlax Plushie Doll
-
 Crochet Beautiful Penguin Toy
-
 Crochet Tiny Snowman
- DIY
-
 DIY Santa Craft For Kids
-
 Paper Plate Angel Craft
-
 Upcycled Mason Jar Chicken Vase
- Knitting Ideas
-
 Knitted Bridger Cowl
-
 Knitted Keepsake Bag
-
 Knitted Cutie Cupcake Dolls
I love this tunic and bag however; I do not know how to read or follow schemes. Is there a written pattern which include larger sizes?
I can look for a video, maybe I'll find it