Crochet Hat Tutorial Using Lion Brand Color Made Easy Yarn

Ingredients
You will need:
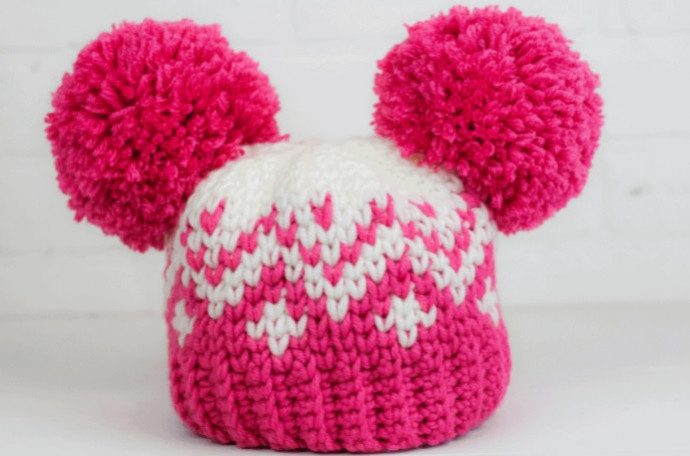
- 1 skein of Lion Brand Color Made Easy Yarn, Birch;
- 1-2 skeins of Lion Brand Color Made Easy Yarn, Pink Lemonade;
- Crochet hook 7 mm;
- Pompoms;
- Yarn Needle;
- Scissors.
Size
20" circumference and 7” height.
Stitches Control
5 sts x 6 rows = 2 inches.
Instructions
Hat Band
With Pink, Ch 7.
Row 1: SC in 2nd CH from the hook, SC in next 5 CH. (6 SC)
Row 2-48: CH 1, turn, SC in next 6 STS.
Fold the band in half, holding the first and last row on top of each other. Slip stitch the rows together with 6 Slip Stitches.
Hat Body
From where we left off on the hat band.
Row 1: CH 1, working down the sides of the rows on the hat band, work 1 SC into the side of each row in the hat band. Slip stitch to first SC. (48 SC)
Note: Row 2 is where you will start working with two colors. Carry one color underneath the other as you work.
Row 2: CH 1, *WC in next 2 STS, CC to White, WC in next ST, CC to Pink, WC in next 3 STS* repeat from *to* until you reach the end of the row. Slip stitch to first WC.
Row 3: CH 1, *WC in next ST, CC to White, WC in next 3 STS, CC to Pink, WC in next 2 STS.* repeat from *to* until you reach the end of the row. Slip stitch to first WC.
Row 4: CH 1, *WC in next 2 STS, CC to White, WC in next ST,* repeat from *to* until you reach the end of the row. Slip stitch to first WC.
Row 4 ends with white and Row 5 begins with White.
Row 5: CH 1, *WC in next ST, CC to Pink, WC in next 3 STS, CC to White, WC in next 2 STS,* repeat from *to* until you reach the end of the row. Slip stitch to first WC.
Row 6: With White, CH 1, *WC in next 2 STS, CC to Pink, WC in next ST,* repeat from *to* until you reach the end of the row. Slip stitch to first WC.
Row 7: White Pink, CH 1, *WC in next ST, CC to White, WC in next 3 STS, CC to Pink, WC in next ST, CC to White, WC in next ST,* repeat from *to* until you reach the end of the row. Slip stitch to first WC.
Row 8: With White, CH 1, *WC in next ST, CC to Pink, WC in next ST, CC to White, WC in next ST, CC to Pink, WC in next ST, CC to White, WC in next 2 STS,* repeat from *to* until you reach the end of the row. Slip stitch to first WC.
Row 9: With White, CH 1, *WC in next 2 STS, CC to Pink, WC in next ST,* repeat from *to* until you reach the end of the row. Slip stitch to first WC.
Note: At the end of Row 9, change your color back to white. From now on, we will only be working with white.
Row 10-11: CH 1, WC in every ST around. Slip stitch to first WC.
Notes for Different Sizes
For Smaller Hat: If you are making a baby size hat, you may want to skip rows 10-11 to make a shorter hat. If you are using a hat band with 42 rows, skip Row 12 so that your decreases work correctly.
For Larger Hat: For an adult size hat, you will want to repeat Row 11 for 5 more times. This will give you a hat that is 9 inches tall. If your hat band has 54 rows, you will need to work this additional row after you have added extra height.
Additional Row for hats with 54 STS: CH 1, *WC in next 7 STS, WC2TOG* repeat from *to* a total of 6 times. Slip stitch to first WC.
Row 12: CH 1, *WC in next 6 STS, WC2TOG* repeat from *to* a total of 6 times. Slip stitch to first WC.
Row 13: CH 1, *WC in next 5 STS, WC2TOG* repeat from *to* a total of 6 times. Slip stitch to first WC.
Row 14: CH 1, *WC in next 4 STS, WC2TOG* repeat from *to* a total of 6 times. Slip stitch to first WC.
Row 15: CH 1, *WC in next 3 STS, WC2TOG* repeat from *to* a total of 6 times. Slip stitch to first WC.
Row 16: CH 1, *WC in next 2 STS, WC2TOG* repeat from *to* a total of 6 times. Slip stitch to first WC.
Row 17: CH 1, *WC in next ST, WC2TOG* repeat from *to* a total of 6 times. Slip stitch to first WC. Fasten off, leaving a long tail.
Use the yarn tail to sew a gathering stitch through the last row of stitches and gather the top together. Weave in your ends.
Now you just have to make two large pom poms and sew them to the sides of the hat around Rows 11 and 12 of the hat body. Make and sew 2 or 1 pompoms.