

DIY Crochet Bramble Basket Hanging Organizer — Free Pattern & Step-by-Step Instructions

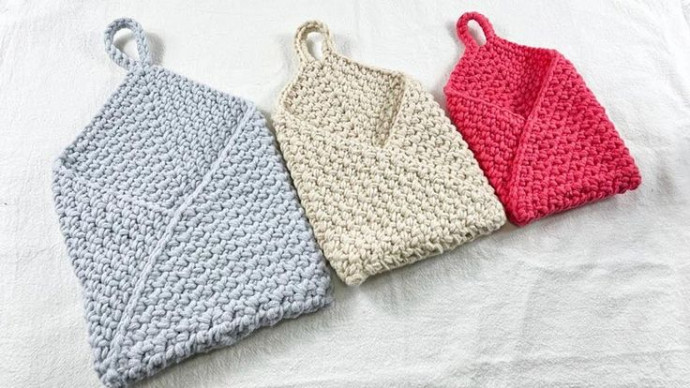
Make a charming and practical Crochet Bramble Basket Hanging Organizer to store small items and maximize vertical space. This easy-to-follow triangular-to-basket pattern creates a cozy handmade organizer that hangs from a loop and can be finished with a wooden hook for a rustic look. Below you'll find materials, measurements, abbreviations, the full stitch instructions, assembly notes, and simple finishing tips.
Materials Needed & Measurements:
-
Suggested Yarn:
- WeCrochet Wool of the Andes Bulky (100g, 137 yds) – single-stranded
- WeCrochet Billow (100g, 120 yds) – double-stranded
-
Yarn Measurements:
- 135 yds of Wool of the Andes Bulky
- 230 yds of Billow
-
Hook Size:
L/8.0mm crochet hook
-
Finished Pattern Size:
8″ wide x 12″ tall (excluding loop)
-
Other Tools:
- Scissors
- Tapestry needle
- Chunky natural wood coat hooks (Optional)
Abbreviations Used:
-
st(s)
– stitch(es)
-
ch
– chain stitch
-
sc
– single crochet
-
sp
– space
-
ch-1 sp
– chain-1 space
-
ch-2 sp
– chain-2 space
-
DO NOT JOIN
– continue working without joining the round
Stitching Instructions for Making the Bramble Basket Hanging Organizer Pattern:
Foundation Row:
-
Row 1:
Start with a magic circle. Work 2 sc, ch 2, 2 sc into the magic circle. Pull tight, but DO NOT JOIN. Turn. (4 sc + ch-2 sp)
Increasing Rows (Triangle Base):
-
Row 2:
Ch 1, sc in first st, ch 1, (sc, ch 2, sc) in ch-2 sp, ch 1, sc in last st. Turn. (6 sts – ch-1 counts as st, + ch-2 sp)
-
Row 3:
Ch 1, sc in first st, ch 1, sc in ch-1 sp, ch 1, (sc, ch 2, sc) in ch-2 sp, ch 1, sc in ch-1 sp, ch 1, sc in last st. (10 sts + ch-2 sp)
-
Row 4 & Onwards:
Ch 1, sc in first st, ch 1, (sc in ch-1 sp, ch 1) across until ch-2 sp, (sc, ch 2, sc) in ch-2 sp, (ch 1, sc in ch-1 sp) across until 1 st remains, ch 1, sc in last st. (Increases by 4 sts per row)
-
Continue repeating Row 4 until reaching the desired size:
-
For Wool of the Andes (single-stranded):
35 total rows.
-
For Billow (double-stranded):
25 total rows.
-
Hanging Loop Instructions:
-
Row 1:
Ch 1, sc in first st, ch 1, (sc in ch-1 sp, ch 1) across until ch-2 sp, (sc, ch 10, sc) in ch-2 sp, (ch 1, sc in ch-1 sp) across until 1 st remains, ch 1, sc in last st. (Modify ch-10 for different loop sizes)
-
Row 2:
Ch 1, sc in first st, ch 1, (sc in ch-1 sp, ch 1) across until ch-2 sp, work 12-14 sc around the loop ch sts, (ch 1, sc in ch-1 sp) across until 1 st remains, ch 1, sc in last st. (Adjust sc count in loop if needed)
Cut yarn, leaving a long tail (twice the bottom width of the triangle). Fasten off.
Basket Assembly:
-
Secure the magic circle tail
by knotting and weaving in ends.
-
Fold the triangle into a basket shape:
- Fold both corners toward the center so the right corner overlaps the left.
- The long tail should be on the right side, underneath the right fold.
-
Stitching the bottom:
- Thread the tail onto a tapestry needle and whip stitch across the bottom, ensuring all layers are secured.
- At the left corner, use a running stitch to lightly attach the right fold to the basket’s body.
- Reinforce the fold intersection with extra stitches for added sturdiness.
-
Loop Finishing (Optional):
Leave the loop as is, or wrap yarn around its base for a decorative tassel effect.
Finishing, Uses & Care:
-
Trim and weave in any loose ends with a tapestry needle for a neat finish.
-
Hang your organizer from a chunky wooden hook or a peg. It’s ideal for small items such as keys, mail, craft supplies, or small toiletries.
-
To care for the basket, spot clean as needed or follow the yarn manufacturer's washing recommendations.
Tips & Variations:
-
Adjust the ch-10 loop length to make a shorter or longer hanging loop for different hanging heights.
-
Use a sturdier or doubled yarn if you plan to store heavier items, and consider a fabric lining for extra support.
-
Experiment with color changes or stripes while building the triangle to create a decorative pattern.